Looking for a simple way to organize your favorite reads without taking up much space? You’re in the right place.
Making a tabletop bookshelf is easier than you think, and it can add charm to any room. Imagine having your books neatly displayed, easy to reach, and perfectly suited to your style. In this guide, you’ll discover step-by-step instructions that anyone can follow, even if you’ve never built anything before.
Ready to transform your clutter into a beautiful, functional piece? Let’s get started!
Materials Needed
Gathering the right materials makes building a tabletop bookshelf easier. Choose good quality items to ensure strength and durability. This section breaks down what you need to get started.
Wood Types
Pick wood that is sturdy and easy to work with. Pine is soft, affordable, and simple to cut. Oak is strong but harder to handle for beginners. Plywood offers a smooth surface and resists warping. Choose the wood based on your budget and skill level.
Tools Required
Basic tools help shape and join the wood pieces. A saw is necessary to cut wood to size. Use a drill for making holes and screwing parts together. Sandpaper smooths rough edges and surfaces. A measuring tape ensures accurate dimensions. A screwdriver or power driver tightens screws securely.
Additional Supplies
Besides wood and tools, extra supplies improve your bookshelf. Wood glue strengthens joints and prevents wobbling. Screws hold the parts firmly in place. Paint or wood stain adds color and protects the wood. Brushes or rags help apply finishes evenly. Use clamps to hold parts while glue dries.

Credit: www.instructables.com
Design Planning
Design planning is the first step to build a tabletop bookshelf. It helps you create a clear idea of how the bookshelf will look and fit in your space. Planning saves time and materials by avoiding mistakes.
Focus on the space you have. Think about the style and size that suits your needs. A good plan makes the building process easier and more fun.
Measuring Space
Start by measuring the area where you want to place the bookshelf. Use a tape measure to get the width, height, and depth. Write down these numbers carefully. Check if there are any obstacles like power outlets or switches.
Measure twice to avoid errors. Consider the space needed for books and decorations. Remember to leave some extra room for easy access and air circulation.
Choosing Dimensions
Decide the size of your tabletop bookshelf based on your space measurements. Think about how many books or items you want to store. Choose a height that is easy to reach while sitting or standing.
Keep the depth shallow to avoid taking too much table space. A width that fits comfortably on your table works best. Balance size with usability and style.
Sketching The Layout
Draw a simple sketch of your bookshelf design. Show the overall shape and shelf positions. Use your measurements to keep the sketch accurate.
Label each part clearly. This sketch guides you during cutting and assembling. It helps you see the final look before starting.
Cutting The Wood
Cutting the wood is a key step in making a tabletop bookshelf. It shapes the pieces that form your shelf. Careful cutting ensures the shelf fits well and looks neat. Taking time here saves effort later.
Marking Measurements
Start by measuring the wood carefully. Use a tape measure for accuracy. Mark the cut lines with a pencil. Draw straight lines to guide your saw. Double-check each measurement before cutting. Clear marks help avoid mistakes.
Safe Cutting Techniques
Wear safety glasses to protect your eyes. Use clamps to hold wood steady. Cut slowly and follow the marked lines. Keep hands away from the blade path. Use a sharp saw for clean cuts. Take breaks if your hands feel tired.
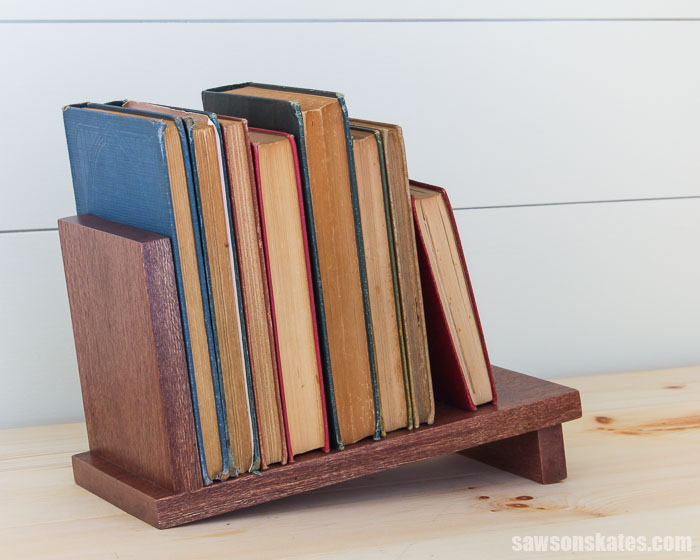
Credit: sawsonskates.com
Assembling The Frame
Assembling the frame is the first big step in making your tabletop bookshelf. This part gives the shelf its shape and strength. You will put together all the wooden pieces to form a solid base. Taking your time here ensures the whole shelf stays stable and looks neat.
Keep your workspace clear and all tools handy. Check each piece for any rough edges and sand them if needed. Follow the measurements carefully to make sure everything fits perfectly.
Joining Pieces
Start by aligning the side panels with the bottom and top pieces. Hold them firmly in place. Use clamps if you have them. This keeps the wood steady while you work. Check that all corners are square with a carpenter’s square or a right angle tool. The frame must be even for the shelves to sit correctly.
Wood glue helps hold the pieces together before you add screws or nails. Apply a thin layer on the edges where the pieces meet. Press them together firmly and wipe away any extra glue. This step makes the frame stronger and stops it from wobbling.
Securing With Screws Or Nails
Choose screws or nails to fasten the frame securely. Screws hold better and can be removed if needed. Nails are quicker but less strong. Drill pilot holes first to avoid splitting the wood. This is important for thin or soft wood.
Drive screws or nails into the joints slowly and straight. Countersink screws below the surface for a smooth finish. Use a hammer or screwdriver that fits well. Check the frame often to keep it square during this process. Tighten everything until the frame feels solid and steady.
Adding Shelves
Adding shelves to your tabletop bookshelf gives it function and style. Shelves hold your books and small items neatly. Proper placement and support keep shelves strong and balanced.
Spacing Shelves
Measure the height of your books and items first. Leave extra space so books fit easily. Mark shelf positions on the side panels with a pencil. Keep shelves evenly spaced for a clean look. Avoid placing shelves too close or too far apart.
Attaching Shelf Supports
Use small brackets or wooden cleats to hold shelves in place. Screw supports firmly into the side panels. Check that supports are level before securing. Slide shelves onto the supports carefully. Test the shelves with light pressure to ensure stability.

Credit: www.youtube.com
Sanding And Finishing
Sanding and finishing are key steps in building a tabletop bookshelf. They make the wood smooth and protect it from damage. Good sanding removes rough spots and splinters, creating a clean surface. Finishing adds color and shields the wood from water and dirt. These steps help your bookshelf look great and last long.
Smoothing Surfaces
Start by sanding the wood with medium-grit sandpaper. Move in the direction of the wood grain. Sand all surfaces evenly to avoid rough patches. After that, use fine-grit sandpaper for a smooth finish. Wipe the wood with a damp cloth to remove dust. This step prepares the wood for painting or staining.
Applying Paint Or Stain
Choose paint or stain based on the look you want. Use a brush or cloth to apply evenly. Paint gives a solid color and hides wood grain. Stain enhances the wood’s natural texture and color. Let the first coat dry completely. Apply a second coat for better coverage and depth.
Sealing For Protection
Seal the bookshelf with a clear finish like varnish or polyurethane. This protects the wood from scratches and spills. Apply thin, even coats with a clean brush. Allow each coat to dry fully before adding another. Lightly sand between coats for a smooth surface. Sealing ensures your bookshelf stays beautiful over time.
Final Touches
The final touches bring your tabletop bookshelf to life. They make it unique and fit your space well.
Small details can change the look and feel of your bookshelf. Focus on how it blends with your room and style.
Adding Decorative Elements
Place small plants or candles on the shelves. These add color and warmth without crowding the space.
Use bookends that reflect your taste. They keep books tidy and add personality.
Try framed photos or art pieces for a personal touch. Keep decorations balanced to avoid clutter.
Positioning On Tabletop
Pick a spot with good light but not direct sunlight. This prevents damage to books and decor.
Center the bookshelf for symmetry or place it to one side for an artistic look. Ensure it does not block important items.
Leave some space around the bookshelf. This makes the area feel open and inviting.
Maintenance Tips
Maintaining your tabletop bookshelf keeps it looking great and lasting longer. Regular care helps avoid damage and keeps your books safe. Follow simple steps to clean and fix small problems fast.
Cleaning Advice
Dust your bookshelf often with a soft cloth. Use a dry or slightly damp cloth to avoid water damage. Avoid harsh chemicals that can ruin the wood or paint. Clean corners and shelves gently to remove dirt and dust buildup. Keep your bookshelf dry to prevent mold and warping.
Repairing Minor Damages
Fix small scratches with a wood marker or crayon that matches the color. Use wood glue to reattach loose parts carefully. Sand rough edges lightly to smooth them out. Tighten any loose screws or nails to keep the shelf stable. Handle repairs quickly to prevent bigger problems later.
Frequently Asked Questions
How Do I Start Making A Tabletop Bookshelf?
Begin by selecting the right wood size and type. Gather tools like a saw, drill, screws, and sandpaper. Sketch your design and measure carefully. Cut the wood pieces according to your plan. Assemble using screws and wood glue for stability.
What Materials Are Best For A Tabletop Bookshelf?
Use sturdy woods like pine, oak, or plywood for durability. Choose smooth finishes for a polished look. Avoid softwoods that easily dent. Consider paint or varnish to protect and enhance appearance.
How Can I Customize My Tabletop Bookshelf?
Add paint or stain for color and style. Incorporate decorative trims or patterns. Adjust shelf heights for different book sizes. Attach hooks or small baskets for extra storage options.
How Long Does It Take To Build A Tabletop Bookshelf?
Building time depends on skill level and design complexity. Simple models take around 2-4 hours. More detailed projects may require a full day. Planning and preparation speed up the process.
Conclusion
Building a tabletop bookshelf is simple and fun. You only need a few tools and materials. Follow the steps carefully to get a sturdy shelf. It can hold your books and save space. Personalize it with paint or decorations. This project adds style to any room.
Try making one today and enjoy your new shelf. Small changes make a big difference in your home. Keep practicing, and your skills will improve quickly. Happy building!