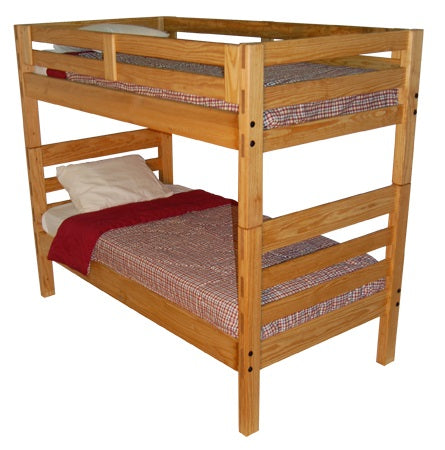
Are you ready to take apart your wood bunk bed but not sure where to start? Breaking down a bulky piece like a bunk bed can feel tricky and overwhelming.
But with the right steps, you can do it safely and quickly without damaging your bed or hurting yourself. In this guide, you’ll discover simple, clear instructions that make the process smooth and stress-free. Keep reading—you’ll be surprised how easy it is to dismantle your wood bunk bed like a pro.
Tools Needed
Taking apart a wood bunk bed needs the right tools. Using proper tools makes the job easier and safer. This section covers the main tools you need to disassemble a wood bunk bed. Having these tools ready helps you finish the task faster and with less effort.
Essential Hand Tools
A wrench set is key for loosening bolts on the bed frame. A screwdriver, both flathead and Phillips, helps remove screws holding parts together. A hammer can help tap out stubborn nails or pins. Pliers are useful for gripping and pulling small parts. Keep a tape measure to check sizes and distances as you work. A rubber mallet can gently separate wood without damage.
Optional Power Tools
An electric drill with screwdriver bits speeds up removing screws. A cordless impact driver handles tough bolts quickly. A power screwdriver can save your hands from strain. Use a power sander to smooth rough edges after disassembly. These tools are not necessary but make the process faster. Always handle power tools with care and follow safety rules.
Credit: shelteroutfitters.com
Prepare The Area
Preparing the area is the first step to take apart a wood bunk bed safely. A neat and organized space helps you work faster. It also reduces the chance of accidents. Focus on making the room ready before you start removing any parts.
Clear The Space
Remove all furniture and items near the bunk bed. This gives you plenty of room to move around freely. A clear space prevents tripping over objects or damaging anything. It also makes it easier to lay down the bed parts once removed.
Keep tools close by but out of your walking path. Clear floors help you see screws and small parts if they fall. Take time to make the area tidy before beginning.
Protect The Floor
Wood floors can scratch easily during disassembly. Place a soft blanket or old rug under the bed. This protects the floor from dents and scratches. It also cushions the bed parts as you take them apart.
Use cardboard or foam sheets if blankets are not available. Protecting the floor saves you from extra cleaning or repairs later. It keeps your workspace safe and neat throughout the job.
Remove Bedding And Accessories
Before starting to take apart your wood bunk bed, clear off all bedding and accessories. This step makes the disassembly process easier and safer. Removing these items also prevents any damage to mattresses, sheets, or bed parts. Organize the removed items so you can store or clean them.
Strip The Mattress And Sheets
First, pull off the mattress carefully. Set it aside in a clean area. Next, remove all sheets, pillowcases, and blankets. Fold the bedding neatly to avoid wrinkles or damage. Check for any small items like toys or books hidden under the mattress. Keep everything out of the way to have a clear workspace.
Take Off Guardrails And Ladders
Locate the screws or bolts holding the guardrails. Use the correct tools to unscrew them slowly. Place the guardrails safely to avoid scratches or dents. Next, detach the ladder by removing its fasteners. Keep the ladder parts together to avoid losing any pieces. Removing these accessories first gives better access to the bed frame.

Credit: removalsandstoragex.com
Disassemble The Top Bunk
Disassembling the top bunk is the first step to safely take apart a wood bunk bed. It requires care and a clear plan to avoid damage. Start by removing smaller parts before moving to the larger frame sections. This method keeps the process smooth and organized.
Follow these simple steps to disassemble the top bunk quickly and safely.
Detach The Guardrails
Begin by unscrewing the guardrails on each side of the top bunk. These rails keep the sleeper safe and are usually attached with bolts or screws. Use a screwdriver or wrench to remove the fasteners. Keep the screws in a safe place to avoid losing them.
Once all screws are out, gently lift the guardrails away from the bed frame. Set them aside carefully to prevent scratches or damage.
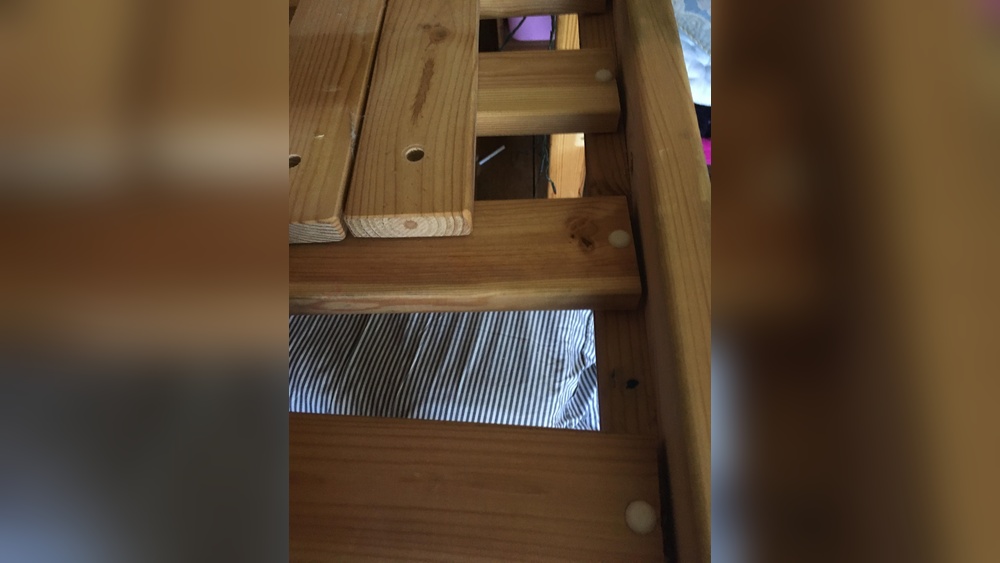
Remove The Slats
Next, take out the slats that support the mattress. These are thin wooden boards laid across the frame. They may be nailed or screwed down. Remove any nails or screws using the right tools.
Lift each slat one by one and stack them neatly. Handling them with care avoids cracking or breaking the wood.
Separate The Frame
Finally, work on separating the main frame of the top bunk. Look for bolts or screws connecting the side rails and end panels. Use your tools to undo these connections.
Pull apart the frame pieces carefully. If the wood feels stuck, check for hidden screws or nails. Lay the parts flat to prevent warping or damage.
Disassemble The Bottom Bunk
Disassembling the bottom bunk is an important step in taking apart a wood bunk bed. This part holds the mattress and supports the weight. Careful handling helps avoid damage and keeps parts organized.
Start by clearing the mattress and bedding. This makes the bed frame easier to work with. Use simple tools like a screwdriver or wrench. Keep all screws and bolts in a safe place.
Remove Slats And Frame
Begin by removing the slats that support the mattress. These are usually thin wooden strips laid across the frame. Unscrew or lift them out gently. Set them aside in a safe spot.
Next, detach the main frame of the bottom bunk. Look for bolts or screws holding the frame together. Unscrew these carefully to avoid stripping the threads. Once loose, separate the frame pieces and stack them neatly.
Detach Legs And Supports
Locate the legs and any support beams attached to the bottom bunk. These parts provide stability to the bed. Use a wrench or screwdriver to remove bolts or screws. Work slowly to keep parts from falling or breaking.
After detaching, keep legs and supports with the frame pieces. This helps during reassembly or storage. Clean any dust or dirt before packing the parts away.
Handle Fasteners And Hardware
Handling fasteners and hardware properly makes taking apart a wood bunk bed easier. These small parts hold the bed together. Losing even one screw or bolt can delay reassembly. Careful attention helps keep everything in order. This section guides you on organizing and storing these pieces.
Organize Screws And Bolts
Sort screws and bolts by size and type. Use small containers or trays to separate them. Label each container for quick identification. Group similar fasteners together to avoid confusion. This method saves time during reassembly. Keep a magnetic tray nearby to catch falling metal parts. Handle fasteners gently to avoid damage.
Store Small Parts Safely
Place all small parts in a secure box or bag. Seal the container to prevent spills. Use clear containers to see contents easily. Store the box in a safe spot away from children and pets. Avoid mixing hardware from different furniture pieces. Check the storage container often to ensure no parts are lost. This practice protects your fasteners and speeds up future assembly.
Move And Store Pieces
After taking apart your wood bunk bed, moving and storing the pieces properly is important. Proper handling keeps parts safe and ready for future use. It also helps avoid confusion when reassembling. Follow simple steps to organize and protect each piece.
Label Components
Label each piece with clear tags or stickers. Use a marker to write part names or numbers. For example, label “Side Rail 1” or “Bottom Ladder.” This saves time during reassembly. Keep all small parts like screws and bolts in labeled bags. Attach bags to the matching wood piece. This prevents losing any components.
Stack And Protect Wood
Stack wooden pieces flat on a clean surface. Place soft cloth or cardboard between layers. This prevents scratches and dents. Avoid leaning wood against walls to stop warping. Store pieces in a dry area away from moisture. Proper stacking keeps wood strong and in good shape.
Tips For Reassembly
Taking apart a wood bunk bed is only half the job. Putting it back together matters just as much. Proper reassembly keeps the bed strong and safe. It also saves time and effort later on. Follow these tips to make reassembly smooth and easy.
Check For Damage
Look closely at every piece before you start. Check for cracks, splits, or loose joints. Small damage can cause big problems. Fix or replace broken parts first. This step helps avoid accidents. It also makes the bunk bed last longer.
Follow Original Assembly Steps
Use the same order as when you built it. Follow the instructions or notes taken during disassembly. This keeps the bed stable and strong. Tighten screws and bolts carefully. Avoid forcing pieces together. Taking your time helps ensure a safe bunk bed.

Credit: removalsandstoragex.com
Frequently Asked Questions
How Do I Safely Disassemble A Wood Bunk Bed?
Start by removing mattresses and bedding. Use proper tools like screwdrivers and wrenches. Work slowly, loosening bolts and screws one at a time. Keep all hardware in a labeled container to avoid loss. Follow the bed’s manual if available for specific instructions.
What Tools Are Needed To Take Apart A Wood Bunk Bed?
You typically need a screwdriver, Allen wrench, and adjustable wrench. A rubber mallet can help loosen tight joints. Keep a container handy to store screws and bolts securely. Having the right tools ensures a smooth and damage-free disassembly process.
How Do I Prevent Damage When Dismantling The Bunk Bed?
Avoid using excessive force on wooden parts. Loosen screws and bolts gently. Lay the bed flat on a soft surface to protect it. Keep all parts organized and handle wood carefully to prevent scratches or cracks during the process.
Can One Person Disassemble A Wood Bunk Bed Alone?
Yes, but it’s safer with two people. One person can hold parts steady while the other removes screws. Having help reduces the risk of injury and damage. If alone, work slowly and take breaks to avoid mistakes.
Conclusion
Taking apart a wood bunk bed is easier than it seems. Follow the steps carefully and use the right tools. Keep the screws and parts organized for quick reassembly. Work slowly and check each piece before removing it. Safety matters—work in a clear space and ask for help if needed.
With patience, you can finish the job without damage. This guide helps you save time and avoid mistakes. Now, your bunk bed is ready to move or store safely.