Are you ready to transform your bathroom with a sleek, modern look? Building a floating vanity cabinet is easier than you think, and it can give your space a fresh, open feel.
Imagine having more floor space, easier cleaning, and a stylish centerpiece all in one. In this guide, you’ll discover simple steps to create a floating vanity that fits your style and needs. Keep reading, and by the end, you’ll have the confidence to build your own stunning vanity cabinet that elevates your bathroom instantly.
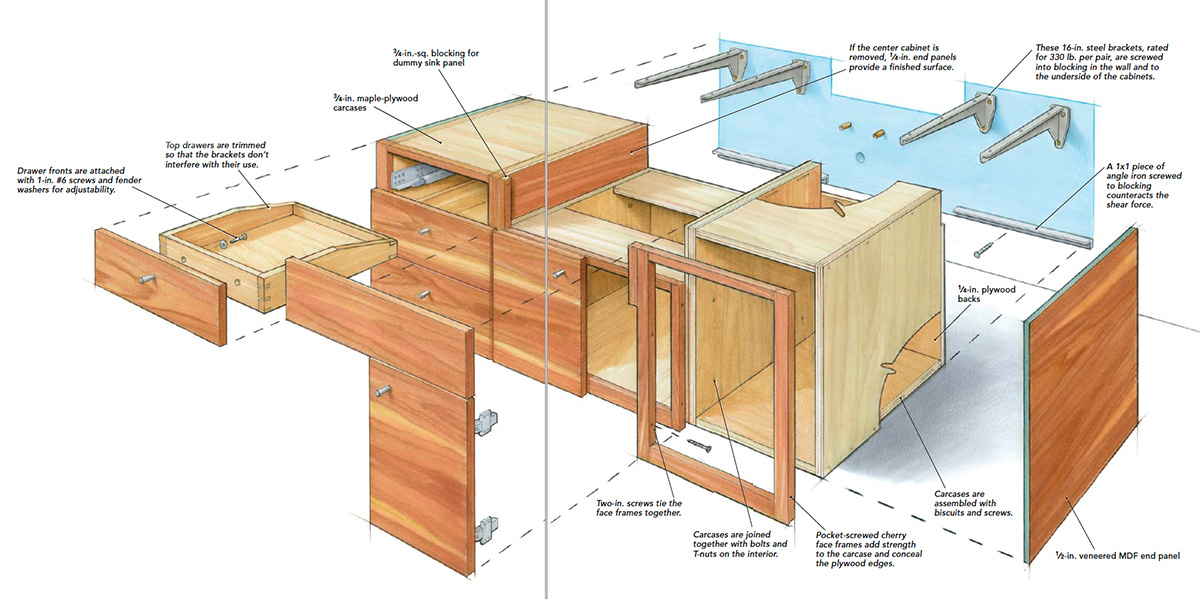
Credit: www.finehomebuilding.com
Choosing The Right Materials
Choosing the right materials is key to building a strong floating vanity cabinet. The materials affect how long the cabinet lasts and how good it looks. This section covers important points about wood, hardware, and finishes. Use this guide to pick materials that suit your space and style.
Selecting Wood Types
Wood is the main material for a floating vanity cabinet. Choose wood that is strong and resists moisture. Common options include plywood, oak, and maple. Plywood is stable and less likely to warp. Oak is very durable and has a classic look. Maple is smooth and easy to paint. Avoid soft woods that may swell in bathrooms.
Hardware And Fixtures
Hardware holds the cabinet securely to the wall. Use heavy-duty brackets made of metal for good support. Choose screws and anchors that match the wall type. For handles and knobs, pick rust-resistant metals like stainless steel or brass. These materials last longer in damp bathroom environments. Good hardware improves both safety and style.
Finishes And Paints
Finishes protect the wood from water damage. Use waterproof sealants or varnishes designed for bathrooms. Paint should be mold-resistant and easy to clean. Satin or semi-gloss finishes work best because they repel moisture. Avoid flat paints that soak in water. Proper finishing keeps the cabinet looking new for years.

Credit: www.youtube.com
Measuring And Planning
Measuring and planning are the first steps in building a floating vanity cabinet. Careful measurements ensure the cabinet fits well and stays secure. Planning helps avoid mistakes and saves time during installation. This section covers how to measure, find wall studs, and sketch your design.
Determining Vanity Size
Measure the available space on your bathroom wall. Note the width, height, and depth. The vanity should fit comfortably without blocking doors or fixtures. Leave some space around for cleaning and movement. Decide on the cabinet size based on your needs and room layout.
Locating Wall Studs
Use a stud finder to locate wall studs behind the drywall. Mark the stud positions with a pencil. Floating vanities must be anchored to studs for strong support. Studs are usually 16 or 24 inches apart. Double-check locations before drilling or installing the cabinet.
Drafting A Design Sketch
Draw a simple sketch of your vanity design on paper. Include measurements and stud locations. Mark where the cabinet will attach to the wall. Sketch shelves, drawers, or doors if needed. This plan guides you during cutting and assembly. Keep the sketch clear and easy to follow.
Preparing The Workspace
Preparing the workspace is the first step in building a floating vanity cabinet. A clean and organized area helps you work faster and safer. This section explains how to get your workspace ready for the project.
Clearing The Area
Remove all furniture and items near the installation spot. This gives you enough space to move freely. Sweep the floor to clear dust and dirt. A tidy area reduces the chance of accidents and keeps tools clean.
Gathering Tools
Collect all tools before starting the build. Common tools include a drill, level, measuring tape, screwdriver, and stud finder. Having everything ready saves time and avoids interruptions. Check if tools work properly to prevent delays.
Safety Precautions
Wear safety glasses and gloves to protect your eyes and hands. Use a dust mask to avoid breathing sawdust. Keep a first aid kit nearby for small injuries. Follow all safety instructions for each tool used.
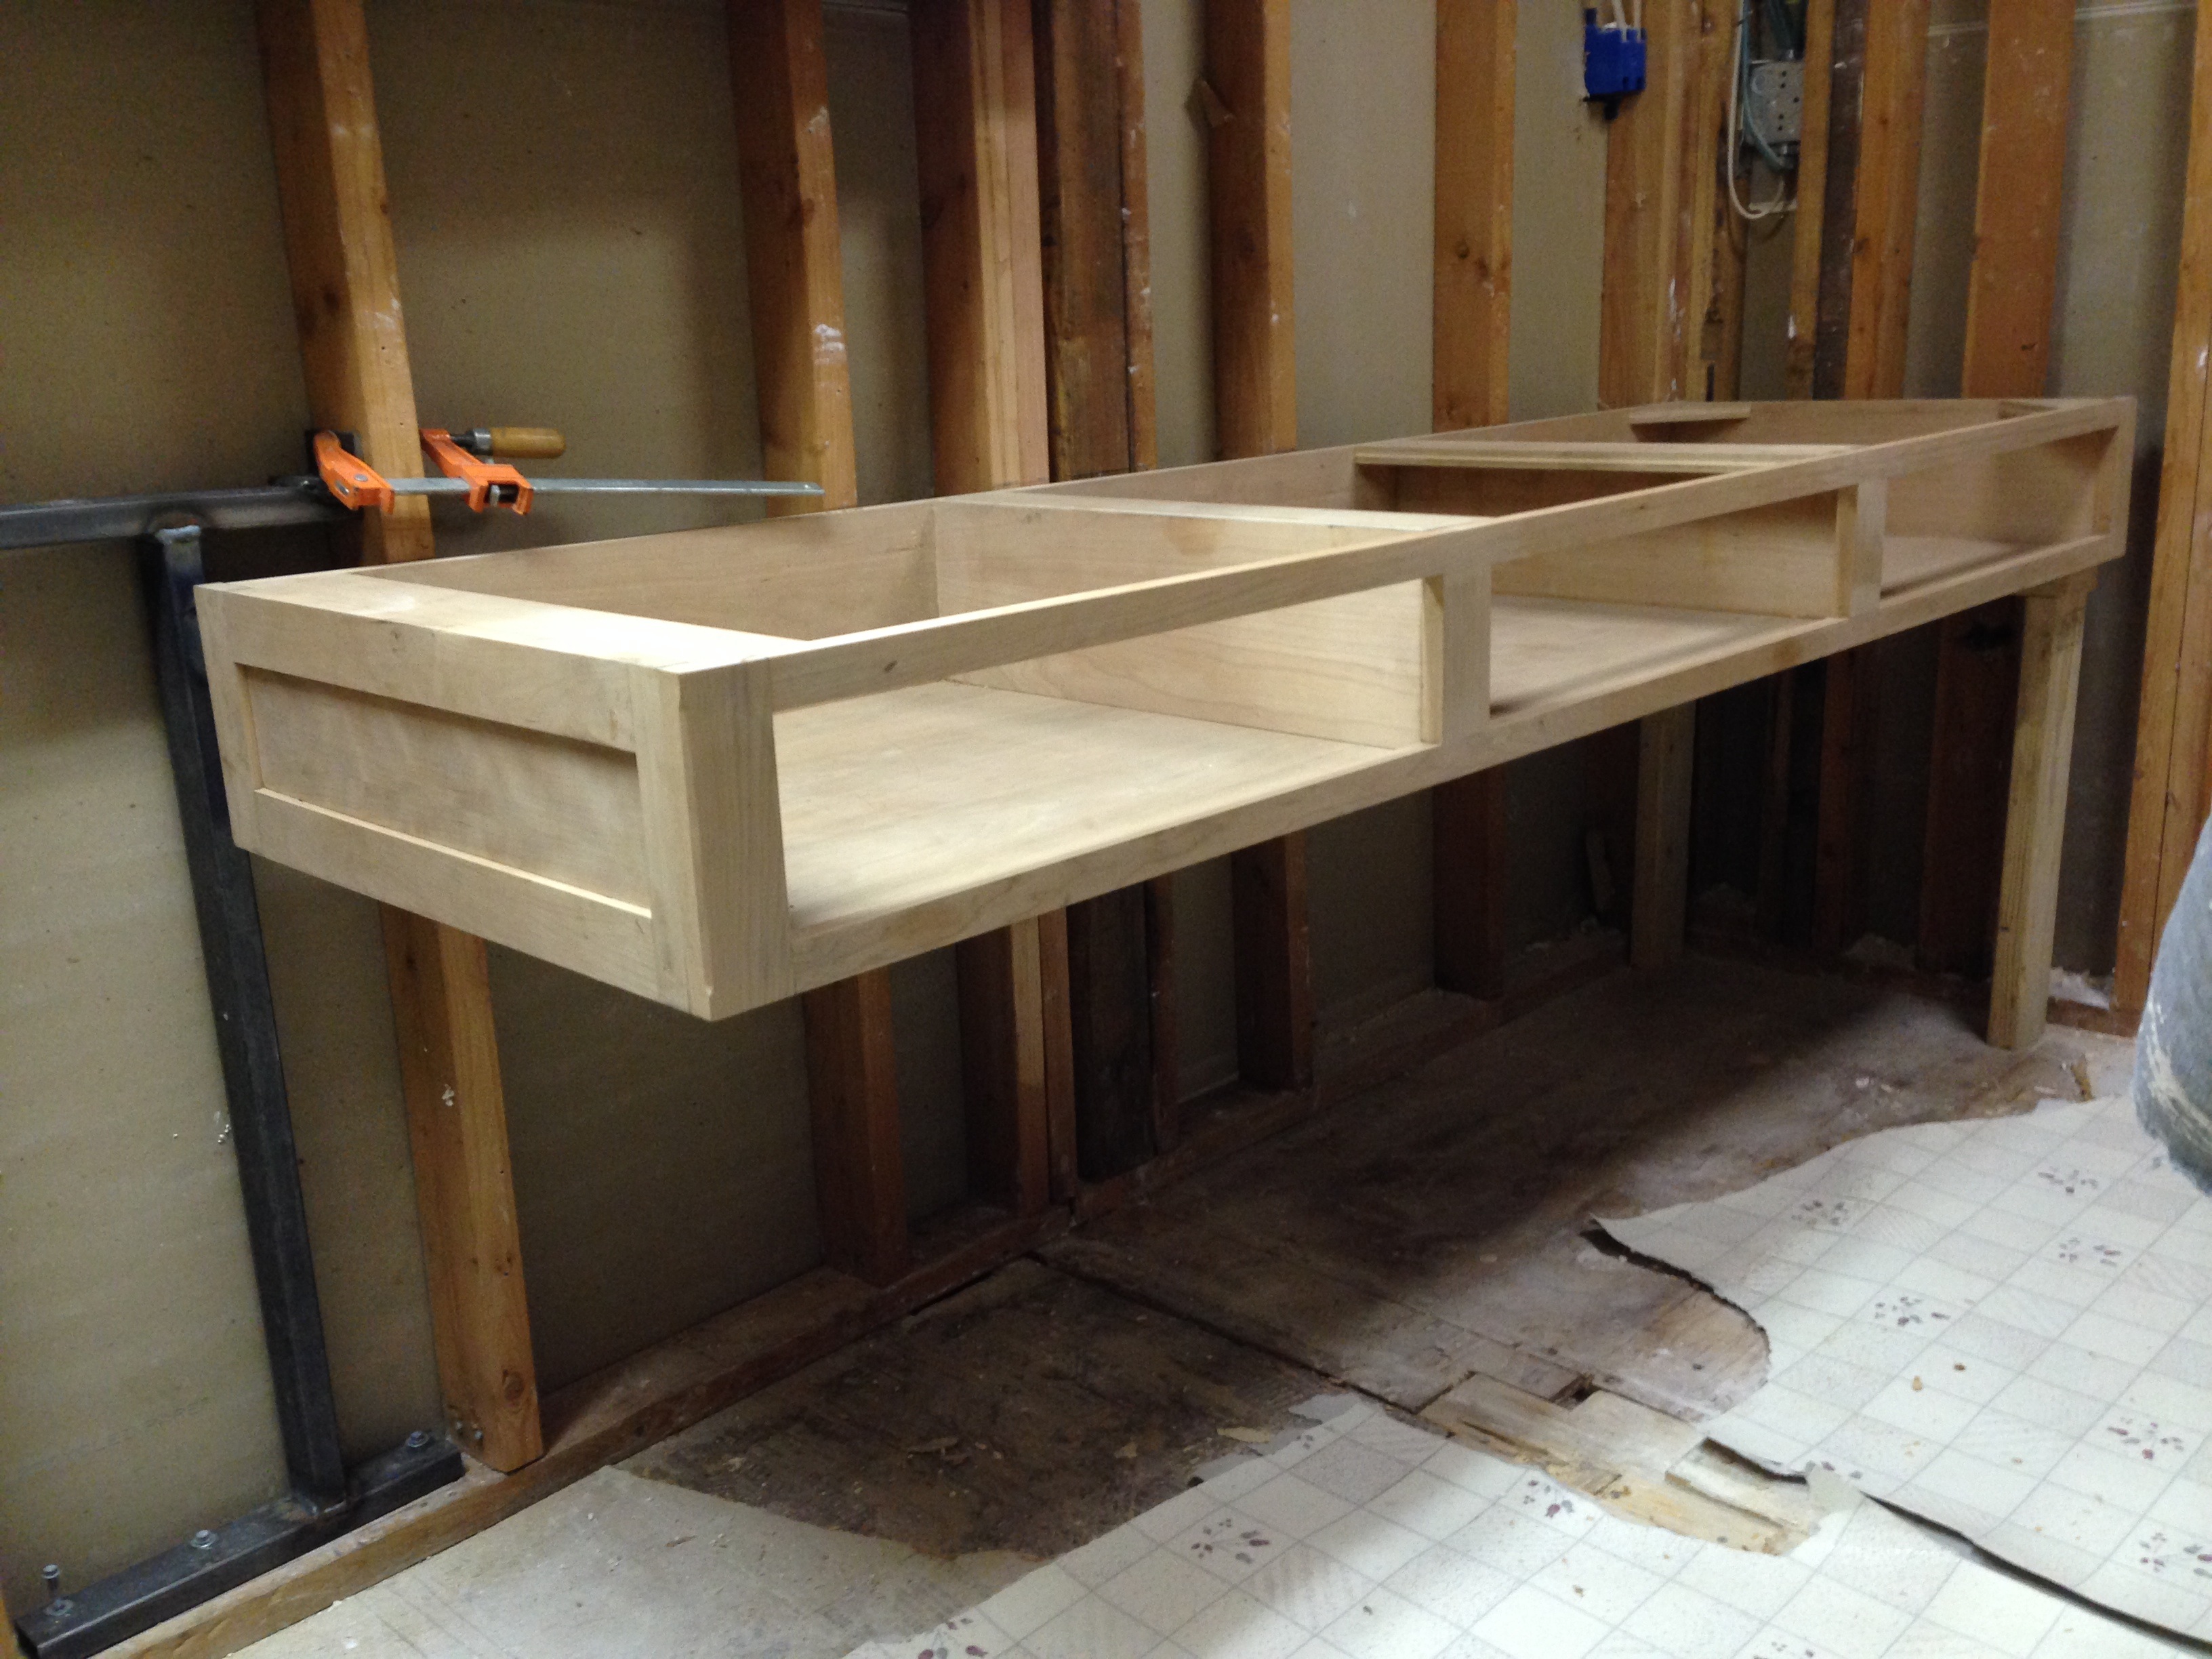
Building The Vanity Frame
Building the vanity frame is a key step in creating a floating vanity cabinet. The frame supports the cabinet and holds everything in place. It must be sturdy and well-measured. Start by preparing your tools and materials. Follow each step carefully to ensure a strong frame.
Cutting Wood Pieces
Measure the space where the vanity will hang. Cut the wood pieces to fit these dimensions. Use a saw to make clean, straight cuts. Label each piece to avoid confusion later. Accurate cuts help the frame fit perfectly on the wall.
Assembling The Frame
Lay out the wood pieces on a flat surface. Join the pieces using wood glue and screws. Make sure the corners form right angles. Use clamps to hold the pieces tight while securing them. Check the frame for squareness before the glue dries.
Reinforcing Joints
Strengthen the frame by adding corner braces or metal brackets. Attach them at each joint with screws. This prevents wobbling and adds durability. Double-check all screws to ensure they are tight. A reinforced frame holds the vanity firmly on the wall.
Installing Wall Support
Installing wall support is a key step in building a floating vanity cabinet. It holds the cabinet securely on the wall. Proper support prevents accidents and keeps the vanity stable for years. This process involves mounting brackets, securing the frame, and checking stability carefully.
Mounting Support Brackets
Start by finding the wall studs using a stud finder. Mark the spots where the brackets will go. Use heavy-duty support brackets designed for floating vanities. Drill pilot holes into the studs for easy installation. Attach the brackets firmly with screws that fit the studs well. Make sure each bracket is level and aligned.
Securing Frame To Wall
Place the vanity frame onto the mounted brackets carefully. Check the frame fits tightly against the wall. Use screws to secure the frame through the brackets into the studs. Tighten all screws to hold the frame in place. Avoid gaps between the wall and the frame for a clean look.
Checking Stability
Press gently on different parts of the vanity. It should not wobble or move. Test the strength by applying some weight. If the vanity shifts, tighten the screws more. Confirm all brackets are firmly attached to the wall. A stable frame ensures safety and durability.
Credit: www.corbinstreehouse.com
Adding Storage And Shelves
Adding storage and shelves to your floating vanity cabinet improves its functionality. It helps keep your bathroom neat and organized. Storage options can include drawers and open shelves. These elements provide space for toiletries, towels, and other essentials. Thoughtful design makes your vanity both stylish and practical.
Installing Drawers
Drawers offer hidden storage inside your vanity. Choose smooth-glide drawer slides for easy opening and closing. Measure the vanity space to fit the drawers perfectly. Use moisture-resistant materials to protect against bathroom humidity. Install drawer handles or knobs that match your bathroom style. Drawers keep clutter out of sight, making your space tidy.
Adding Open Shelves
Open shelves add extra storage and display space. Use sturdy wood or metal shelves that support weight. Position shelves below or beside the vanity for easy access. Open shelves are perfect for storing towels and decorative items. Keep shelves simple to avoid a crowded look. This design creates an airy and open feel in your bathroom.
Organizing Storage Space
Organize your storage to maximize space and efficiency. Use small bins or baskets inside drawers to separate items. Label storage containers to find things quickly. Place everyday items within easy reach. Store less-used items on higher shelves. Good organization keeps your bathroom clean and easy to use.
Finishing Touches
Finishing touches bring your floating vanity cabinet to life. These steps protect the wood and make it look great. Proper finishing ensures your cabinet lasts longer and stays beautiful. Focus on sanding, painting or staining, and sealing for the best results.
Sanding Surfaces
Sanding smooths the wood and removes rough spots. Use fine-grit sandpaper for the last pass. Sand along the wood grain to avoid scratches. Clean dust with a cloth before moving on.
Applying Paint Or Stain
Choose paint or stain to match your bathroom style. Apply thin, even coats with a brush or cloth. Let each coat dry fully before adding another. Stain highlights wood grain, while paint offers solid color.
Sealing For Durability
Seal the surface to protect against moisture and wear. Use a clear varnish or polyurethane for strong coverage. Apply two or three coats for best protection. Allow each layer to dry well before the next.
Mounting The Vanity Sink
Mounting the vanity sink is a key step in building a floating vanity cabinet. This part connects the sink to the cabinet and plumbing. Proper mounting ensures the sink stays secure and water flows correctly. Careful attention here prevents leaks and damage later.
Positioning The Sink
Start by placing the sink on the cabinet top. Align it carefully with the edges. Make sure the sink sits flat and stable. Mark the spots where you need to drill holes. These holes will secure the sink to the cabinet. Double-check the position before drilling.
Connecting Plumbing
Attach the faucet to the sink first. Tighten all fittings but avoid overtightening. Connect the drain pipe to the sink’s drain hole. Use plumber’s tape on threaded parts to stop leaks. Connect the water supply lines to the faucet. Tighten all connections with a wrench.
Testing For Leaks
Turn on the water supply slowly. Watch all connection points for drips or moisture. Check under the sink and around the faucet. Use a dry cloth to spot small leaks. Tighten any loose fittings carefully. Run water for a few minutes to confirm no leaks remain.
Maintaining Your Floating Vanity
Maintaining your floating vanity keeps it looking great and working well. Regular care extends its life and prevents costly repairs. Simple steps help protect your investment and keep your bathroom neat.
Cleaning Tips
Use a soft cloth for daily cleaning. Avoid harsh chemicals that can damage the finish. Mild soap and water work best for most surfaces. Wipe spills immediately to prevent stains. Dry the vanity after cleaning to stop water spots.
Preventing Water Damage
Water can harm your floating vanity quickly. Seal edges and joints with waterproof sealant. Check that faucets and pipes don’t leak. Avoid placing wet items directly on the surface. Use coasters or trays under toiletries to catch drips.
Regular Inspections
Look over your vanity often for signs of wear. Check for loose screws or brackets that hold it in place. Watch for cracks or peeling in the finish. Fix small issues early to avoid bigger problems. Tighten fittings and clean drains to keep everything secure.
Frequently Asked Questions
What Materials Are Needed To Build A Floating Vanity Cabinet?
You need plywood, wall anchors, screws, a drill, wood glue, paint, and mounting brackets. Quality materials ensure durability and safety.
How Do You Securely Mount A Floating Vanity Cabinet?
Use heavy-duty wall studs for mounting. Attach brackets firmly with screws and anchors for strong support and stability.
What Tools Are Essential For Building A Floating Vanity?
A drill, level, measuring tape, saw, screwdriver, and sanding tools are essential. These ensure precision and proper assembly.
How To Choose The Right Size For A Floating Vanity Cabinet?
Measure your bathroom space carefully. Choose a vanity size that fits comfortably without overcrowding the area for optimal use.
Conclusion
Building a floating vanity cabinet brings style and space to your bathroom. You can create a sleek, modern look with basic tools. Each step is simple and clear, making the project easy to follow. A floating vanity keeps floors clear and rooms feeling bigger.
You save money by doing it yourself. Enjoy the pride of a fresh, new bathroom feature. Start your project today and see the difference it makes. Small changes can have big effects. Your bathroom deserves this upgrade.