Looking to create the perfect bunk bed for your 18-inch doll? You’re in the right place.
Making a doll bunk bed yourself means you can customize it exactly how you want—sturdy, stylish, and just the right size. Imagine your doll having a cozy spot that you built with your own hands. In this guide, you’ll find simple steps and helpful tips that make the whole process easy and fun.
By the end, you’ll have a beautiful bunk bed that your doll—and you—will love. Ready to get started? Let’s dive in!
Materials Needed
Gathering the right materials is the first step to build an 18 inch doll bunk bed. Each item plays a role in making the bed strong and safe. Prepare everything before starting to save time and avoid interruptions.
Wood Pieces
Choose smooth, sturdy wood like pine or poplar. Cut wood into parts for the frame, ladder, and slats. Typical sizes include 1×2 and 1×4 boards. Sand edges to prevent splinters.
Wood Glue And Screws
Wood glue holds pieces tightly together. Use small screws for extra strength. Pick screws that fit the wood thickness. A screwdriver or drill will help assemble parts quickly.
Paint Or Wood Finish
Pick non-toxic paint or finish safe for children’s toys. Choose colors that match your doll’s room. Apply thin coats for a smooth look. Let each coat dry fully before the next.
Sandpaper
Use fine-grit sandpaper to smooth rough surfaces. Sand all edges and corners carefully. This makes the bed safe for dolls and children. It also helps paint stick better.
Measuring Tools
Keep a ruler or tape measure handy. Accurate measurements ensure parts fit well. Mark wood pieces clearly before cutting. Precision avoids gaps and weak joints.
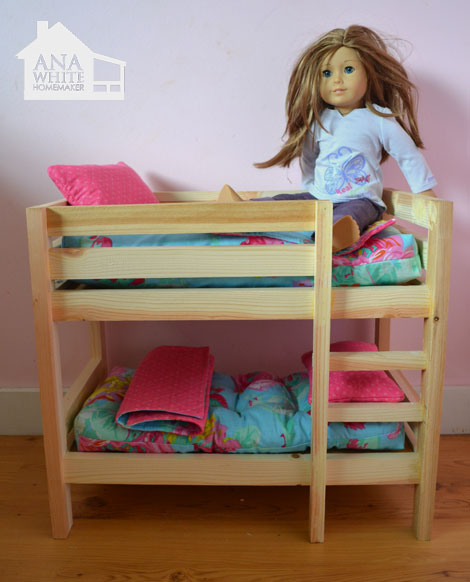
Credit: www.ana-white.com
Tools Required
Building an 18-inch doll bunk bed needs the right tools. These tools help you cut, join, and finish the wood properly. Having everything ready saves time and makes the project easier.
Most tools are simple and easy to use. You do not need fancy equipment to create a sturdy doll bunk bed. Below is a list of tools that work best for this project.
Measuring Tape
Use measuring tape to get accurate wood lengths. Precise measurements keep the bed balanced and safe.
Hand Saw Or Jigsaw
A hand saw or jigsaw cuts the wood pieces to size. Choose a saw you feel comfortable using.
Sandpaper
Sandpaper smooths rough edges and surfaces. It helps avoid splinters and gives a neat finish.
Screwdriver
A screwdriver tightens screws to hold parts together. Both manual and electric screwdrivers work well.
Wood Glue
Wood glue strengthens joints and keeps the bed sturdy. Use it along with screws for best results.
Clamps
Clamps hold wood pieces steady while glue dries. They make assembly easier and more precise.
Pencil
A pencil marks cutting lines and drilling spots. Clear marks guide your work and reduce mistakes.
Choosing The Right Wood
Choosing the right wood is key to building a sturdy 18 inch doll bunk bed. The wood must be strong enough to hold the bed’s weight. It also needs to be safe and smooth for children to use.
Wood type affects the bed’s look and how easy it is to work with. Some woods are harder to cut or sand. Others may cost more or less. Picking the right wood helps create a beautiful and lasting doll bunk bed.
Types Of Wood Suitable For Doll Bunk Beds
Softwoods like pine are light and easy to cut. Pine is also affordable and widely available. Hardwoods such as oak or maple are stronger and last longer. They have a nicer finish but cost more. Choose wood based on your budget and skill level.
Wood Quality And Safety
Look for wood with no cracks or knots. These weak spots can cause breaks. Sand the wood well to avoid splinters. Use non-toxic paint or finish to keep the bed safe for kids. Smooth surfaces help prevent injuries.
Wood Size And Thickness
Use wood pieces that match the bed’s size needs. Boards should be thick enough to hold weight without bending. A thickness of about ¾ inch works well for most parts. Measure twice and cut once for accuracy.
Measuring And Cutting Pieces
Measuring and cutting pieces is the first step to build your 18 inch doll bunk bed. Accurate measurements keep the bed strong and safe. Take your time to measure each part carefully. Use a ruler or tape measure for exact lengths. Mark the cutting lines clearly with a pencil. This helps avoid mistakes and keeps the wood neat.
Cutting The Frame
The frame holds the whole bunk bed together. Start by cutting four long pieces for the bed’s sides. Cut four shorter pieces for the head and foot ends. Use a saw to cut along the pencil lines. Keep the cuts straight and smooth. Sand the edges to avoid splinters. Check each piece fits well before moving on.
Cutting The Slats
Slats support the doll’s mattress. Cut several thin strips of wood for the slats. Each should be the same length to fit the frame. Use a fine saw for clean cuts. Sand the slats to make them smooth. Test how they fit inside the frame. Adjust if any piece feels too tight or loose.
Cutting The Guardrails
Guardrails keep the doll safe from falling. Measure the height and length for each guardrail. Cut two long pieces for the sides and several short pieces for the bars. Make sure the bars are spaced evenly. Sand all parts to avoid sharp edges. Check the guardrails fit securely on the bunk bed frame.
Assembling The Bed Frame
Assembling the bed frame is a key step in making an 18-inch doll bunk bed. This part sets the shape and strength of the entire bed. Follow each step carefully to build a safe and sturdy frame for your dolls.
Building The Base
Start by cutting the wood pieces for the base. Use smooth wood to avoid splinters. Join the side rails with the head and foot boards. Make sure the corners form perfect right angles. Use wood glue and nails for a strong hold. The base must be flat and stable for the mattress.
Attaching The Legs
Next, fix the legs to each corner of the base. Choose legs of equal length for balance. Drill pilot holes before screwing in the legs. This step prevents the wood from splitting. Tighten the screws firmly but do not overdo it. The legs should stand straight and support weight well.
Securing The Frame
Secure the frame by adding extra supports if needed. Use corner braces inside the frame for more strength. Check all joints to make sure they are tight. Sand any rough edges to keep the bed safe. Test the frame by gently pressing on different parts. A solid frame will hold up during playtime.
Adding The Bunk Bed Slats
Adding the bunk bed slats is a key step in building your 18 inch doll bunk bed. Slats support the mattress and keep it in place. They also add strength to the bed frame. Properly spaced slats prevent the mattress from sagging or falling through.
This part needs careful measuring and cutting. Each slat must fit well between the side rails. Strong wood slats give the bed durability. Light wood might bend or break under weight.
Choosing The Right Wood For Slats
Select wood that is strong and smooth. Pine, poplar, or birch work well. Avoid soft or splintery wood. Sand the slats to remove rough edges. This keeps the doll safe from scratches.
Measuring And Cutting The Slats
Measure the distance between the bunk bed rails. Cut each slat to fit snugly inside this space. Cut multiple slats of the same length. Use a saw for clean, straight edges.
Spacing The Slats Properly
Place the slats evenly across the bed frame. Space them about 2 inches apart. This spacing supports the mattress well. It also allows air to flow under the mattress.
Securing The Slats In Place
Attach the slats to the side rails with small screws or nails. Pre-drill holes to avoid splitting the wood. Make sure each slat is secure and does not move. Loose slats can cause the mattress to shift.
Constructing The Ladder
Constructing the ladder is a key step in making an 18 inch doll bunk bed. The ladder lets your doll climb safely to the top bunk. It needs to be sturdy and just the right size.
Start by choosing wood pieces that are smooth and strong. The ladder should fit well on the bed frame. It must be easy to hold and climb for your doll.
Select thin wooden strips about half an inch thick. Softwood like pine works well and is easy to cut. Avoid wood with splinters or cracks to keep the ladder safe.
Measuring And Cutting The Ladder Pieces
Cut two long side pieces about 10 inches tall. Next, cut four short rungs to fit between the sides. Each rung should be around 3 inches long for good grip.
Assembling The Ladder
Lay the side pieces flat and space them apart. Attach the rungs evenly between the sides using wood glue or small nails. Keep the rungs level and straight for stability.
Sand all edges carefully to remove rough spots. Use fine sandpaper for a smooth finish. Paint or stain the ladder to match the bunk bed design.

Credit: www.amazon.com
Sanding And Finishing
After building the 18 inch doll bunk bed, sanding and finishing are key steps. These steps protect the wood and make the bed look great. Sanding smooths the surface, removing rough spots and splinters. Finishing adds color and shields the wood from damage. Taking time on these steps gives the doll bed a polished, professional look.
Sanding For Smoothness
Start sanding with medium-grit sandpaper to remove rough areas. Sand all surfaces evenly, especially edges and corners. Use light pressure to avoid scratches. Switch to fine-grit sandpaper for a smooth finish. Wipe away dust with a dry cloth. Smooth wood prevents splinters and helps paint or stain stick better.
Painting Or Staining
Choose paint or stain based on your style preference. Paint gives bright, solid colors. Stain shows the wood grain and adds warmth. Use a small brush for detailed areas. Apply thin, even coats and let dry fully. Sand lightly between coats for a smooth surface. Finish with a clear sealant to protect the color and wood.
Safety Tips For Doll Bunk Beds
Safety is very important when making a doll bunk bed. A sturdy and secure bed keeps dolls safe and prevents accidents during play. Small parts, sharp edges, and loose pieces can cause problems. Following safety tips helps create a strong bed that lasts long and stays safe.
Use simple steps to check the bed’s safety before and after making it. These tips protect dolls and give children a fun, worry-free experience.
Check For Sharp Edges And Smooth Surfaces
Make sure all wood or plastic parts have smooth edges. Sand any rough spots to avoid scratches or cuts. Sharp edges can hurt dolls or children during play. Smooth surfaces look better and are safer to handle.
Use Non-toxic Paints And Finishes
Choose paints and finishes that do not contain harmful chemicals. Non-toxic materials keep dolls and children safe. Let paint dry completely before using the bed. Avoid strong smells that can bother kids.
Secure All Joints And Screws Firmly
Tighten all screws and bolts to keep the bed strong. Loose parts can cause the bed to wobble or fall apart. Check the bed regularly and fix any loose pieces. Use wood glue or small nails for extra strength.
Keep The Bed Size Suitable For 18 Inch Dolls
Make the bed size just right for your dolls. Too big or too small beds can cause dolls to fall. Measure carefully and double-check before cutting wood. A perfect fit keeps dolls safe and comfortable.
Avoid Small Parts That Can Come Off Easily
Do not use tiny buttons or beads that can fall off. Small parts are a choking hazard for children. Use glued or fixed decorations that stay in place. Simple designs are safer and easier to clean.
Customizing Your Doll Bunk Bed
Customizing your 18 inch doll bunk bed makes it unique and fun. It lets you add personality to the simple structure. Small changes bring charm and character. Personal touches turn a plain bed into a special play item.
Customization also encourages creativity and makes the bed feel more like home. It is a chance to match the bed to your doll’s style or your child’s taste. Each detail adds to the overall look and feel.
Decorative Touches
Start by painting the bed in bright or soft colors. Use non-toxic paint for safety. Add patterns like stripes or polka dots for a playful look. Stickers or decals can add fun shapes and themes.
Try small craft items like ribbon, lace, or tiny buttons. Glue them carefully on edges or corners. These little decorations make the bed look cozy and inviting. Keep decorations light to avoid making the bed unstable.
Adding Bedding And Accessories
Choose tiny pillows and blankets that fit the bed size. Use soft fabrics like cotton or fleece for comfort. Mix colors and patterns that match the bed’s paint.
Add small accessories such as a mini lamp or a bedside rug. These items create a realistic and warm setting. Make sure accessories are safe and won’t fall off easily.
Custom bedding and accessories bring your doll’s bedroom to life. They make playtime more exciting and imaginative.
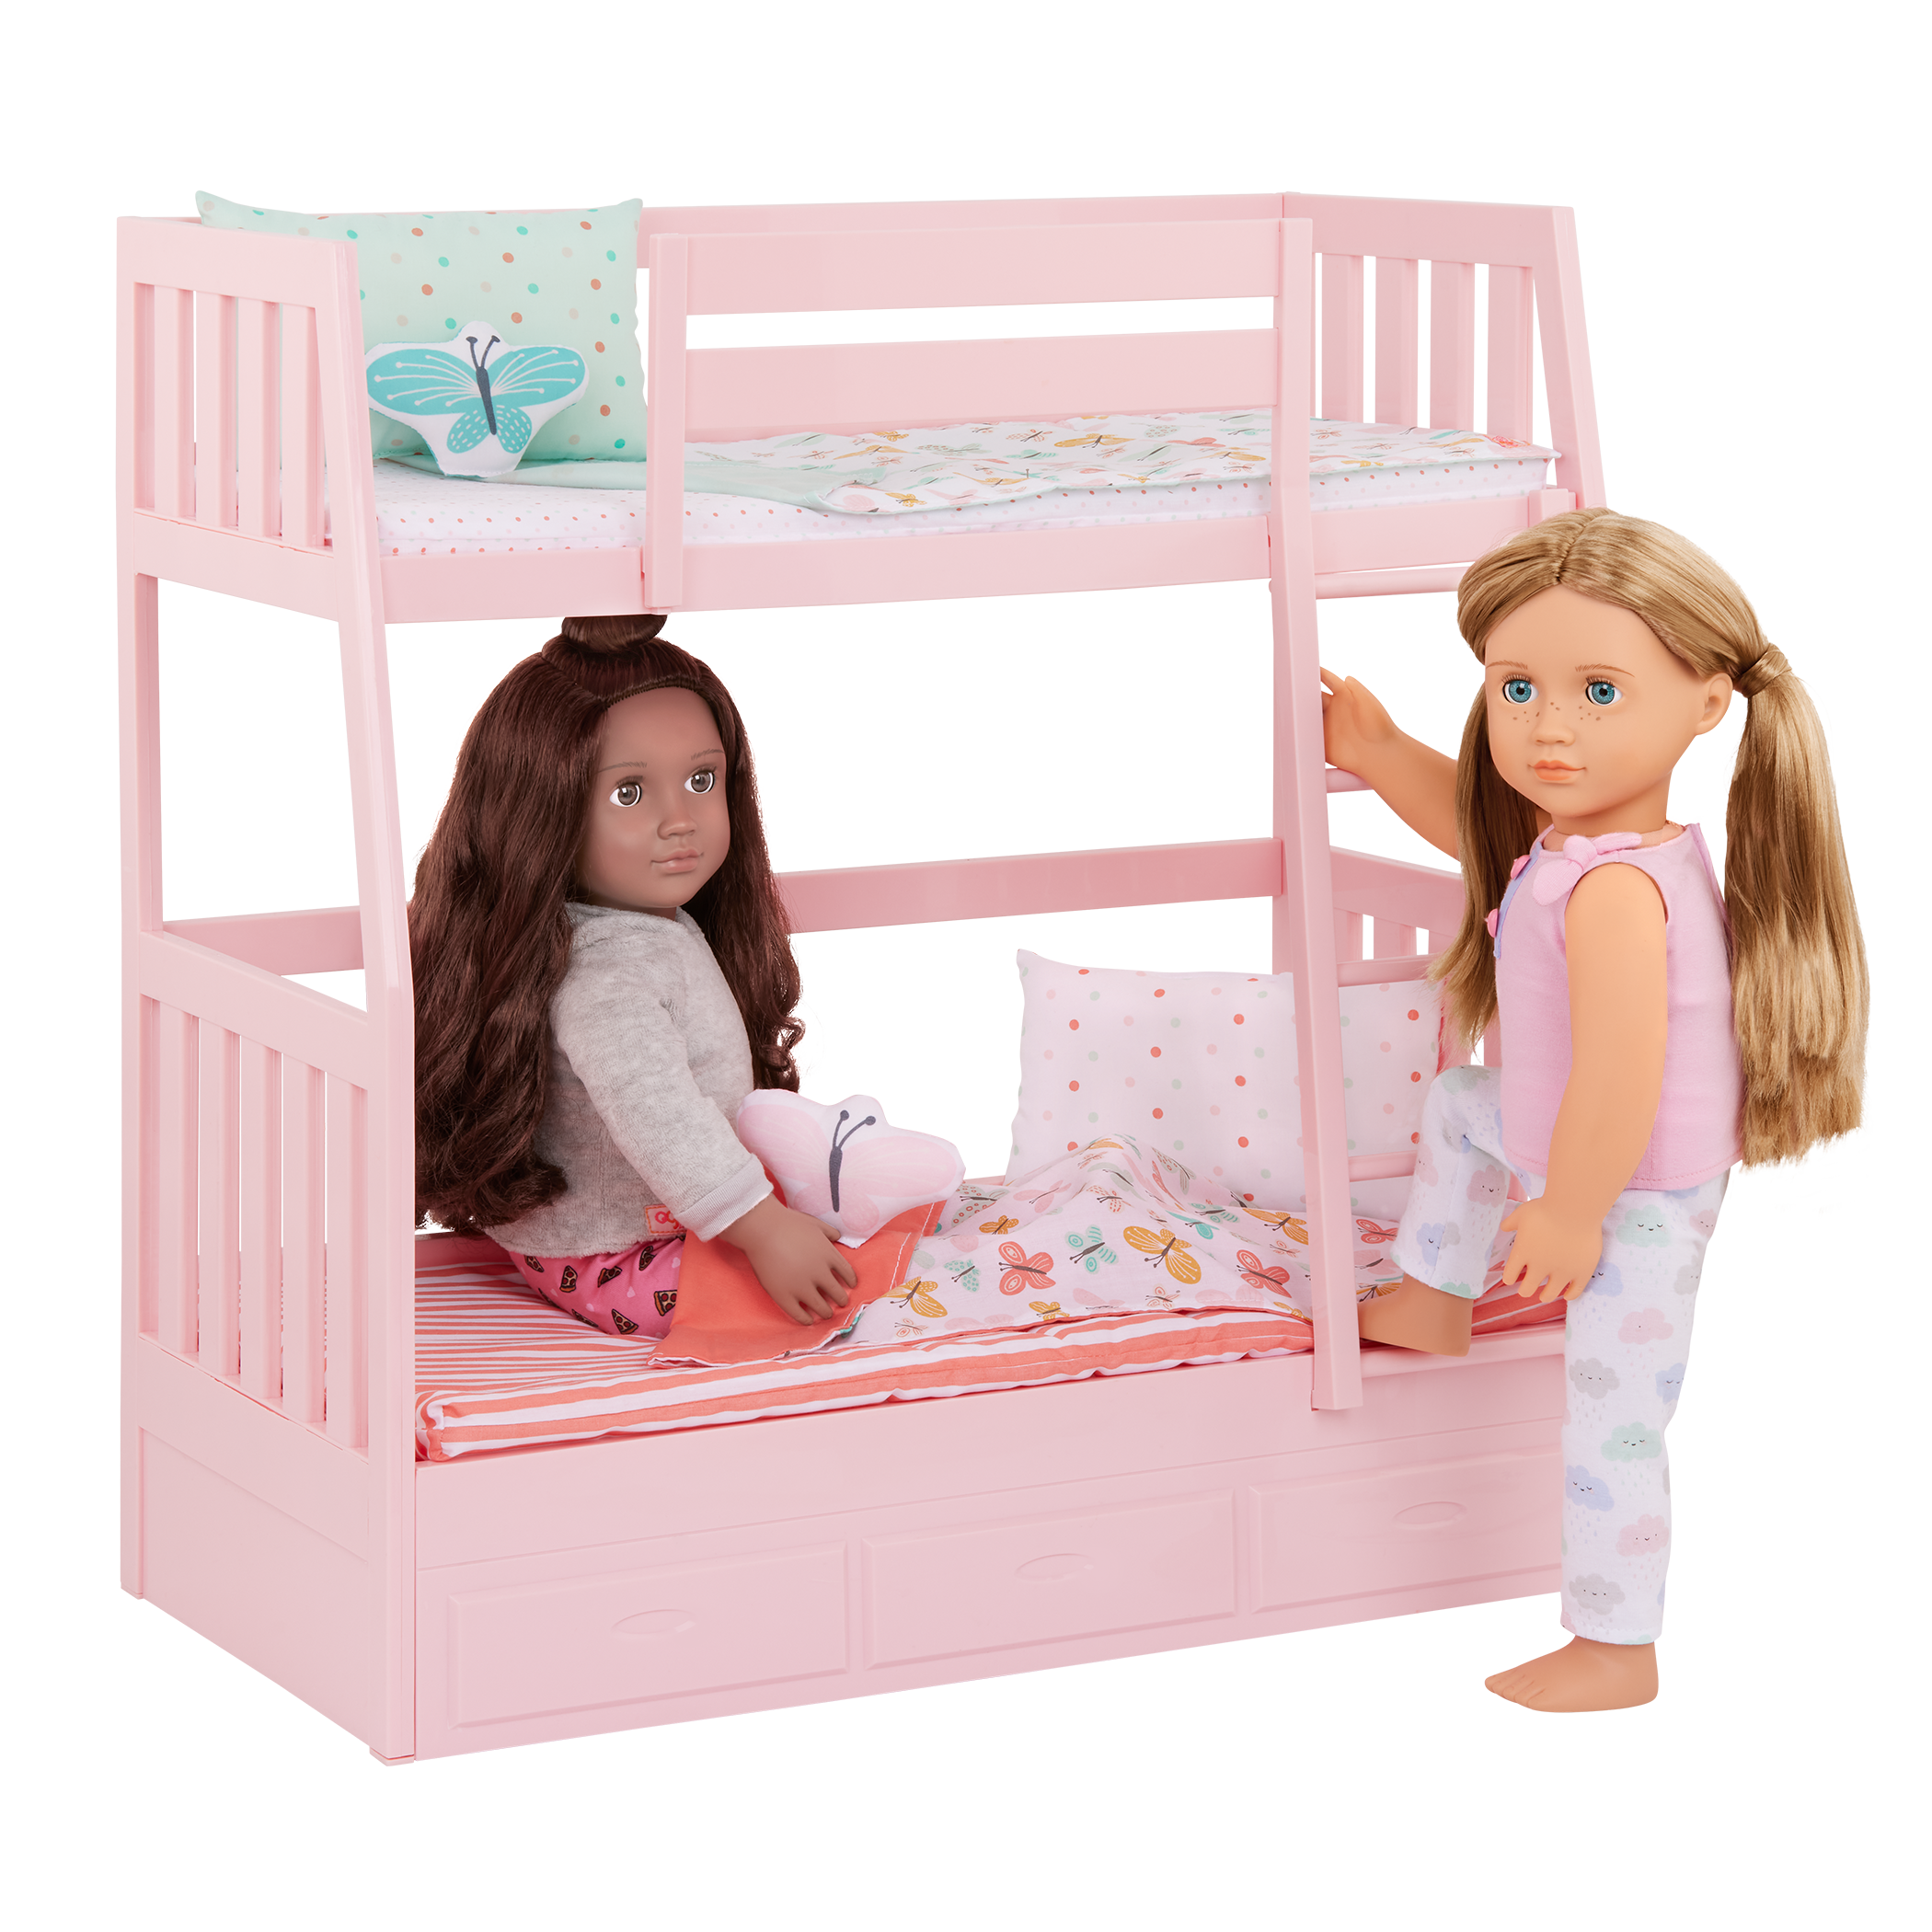
Credit: ourgeneration.com
Frequently Asked Questions
What Materials Are Needed For An 18 Inch Doll Bunk Bed?
You need wood, screws, wood glue, sandpaper, and paint. Choose sturdy wood like pine for durability. Also, gather tools like a saw, drill, and measuring tape for precise cuts and assembly.
How Long Does It Take To Build The Doll Bunk Bed?
Building typically takes 2 to 4 hours, depending on skill level. Preparation and drying time for paint may add extra hours. Planning and following instructions carefully can speed up the process.
Can I Customize The Doll Bunk Bed Design?
Yes, you can customize size, color, and decorations. Add drawers or safety rails for extra functionality. Personalizing the bed makes it unique and suits your doll’s style perfectly.
Is The Doll Bunk Bed Safe For Children?
Yes, if built with smooth edges and non-toxic paint. Secure all parts tightly to avoid wobbling. Always supervise young children during play to ensure safety.
Conclusion
Building an 18-inch doll bunk bed can be fun and simple. Follow the steps carefully and use the right tools. Take your time to measure and cut the pieces well. Paint or decorate the bed to make it special. Your doll will love this cozy new space.
Enjoy the project and share your creation with friends. Keep practicing to make even better doll furniture next time. Crafting brings joy and creativity to playtime.
