
Are you ready to transform your bathroom with a stunning vanity cabinet you built yourself? Imagine having a beautiful, custom piece that fits perfectly in your space and shows off your personal style.
In this guide, you’ll discover simple, step-by-step instructions paired with a helpful video that makes building your own vanity cabinet easier than you think. Whether you’re a beginner or just looking to save money, this project will give you the confidence to create something truly special.
Keep reading, and soon you’ll have all the tools and tips you need to start building your dream vanity cabinet today!
Planning Your Vanity Cabinet
Planning your vanity cabinet is the first step to a successful build. Careful planning saves time and money. It also ensures the cabinet fits well and looks good. Focus on three key areas: materials, measurements, and layout. Each part is important for a strong and attractive vanity.
Choosing The Right Materials
Select materials that last and suit your bathroom style. Common options include plywood, MDF, and solid wood. Plywood resists moisture well, making it a good choice. MDF is smooth and easy to paint. Solid wood looks natural but costs more. Also, pick hardware like handles and hinges that match your design.
Measuring Your Space
Measure the bathroom area carefully. Note the width, height, and depth available. Check for obstacles like pipes or electrical outlets. Write down all numbers to avoid mistakes. Accurate measurements help the cabinet fit perfectly. Double-check measurements before buying materials or cutting wood.
Designing The Layout
Plan how the cabinet will organize your bathroom items. Think about drawers, shelves, and doors. Decide what size each section should be. Make sure there is enough space for the sink and plumbing. A good layout improves storage and keeps the area neat. Sketch your ideas on paper or use simple software.
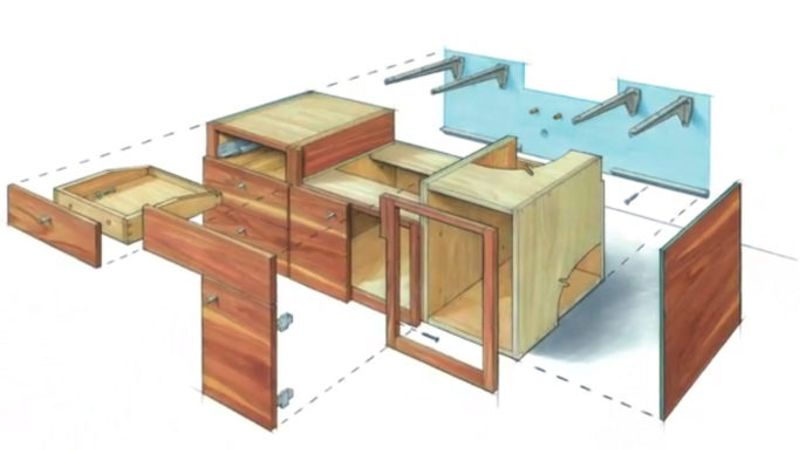
Credit: www.finehomebuilding.com
Gathering Tools And Supplies
Gathering the right tools and supplies is the first step in building a vanity cabinet. Having everything ready makes the project smoother. It saves time and avoids frustration. This stage ensures you work safely and efficiently.
Before starting, take time to prepare. Organize your workspace and check your materials. Knowing what you need helps you stay focused. It also helps avoid unnecessary trips to the store.
Essential Tools Checklist
Start with basic hand tools. A tape measure is key for accurate cuts. A carpenter’s square helps keep corners perfect. Clamps hold pieces tightly during assembly. You need a power drill for screws and holes. Sandpaper or a sander smooths rough edges. A saw cuts wood to size. A level checks that everything is straight. Safety gear like goggles and gloves protects you.
Selecting Hardware And Fixtures
Choose hardware that fits your style and cabinet size. Hinges must match the door type and weight. Drawer slides need to be smooth and strong. Pick handles or knobs that are easy to grip. Consider finishes that resist water and wear. Match fixtures to your bathroom’s overall look. Good hardware improves function and appearance. Take your time to select quality pieces.
Cutting And Preparing Wood
Cutting and preparing wood is an important step in building a vanity cabinet. This step shapes the wood to fit your design. Accurate cuts save time and reduce waste. Proper preparation ensures smooth assembly and a strong cabinet.
Each piece must be measured and cut carefully. Taking your time here leads to a better final product. Safety also plays a big role. Using the right techniques keeps you safe and makes the work easier.
Marking And Measuring Cuts
Start by measuring the wood pieces you need. Use a tape measure for accuracy. Mark the lines clearly with a pencil. Double-check your measurements before cutting. Marking helps guide your saw and prevents mistakes. Use a square tool to keep lines straight. This ensures all parts fit perfectly together.
Safe Cutting Techniques
Wear safety goggles and gloves before cutting. Use a stable surface to hold the wood steady. Keep your hands away from the saw blade. Cut slowly and steadily to avoid slips. Use clamps to hold the wood firmly. Always follow the tool’s instructions carefully. Stop and check your work often. Safety is key to a smooth project.
Assembling The Cabinet Frame
Assembling the cabinet frame is the first key step in building your vanity cabinet. This step creates the main structure that supports the entire unit. Strong and accurate assembly ensures your cabinet stands firm and lasts long. Take your time to align the panels correctly. Proper assembly makes the rest of the build easier and more precise.
Joining The Panels
Start by laying out all the panels on a flat surface. Match the edges carefully to fit the sides, top, and bottom panels. Use clamps to hold the panels in place. Check that all corners form perfect right angles. This helps create a sturdy and square frame. Double-check measurements before moving on. Proper panel joining prevents gaps and weak spots.
Securing With Screws And Glue
Apply wood glue along the edges where the panels meet. Spread the glue evenly for a strong bond. Next, drill pilot holes to avoid splitting the wood. Insert screws into the pilot holes and tighten them firmly. The glue and screws work together to lock the frame solidly. Wipe away any excess glue before it dries. Allow the glue to cure fully for the best strength.
Installing Shelves And Drawers
Installing shelves and drawers is a key step in building a vanity cabinet. Shelves help organize items, while drawers provide easy access to smaller things. Both must fit well and slide smoothly for daily use. This section guides you through building drawer boxes and attaching drawer slides with clear steps.
Building Drawer Boxes
Start by cutting wood pieces for the drawer box. You need a bottom, two sides, a front, and a back. Use smooth plywood or hardwood for strength. Measure carefully to fit inside the cabinet frame. Assemble the pieces using wood glue and screws. Clamp the box to hold parts tight until dry. Sand edges to remove rough spots. The box should be square and strong.
Attaching Drawer Slides
Choose drawer slides that match your drawer size and weight. Attach one side of the slide to the drawer box edge. Use screws and check alignment to keep slides straight. Fix the other slide part inside the cabinet frame. Make sure the slides are level and at the right height. Test the drawer by sliding it in and out. Adjust screws if the drawer sticks or wobbles. Smooth movement means a perfect fit.
Finishing Touches
Finishing touches make your vanity cabinet look complete and polished. These final steps improve its look and protect the wood. Proper finishing ensures your cabinet lasts longer and stays beautiful. Focus on smoothing surfaces and choosing the right paint or stain.
Sanding And Smoothing Surfaces
Sanding removes rough spots and splinters from the wood. Use fine-grit sandpaper for a smooth finish. Sand all surfaces evenly, including edges and corners. Wipe away dust with a clean cloth. Smooth surfaces help paint or stain stick better. This step prepares your cabinet for a clean, professional look.
Painting Or Staining Options
Choose paint or stain based on your style and wood type. Paint offers many color choices and hides wood grain. Stain shows the natural beauty of the wood. Use a brush or cloth to apply evenly. Apply thin coats and let each dry fully. Finish with a clear sealant to protect the surface. This protects against water and daily wear.
Mounting The Vanity Cabinet
Mounting the vanity cabinet is a key step in your bathroom project. This part gives the cabinet stability and a finished look. It needs care and the right tools to do well. Follow these steps to mount your vanity cabinet securely and neatly.
Securing To The Wall
Start by positioning the cabinet against the wall. Use a level to make sure it is straight. Mark the wall where the cabinet will be attached. Find the wall studs with a stud finder. These provide strong support for the cabinet. Drill pilot holes into the studs. Use long screws to fasten the cabinet to the wall. Check again with the level to keep the cabinet even. Tighten screws firmly, but do not over-tighten them.
Installing Countertop And Sink
Place the countertop on top of the cabinet. Align it carefully with the edges. Apply a bead of silicone sealant around the cabinet top. This keeps water from leaking inside. Set the sink into the countertop cutout. Connect the sink to the plumbing. Tighten the faucet and drain fittings. Clean away excess sealant before it dries. Let everything dry and set before using the vanity.
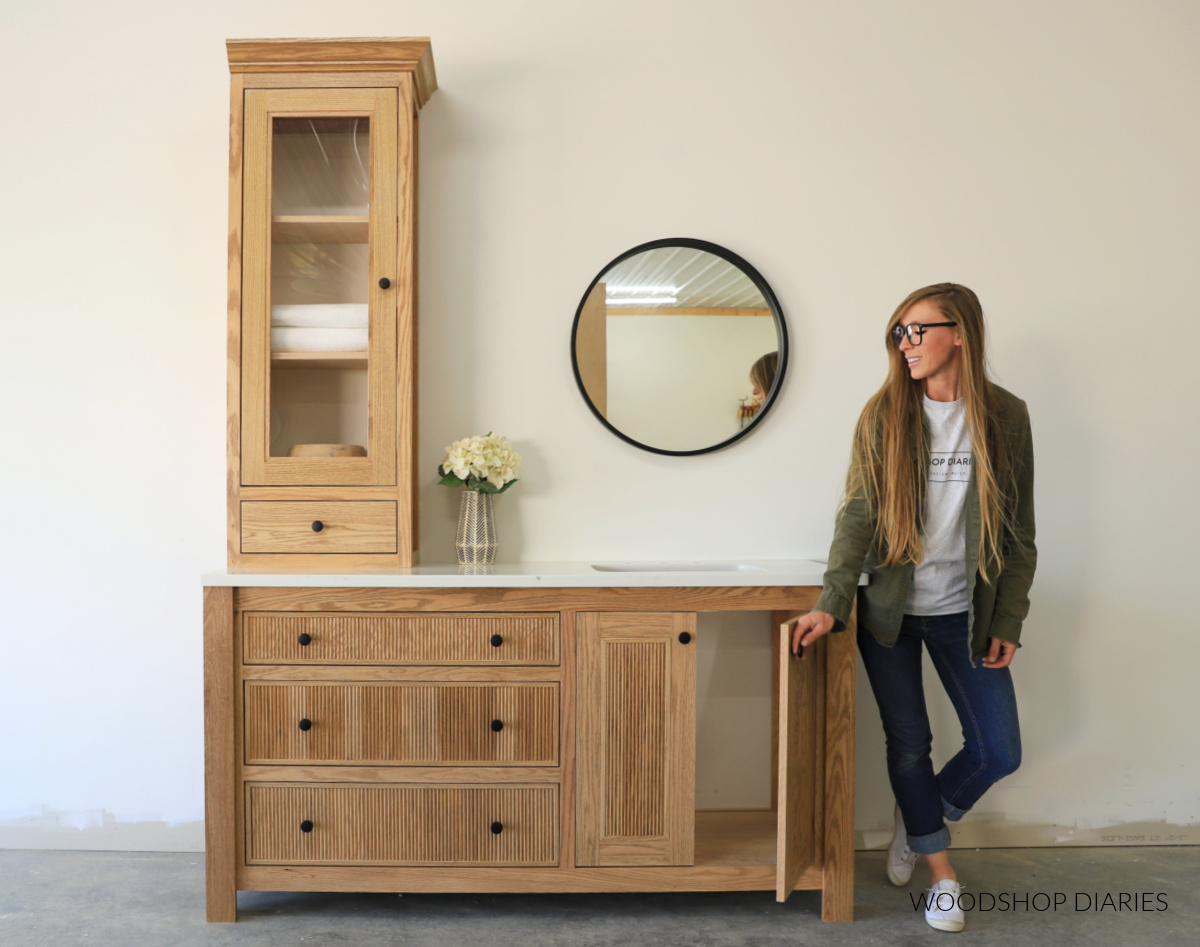
Credit: www.woodshopdiaries.com
Maintenance Tips
Maintaining your vanity cabinet keeps it looking new and lasting longer. Simple care and quick repairs help avoid bigger problems later. Regular attention protects the wood and hardware from damage.
Cleaning And Care
Use a soft cloth to clean the surface daily. Avoid harsh chemicals that can damage the finish. Warm water and mild soap work well for most stains. Dry the cabinet with a clean towel to prevent water marks. Keep the cabinet dry to stop mold and mildew growth. Check for dust buildup inside drawers and wipe regularly.
Handling Repairs
Tighten loose screws to keep doors and drawers working smoothly. Replace broken handles or knobs quickly to avoid further damage. Fill small scratches with a wood touch-up marker matching your cabinet’s color. Fix water damage early by sanding and refinishing the affected area. For bigger issues, call a professional to ensure proper repair.

Credit: www.youtube.com
Frequently Asked Questions
What Materials Are Needed To Build A Vanity Cabinet?
You need plywood, screws, wood glue, hinges, drawer slides, and paint or finish. Tools include saws, drills, clamps, and measuring tape. Quality materials ensure durability and a professional look for your vanity cabinet.
How Long Does It Take To Build A Vanity Cabinet?
Building a vanity cabinet typically takes 4 to 8 hours. Time varies by skill level and complexity of the design. Proper planning and preparation can speed up the process and improve results.
Can Beginners Build A Vanity Cabinet With This Video?
Yes, the video provides step-by-step instructions suitable for beginners. It covers measuring, cutting, assembling, and finishing. Following the guide carefully helps even novices create a sturdy, attractive vanity cabinet.
What Are Common Mistakes When Building A Vanity Cabinet?
Common mistakes include inaccurate measurements, poor joint alignment, and improper finishing. Avoid rushing and double-check all steps. Careful attention ensures a durable and visually appealing vanity cabinet.
Conclusion
Building a vanity cabinet can be simple and rewarding. Follow each step carefully for best results. Use the video as your guide while working. Take your time and measure twice before cutting. This project adds style and storage to your bathroom.
Enjoy the satisfaction of creating something useful yourself. Keep practicing to improve your woodworking skills. Soon, you will build more projects with confidence. A well-made vanity cabinet makes any space look neat. Start your project today and see the difference it brings.

