Are you looking to add a unique, rustic touch to your home décor? Making distressed wood for your coat rack is a simple way to bring charm and character to any space.
Imagine your guests admiring a piece that looks like it has a story to tell—without spending hours or a fortune. In this guide, you’ll discover easy steps to create that perfect worn, vintage look on wood. Whether you’re a beginner or just want a quick project, you’ll find tips that make the process fun and rewarding.
Keep reading to transform plain wood into a stunning, one-of-a-kind coat rack that reflects your style.
Materials Needed
Before starting your distressed wood coat rack project, gather all materials. Having the right items makes your work easier. It also ensures a better final product. Below are the essential materials you need to prepare.
Types Of Wood
Choose wood that shows wear well. Pine is soft and easy to distress. Oak has a strong grain and lasts long. Reclaimed wood adds natural character. Pick boards that fit your rack size and style.
Tools And Supplies
Tools help shape and age the wood quickly. Sandpaper smooths rough edges and creates worn spots. A hammer and nails attach parts securely. Wire brushes add scratches and texture. Paint or stain finishes the look. Consider wood glue for extra hold.
Safety Gear
Protect yourself during the project. Wear safety glasses to shield your eyes. Gloves keep hands safe from splinters and chemicals. Use a dust mask to avoid breathing sawdust. Work in a well-ventilated area for fresh air.
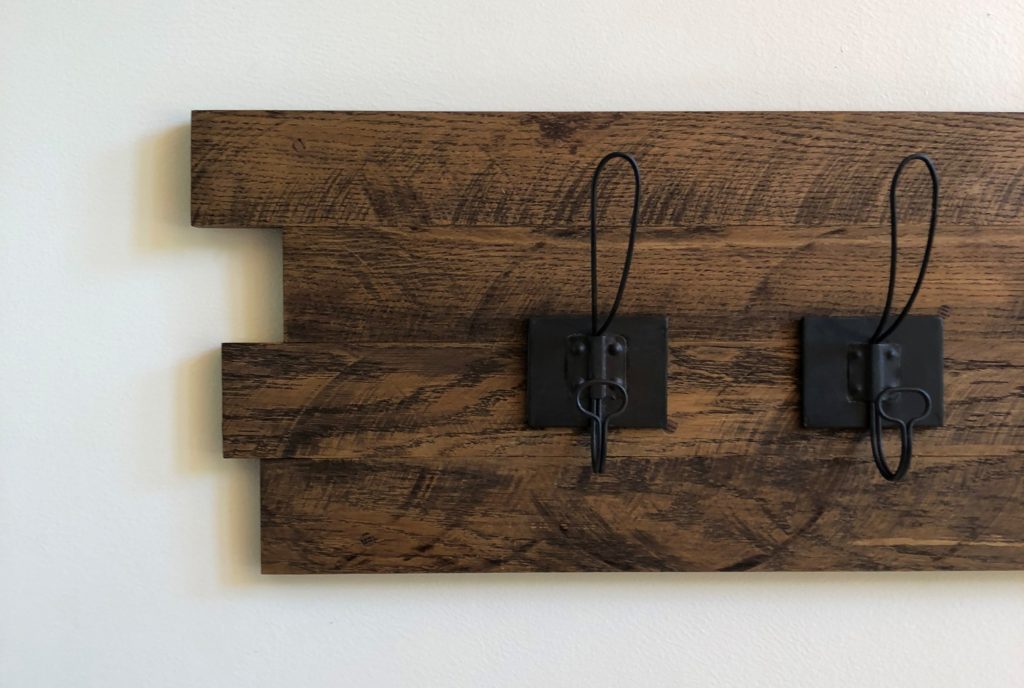
Credit: www.thehandcraftedhaven.com
Preparing The Wood
Preparing the wood is a key step in making a distressed wood coat rack. This step ensures the wood looks natural and lasts longer. Proper preparation creates a solid base for the distressing process. It also helps the final piece look authentic and beautiful.
Selecting The Right Wood Piece
Choose wood that has a strong grain and some natural imperfections. Pine, oak, and cedar work well for distressing. Avoid wood that is too soft or has many knots. A good wood piece makes the distressing easier and the rack more durable.
Cutting To Size
Measure the wood carefully before cutting. Cut the wood to the size you want for your coat rack. Use a saw that gives a clean, straight cut. Smooth cuts help the rack look neat, even with distressing.
Sanding Tips
Sand the wood lightly to remove rough edges. Use medium-grit sandpaper to keep some texture. Avoid sanding too much; the goal is a slightly rough surface. This helps the distressing paint or stain stick better. Sand corners and edges for a worn look.
Creating Distressed Effects
Creating distressed effects gives wood a worn, vintage look. It adds character and charm to your coat rack. This process makes new wood look old and full of stories.
You can achieve this by using simple tools and techniques. Each method changes the wood’s surface in unique ways. Choose the one that fits your style best.
Using Hand Tools
Hand tools help create natural wear and tear. Use a hammer or screwdriver to make small dents. Scrape the wood lightly with a wire brush for texture.
Focus on edges and corners where wood would naturally wear. This makes the distressing look real and authentic. Work slowly and check your progress often.
Applying Chemical Aging
Chemical aging changes the wood’s color and texture. Vinegar and steel wool solution is a popular choice. It darkens the wood and brings out the grain.
Apply the solution with a brush and let it dry. Test on a scrap piece first to see the effect. This method gives a deep, old wood appearance quickly.
Adding Scratches And Dents
Scratches and dents give wood a rugged, used look. Use nails or chains to make small marks randomly. Sand these areas lightly for a softer finish.
Focus on spots that would see regular use or bumps. This adds realism and makes your coat rack stand out. Keep the marks subtle, not too heavy.
Staining And Painting
Staining and painting are key steps to create a distressed look on wood. These steps add color and texture. They help give your coat rack a worn, vintage feel. The right techniques make the wood look aged naturally. You can highlight the grain and add character. This part focuses on how to choose stains, layer paint, and create fading and chipping effects.
Choosing The Right Stain
Select a stain that matches the style you want. Dark stains give a rich, old appearance. Light stains keep the wood looking soft and weathered. Test the stain on a small wood piece first. This helps see how the color will appear. Use a cloth to apply the stain evenly. Wipe off extra stain to avoid blotches. Let the stain dry fully before moving on.
Layering Paint For Vintage Look
Apply multiple paint layers for depth and wear. Start with a base color that shows through later. Add one or two contrasting colors on top. Use a brush or sponge for uneven coverage. Let each layer dry before adding the next. Sand some areas lightly between layers. This exposes parts of the base color. It gives a natural worn effect.
Techniques For Fading And Chipping
Wear the paint to mimic age and use. Use sandpaper to fade edges and flat surfaces. Focus on spots that get natural wear. Use a damp cloth to soften paint in some areas. For chipping, tap the paint lightly with a hard object. Small chips and cracks create a real vintage look. Finish with a matte clear coat to protect the finish.
Sealing And Finishing
Sealing and finishing distressed wood is important to protect your coat rack. This step keeps the wood strong and looking good for a long time. It also helps to keep the rustic look without changing the texture too much. Choosing the right sealant and applying it well can make a big difference in your project’s durability.
Applying Protective Coating
Start by choosing a clear protective coating like polyurethane or wax. Use a brush or cloth to apply the coating evenly. Make sure to cover all surfaces, including edges and corners. Apply thin layers to avoid drips and uneven spots. Let each layer dry before adding the next one. This method keeps the distressed look intact while adding protection.
Drying And Curing Times
Drying time depends on the type of coating used. Usually, the surface will feel dry within a few hours. However, full curing can take several days. Avoid heavy use during this time to prevent damage. Follow the product instructions for best results. Patience helps the finish harden and last longer on your coat rack.
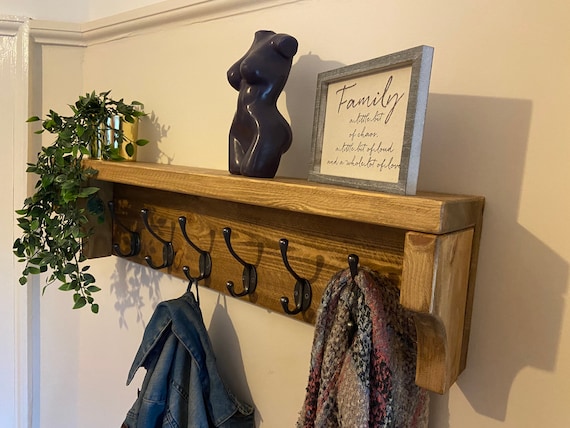
Assembling The Coat Rack
Assembling the coat rack is the final step in your distressed wood project. This part brings all pieces together. It turns the wood and hooks into a useful rack. Follow simple steps to make it sturdy and attractive.
Attaching Hooks
Choose hooks that match your wood style. Place them evenly along the wood board. Use a pencil to mark screw holes. Drill small pilot holes for easier screw insertion. Screw hooks tightly to hold coats well. Check each hook for firmness after attaching.
Mounting Options
Decide where to hang your coat rack. Use wall anchors for heavy coats or drywall. Attach mounting brackets or D-rings to the back. Make sure the rack sits flat against the wall. Measure twice before drilling holes. Secure the rack at eye level for easy reach.
Final Touches
Wipe off dust from the wood and hooks. Apply a clear sealant to protect the finish. Let the coat rack dry completely before use. Add decorative elements like small signs or labels. Step back and admire your new rustic coat rack.
Maintenance Tips
Maintaining your distressed wood coat rack helps keep its charm and durability. Regular care protects the wood and preserves its unique look. Follow simple steps to clean and repair the wood easily.
Cleaning Distressed Wood
Dust your coat rack often with a soft cloth. Use a dry or slightly damp cloth to avoid water damage. Avoid harsh chemicals that can strip the wood’s finish. Mild soap mixed with water works well for tough spots. Wipe gently to keep the wood’s texture and color intact. Always dry the wood after cleaning to prevent moisture buildup.
Repairing Wear And Tear
Minor scratches add to the distressed look but deep damage needs fixing. Use wood filler to fill cracks or holes. Sand the repaired area lightly to blend it with the surface. Apply a matching stain or paint touch-up to keep a consistent look. Tighten any loose screws or hooks to maintain stability. Regular checks prevent small issues from becoming big problems.

Credit: www.antiquefarmhouse.com
Credit: www.etsy.com
Frequently Asked Questions
How Do I Start Making Distressed Wood For A Coat Rack?
Begin by selecting a suitable wood piece. Sand it lightly, then use tools like hammers or chains to create dents and scratches. This adds character and aged look to the wood for your coat rack.
What Materials Are Needed To Distress Wood Effectively?
You need sandpaper, steel wool, hammer, nails, paint or stain, and a wire brush. These tools help create natural wear and tear, giving wood a vintage, distressed appearance.
Can I Distress Wood Without Power Tools?
Yes, manual tools like hammers, chains, and sandpaper work well. They allow controlled distressing and add authentic rustic charm to the wood without the need for power tools.
How Do I Protect Distressed Wood For A Coat Rack?
Apply a clear sealant or polyurethane finish after distressing. This protects the wood from moisture and wear while preserving the rustic, aged look you created.
Conclusion
Creating distressed wood for your coat rack adds charm and character. The process is simple and fun to try at home. Use basic tools and follow steps carefully for best results. This rustic look fits many home styles and adds warmth.
Enjoy crafting your own unique piece with a worn, vintage feel. Give your space a personal touch with distressed wood today.