Are you tired of cluttered spaces and struggling to find the perfect spot for your books? Imagine having a stylish bookshelf that not only holds all your favorite reads but also includes a handy ladder to reach those high shelves easily.
Building a bookshelf with a ladder might sound challenging, but with the right steps, you can create a beautiful, functional piece that fits your space and style. In this guide, you’ll discover simple, clear instructions to help you build your own bookshelf with a ladder—no special skills needed.
Ready to transform your room and showcase your collection like a pro? Let’s get started!
Materials And Tools Needed
Building a bookshelf with a ladder is a fun project. It needs the right materials and tools. Using good quality items makes the shelf strong and safe. Prepare everything before starting to save time and avoid mistakes.
Materials Needed
Wood boards are the main material. Choose smooth, sturdy wood like pine or oak. Pick wood pieces for shelves and ladder steps. Sandpaper helps smooth rough edges. Wood screws hold parts together tightly. Wood glue adds extra strength. Paint or stain finishes the shelf nicely. Ladder brackets keep the ladder secure and stable. Optional: small wheels for ladder mobility.
Tools Needed
A drill makes holes and drives screws fast. A saw cuts wood pieces to the right size. A measuring tape ensures accurate measurements. A level keeps shelves straight and even. Screwdrivers help with small adjustments. Clamps hold wood pieces while gluing or screwing. A pencil marks cutting and drilling spots. Safety gear like gloves and goggles protect your hands and eyes.
Choosing The Right Ladder
Choosing the right ladder is key when building a bookshelf with a ladder. The ladder must fit well with your shelf design. It should be safe, sturdy, and easy to use. Picking the correct ladder style helps your bookshelf look great and work well.
Types of Ladders for BookshelvesStep ladders are common and easy to find. They work well for short bookshelves. Leaning ladders add style and save space. Rolling ladders move along rails for wide shelves. Each type fits different needs and spaces.
Best Materials for a Bookshelf LadderWood ladders match wooden shelves nicely. They feel warm and classic. Metal ladders are strong and modern. They last long and resist damage. Choose a material that fits your room’s look and use.
Finding the Right Size LadderHeight matters. The ladder should reach the top shelf easily. Width must allow safe climbing. Too narrow feels unstable. Too wide takes up space. Measure your bookshelf carefully before buying or building a ladder.
Safety Features to ConsiderLook for ladders with slip-resistant steps. Strong joints keep the ladder steady. Rubber feet prevent slipping on floors. Handrails add extra support. Safety makes your bookshelf ladder easier and safer to use every day.
Designing Your Bookshelf
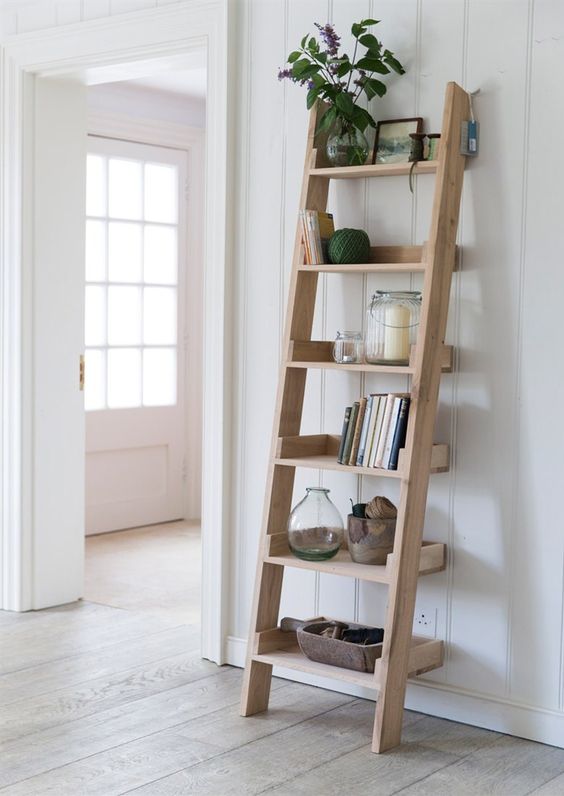
Designing your bookshelf with a ladder is the first step to a great project. This stage shapes how your bookshelf will fit and function in your space. Careful planning helps avoid mistakes and extra work later. Focus on space size and shelf sizes for a perfect match.
A well-designed bookshelf looks good and holds your books safely. It also lets you reach high shelves easily with the ladder. Good design balances style and usefulness.
Measuring Space
Start by measuring the wall or area for your bookshelf. Use a tape measure and write down width, height, and depth. Measure twice to be sure. Check for obstacles like doors or vents. Leave space for the ladder to move freely. Clear space helps your bookshelf fit well and stay safe.
Selecting Shelf Dimensions
Choose shelf sizes based on your books and items. Standard depth is 10 to 12 inches for most books. Adjust height between shelves for tall books or decorations. Keep shelves strong enough to hold heavy books. Ladder height should match bookshelf height for easy access. Proper dimensions make your shelf practical and neat.
Credit: www.brepurposed.com
Preparing The Ladder
Preparing the ladder is an important step in building a bookshelf with a ladder. This process ensures the ladder looks good and lasts longer. Proper preparation helps paint stick well and protects the wood from damage. Take time to clean and smooth the ladder before painting.
Cleaning And Sanding
Start by cleaning the ladder thoroughly. Remove dirt, dust, and grease using a damp cloth. Dry the ladder completely before sanding. Use medium-grit sandpaper to smooth the surface. Focus on rough spots and old paint areas. Sanding creates a better surface for primer and paint. Wipe away sanding dust with a clean cloth.
Applying Primer And Paint
Apply a coat of primer to the ladder. Primer helps paint stick and prevents peeling. Use a brush or spray for an even coat. Let the primer dry fully before painting. Choose paint that suits wood and indoor use. Apply paint in thin layers for a smooth finish. Allow each layer to dry before adding the next. This makes the ladder strong and good-looking.
Cutting And Preparing Shelves
Cutting and preparing the shelves is a key step in building a bookshelf with a ladder. Proper preparation ensures the shelves fit well and hold weight safely. It also gives the bookshelf a neat, polished look. This section guides you through the wood selection, cutting, and sanding processes.
Selecting Wood Type
Choose wood that is strong and durable. Pine, oak, or plywood are common choices. Pine is affordable and easy to work with. Oak is harder and lasts longer but costs more. Plywood offers stability and resists warping. Pick wood that matches your budget and style.
Cutting To Size
Measure the shelf space carefully before cutting. Use a pencil and tape measure for accuracy. Mark the wood clearly to avoid mistakes. Cut the shelves with a saw, following the marks closely. Cut slowly to keep edges straight and smooth. Proper cutting ensures shelves fit perfectly.
Sanding Edges
Sand the edges of each shelf to remove splinters. Use medium-grit sandpaper first. Then switch to fine-grit for a smooth finish. Sand all sides, including corners, to prevent rough spots. Smooth edges protect hands and improve the shelf’s look. Take your time for the best results.

Credit: www.youtube.com
Attaching Shelves To Ladder
Attaching shelves to the ladder is a key step in building your bookshelf. It gives the structure strength and keeps everything in place. Careful measuring and fixing will make the shelves stable and neat. Take your time to do this part right.
Marking Shelf Positions
Start by deciding where each shelf will go on the ladder. Use a tape measure for equal spacing. Mark the spots with a pencil on both sides of the ladder. Check that the marks are level to keep the shelves straight. Double-check your marks before moving on.
Securing Shelves With Screws
Place the shelf on the marked spots. Drill pilot holes to prevent the wood from splitting. Use screws to fix the shelf to the ladder. Tighten the screws but avoid over-tightening to keep the wood safe. Repeat for each shelf until all are secure.
Adding Finishing Touches
Adding finishing touches to your bookshelf with ladder gives it a polished look. These final steps protect the wood and add style. Small details can make a big difference in the final appearance. Take your time to complete these steps carefully.
Sealing The Wood
Sealing the wood protects it from moisture and stains. Use a clear wood sealer or varnish for a natural look. Apply thin coats with a brush, letting each dry completely. This step makes the bookshelf last longer and look better.
Sand lightly between coats to keep the surface smooth. Choose a sealer that matches the wood type. A good seal also prevents dust from settling deep in the wood.
Decorative Elements
Decorative elements add personality to your bookshelf. Consider adding metal brackets or corner protectors for style and strength. Paint the ladder in a contrasting color for a modern touch. You can also add small hooks for hanging items.
Use stencils or decals to create patterns on the shelves. Adding soft lighting inside or under the shelves creates a cozy feel. Simple decorations can make your bookshelf a unique piece in your room.
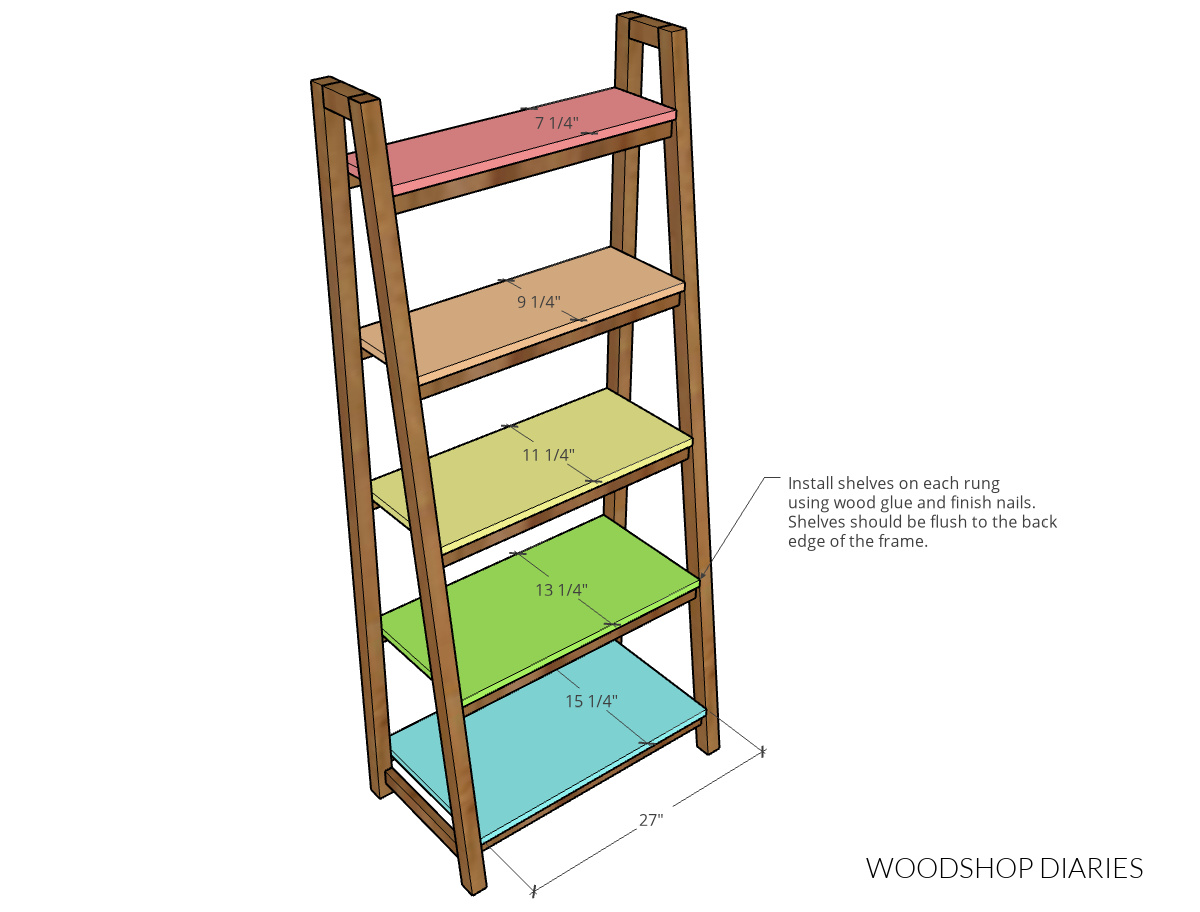
Credit: www.woodshopdiaries.com
Safety Tips And Maintenance
Building a bookshelf with a ladder is a fun project. Safety and maintenance are important parts of this work. Keeping the bookshelf safe helps prevent accidents. Regular care keeps the shelf strong and looking good. Follow simple steps to protect your bookshelf and yourself.
Proper Ladder Use
Always check the ladder before use. Make sure it is stable and clean. Place the ladder on a flat surface. Avoid leaning too far to one side. Climb carefully, holding the ladder with both hands.
Secure The Bookshelf
Fasten the bookshelf to the wall. Use strong brackets or anchors. This stops it from tipping over. Especially important if children are around. Double-check all screws and bolts are tight.
Regular Cleaning
Dust shelves often to avoid dirt build-up. Use a soft cloth or duster. Avoid wet cleaning that can harm wood. Keep the ladder dry and free of dust.
Inspect For Damage
Look for cracks or loose parts regularly. Fix small problems before they grow. Replace broken screws and worn wood. This keeps the bookshelf safe and sturdy.
Weight Distribution
Place heavy books on lower shelves. Avoid overloading the top shelves. Balance the weight evenly across the shelf. This prevents the bookshelf from tipping.
Styling Your Bookshelf
Styling your bookshelf with a ladder adds charm and function to any room. It is not just about filling shelves with books. Thoughtful styling turns your bookshelf into a focal point. You create a space that feels warm and inviting.
Mixing books with decor items brings life to the shelves. The ladder helps you reach and arrange items easily. It also adds a rustic touch that enhances the overall look.
Arranging Books
Place books both vertically and horizontally to add variety. Group books by color or size for a neat look. Leave some space between stacks to avoid clutter. Face a few books outward to show interesting covers. Use the ladder to reach higher shelves safely and adjust books as needed.
Incorporating Decor Items
Balance books with small decor pieces like plants or vases. Use picture frames or small sculptures to add personality. Keep decor items simple to avoid overpowering the books. Place items at different heights to create visual interest. The ladder also acts as a display spot for cozy throws or baskets.
Frequently Asked Questions
How Long Does It Take To Build A Bookshelf With A Ladder?
Building a bookshelf with a ladder typically takes 4 to 6 hours. This includes measuring, cutting, assembling, and finishing. Skill level and tools can affect the time needed. Planning ahead speeds up the process.
What Materials Are Needed For A Bookshelf With Ladder?
You need wood planks, screws, nails, wood glue, sandpaper, paint, and a ladder. Choose sturdy wood like pine or oak for durability. Proper tools like a drill and saw are essential for assembly.
Can Beginners Build A Bookshelf With Ladder Easily?
Yes, beginners can build a bookshelf with ladder by following step-by-step instructions. Start with simple designs and use safety gear. Practice measuring and cutting accurately to ensure a stable structure.
How To Ensure Safety When Building Bookshelf Ladder?
Wear safety goggles, gloves, and use tools properly. Secure the ladder firmly and work in a well-lit area. Follow instructions carefully and avoid rushing to prevent accidents.
Conclusion
Building a bookshelf with a ladder adds style and function to any room. You can organize books while saving space. The project is simple and satisfying to complete. Each step helps create a strong, useful shelf. Take your time and follow instructions closely.
Soon, you will enjoy a unique piece of furniture. This DIY task boosts your skills and home’s charm. Give it a try, and watch your space transform.