Looking for a smart way to upgrade your space without buying new furniture? Turning a simple bookshelf into a stylish cabinet could be the perfect solution for you.
Imagine having extra hidden storage while giving your room a fresh, organized look. In this post, you’ll discover easy steps and practical tips to transform your bookshelf quickly and affordably. Ready to unlock your bookshelf’s full potential? Keep reading to find out how!

Credit: www.youtube.com
Choosing The Right Bookshelf
Choosing the right bookshelf is the first step to turning it into a cabinet. The bookshelf must fit your space and needs well. It should be strong and look good in your room. Picking the right one makes the project easier and the result better.
Consider what material, size, and weight the bookshelf can hold. These points will help you find the best option.
Material Considerations
Wood shelves are sturdy and look classic. They hold weight well and last long. Metal shelves are strong but can be cold in style. Particleboard is cheaper but less durable. Choose a material that fits your style and use.
Size And Shape
Measure the space where you want the cabinet. The bookshelf should fit without crowding the room. Tall shelves work well for big spaces. Shorter shelves fit small rooms better. Pick a shape that matches your storage needs.
Weight Capacity
The shelf must hold heavy items once it becomes a cabinet. Check the weight limit before buying. Strong shelves prevent bending or breaking. This keeps your cabinet safe and stable.
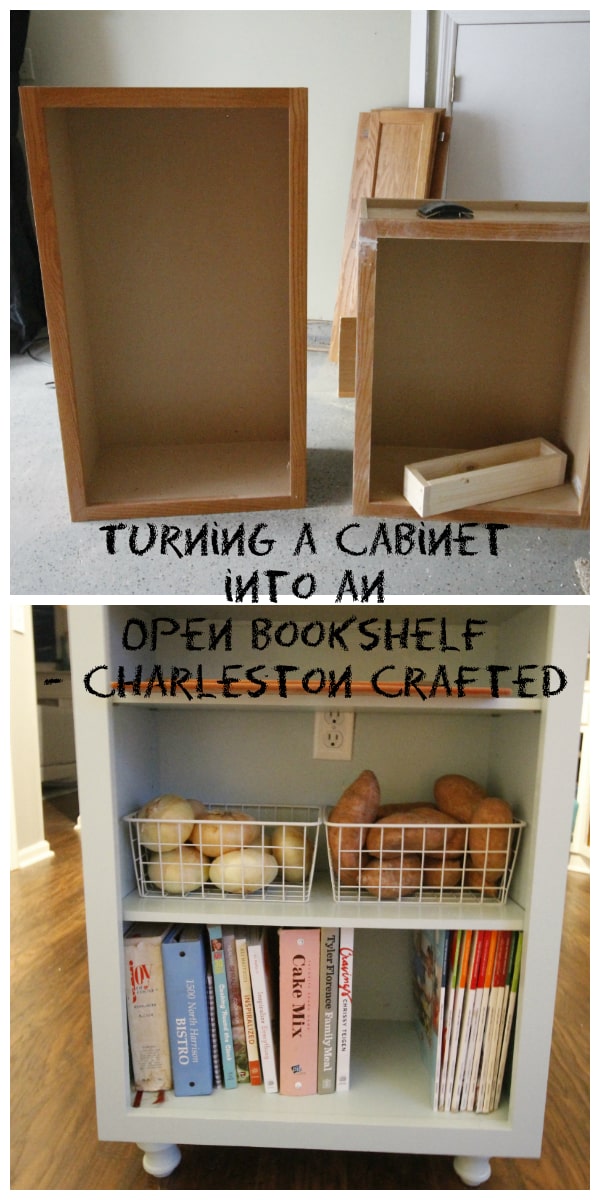
Credit: www.charlestoncrafted.com
Gathering Essential Tools And Supplies
Before starting your project, gather all the tools and supplies. Having everything ready saves time and avoids frustration. This step is important for a smooth process. Focus on the basics first, then collect materials and finishing items.
Basic Tools Needed
Prepare essential tools like a drill and screwdriver. A tape measure helps with accurate cuts and placements. Sandpaper smooths rough edges. A saw is useful for trimming wood pieces. Clamps hold parts together while working. A level ensures your cabinet doors hang straight.
Materials For Cabinet Doors
Choose wood panels or plywood for the doors. Hinges connect the doors to the bookshelf. Screws and nails secure all parts firmly. Handles or knobs make opening doors easy. Paintable or stainable wood works best for a nice finish. Pick sizes that fit your bookshelf perfectly.
Finishing Supplies
Use primer to prepare the wood surface. Paint or wood stain adds color and protection. Brush or roller helps apply finishes evenly. Clear sealant protects against scratches and moisture. Clean rags remove dust before painting. Sanding blocks smooth the final surface for a neat look.
Preparing The Bookshelf
Preparing the bookshelf is the first step to turning it into a cabinet. This stage ensures the structure is strong and smooth. It helps the final piece look clean and last longer. Spend time on this part for the best results.
Cleaning And Sanding
Start by cleaning the bookshelf with a damp cloth. Remove dust, dirt, and any sticky spots. After cleaning, sand the entire surface using medium-grit sandpaper. Sanding smooths rough areas and removes old finishes. This step helps paint or stain stick better. Wipe off the dust after sanding to keep the surface clean.
Reinforcing Shelves
Check if the shelves feel weak or wobbly. Add extra support under each shelf using wooden strips or brackets. Screw these reinforcements tightly to the frame. Strong shelves hold cabinet doors and stored items safely. Reinforcing prevents sagging and increases durability.
Removing Unnecessary Parts
Look for parts that won’t be needed, like back panels or decorative trims. Carefully remove these pieces with a screwdriver or pry bar. Clearing space makes room for new cabinet features. Removing old parts helps the bookshelf change shape easily.
Building And Installing Cabinet Doors
Building and installing cabinet doors is a key step to transform your bookshelf. It adds a clean, polished look and hides clutter. This task feels tricky but breaks down into easy parts. Follow simple steps to measure, cut, and attach doors. Choose the right hinges to make your doors work smoothly. This guide helps you create doors that fit perfectly and open with ease.
Measuring And Cutting Doors
Start by measuring the bookshelf opening carefully. Measure height and width inside the frame. Subtract a small gap for door clearance. Mark these dimensions on your wood panel. Use a saw to cut the doors to size. Smooth edges with sandpaper for a neat finish. Accurate cuts ensure the doors fit well and close properly.
Choosing Hinges
Select hinges that suit your cabinet style and weight. Concealed hinges offer a clean look. Butt hinges are easy to install and sturdy. Check the hinge size matches your door thickness. Pick hinges that allow the door to open fully. The right hinge keeps doors aligned and working smoothly.
Attaching Doors To The Bookshelf
Mark hinge locations on both doors and bookshelf frame. Drill pilot holes to avoid wood splitting. Screw hinges to the doors first, then attach to the frame. Use a level to keep doors straight. Test the doors by opening and closing them. Adjust screws to fix alignment and gaps. Proper attachment keeps doors secure and easy to use.
Adding Storage Features
Adding storage features transforms a simple bookshelf into a practical cabinet. It improves organization and keeps items easy to find. Small changes can make a big difference in how you use the space. Focus on handles, shelves, and drawers to customize your cabinet.
Installing Handles And Knobs
Handles and knobs make opening cabinet doors easier. Choose designs that match your room style. Screw them firmly onto doors or drawer fronts. This upgrade gives your bookshelf a polished, finished look. Soft-close handles add extra convenience.
Adding Shelves Or Dividers
Shelves and dividers create separate spaces inside the cabinet. Use adjustable shelves to fit different item sizes. Dividers help keep things neat and prevent clutter. Measure the interior carefully before cutting shelves. Attach them securely with brackets or shelf pins.
Incorporating Drawers
Drawers add hidden storage for small items. Choose shallow drawers for easy access. Install drawer slides for smooth opening and closing. Build custom drawers to fit your bookshelf size. Drawers keep things organized and out of sight.
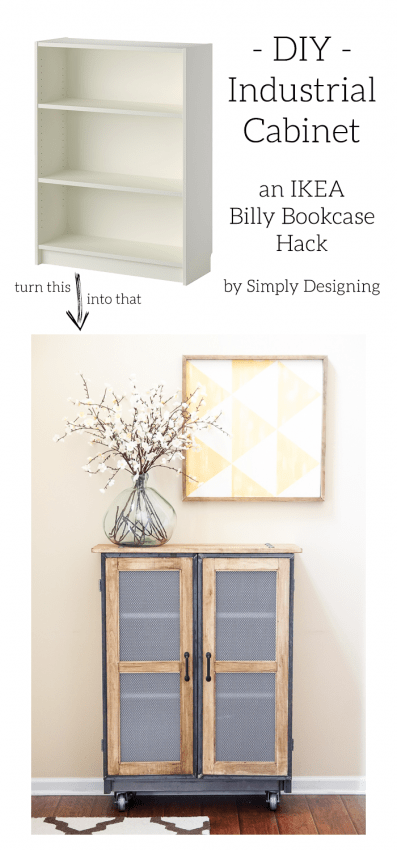
Credit: www.simplydesigning.net
Finishing Touches
Finishing touches give your bookshelf cabinet a complete, polished look. They protect the wood and improve its style. Taking time on these details makes your cabinet last longer and look great.
Painting And Staining
Choose paint or stain to match your room’s style. Paint hides wood grain and offers many colors. Stain shows the wood’s natural beauty and grain. Apply thin, even coats for best results. Let each coat dry fully before adding the next. Light sanding between coats gives a smooth finish.
Sealing For Durability
Seal your cabinet to protect it from water and wear. Use a clear polyurethane or varnish. Apply with a brush or spray in thin layers. Allow drying time between coats for strong protection. A sealed surface is easier to clean and resists scratches.
Decorative Elements
Add knobs, handles, or trim to enhance your cabinet. Choose simple or ornate styles based on your taste. Attach hardware securely to avoid loosening. You can also add molding or decals for extra charm. These small touches make your cabinet unique and stylish.
Maintenance Tips For Your New Cabinet
Maintaining your new cabinet is key to keeping it looking good and lasting longer. Simple care steps help protect the wood and hardware. Regular attention prevents small problems from growing.
Regular Cleaning
Dust the cabinet often using a soft cloth. Avoid wet or harsh cleaners. A dry or slightly damp cloth removes dust without harming the finish. Clean spills right away to stop stains.
Preventing Wear And Tear
Use coasters or mats under items to avoid scratches. Open and close doors gently to protect hinges. Avoid placing heavy objects on shelves. Keep the cabinet away from direct sunlight and heat sources.
Periodic Inspections
Check screws and hinges every few months. Tighten loose parts to keep doors aligned. Look for signs of damage like cracks or chips. Early fixes save money and effort later.
Frequently Asked Questions
How Do I Add Doors To A Bookshelf Cabinet?
To add doors, measure the bookshelf opening accurately. Choose door styles like hinged or sliding. Attach hinges or tracks, then install handles for easy access.
What Materials Are Best For Converting A Bookshelf?
Wood panels, MDF, or plywood work well. Use paint or veneer for a polished look. Select durable materials for long-lasting use.
Can I Add Shelves Inside The New Cabinet?
Yes, add adjustable or fixed shelves for organization. Use brackets or shelf pins for support. This enhances storage flexibility and usability.
How Do I Secure The Cabinet To The Wall Safely?
Use wall anchors and screws to prevent tipping. Find studs with a stud finder. Secure the cabinet firmly to ensure safety.
Conclusion
Transforming a bookshelf into a cabinet adds both style and storage. It is a simple project anyone can do with basic tools. You save money by reusing old furniture. Plus, you get a unique piece that fits your space perfectly.
Take your time and follow each step carefully. Soon, you will enjoy a neat and organized room. Why buy new when you can create something special yourself? Give it a try and see the difference it makes!