Looking for a unique way to organize your space? Imagine turning old spark plugs into a sturdy, eye-catching coat rack that sparks conversation every time someone visits.
You don’t need special skills or expensive tools—just a bit of creativity and some simple steps. In this guide, you’ll discover how to make a spark plug coat rack that’s both practical and full of personality. Ready to add a touch of industrial charm to your home?
Keep reading, and you’ll have your own custom coat rack in no time.
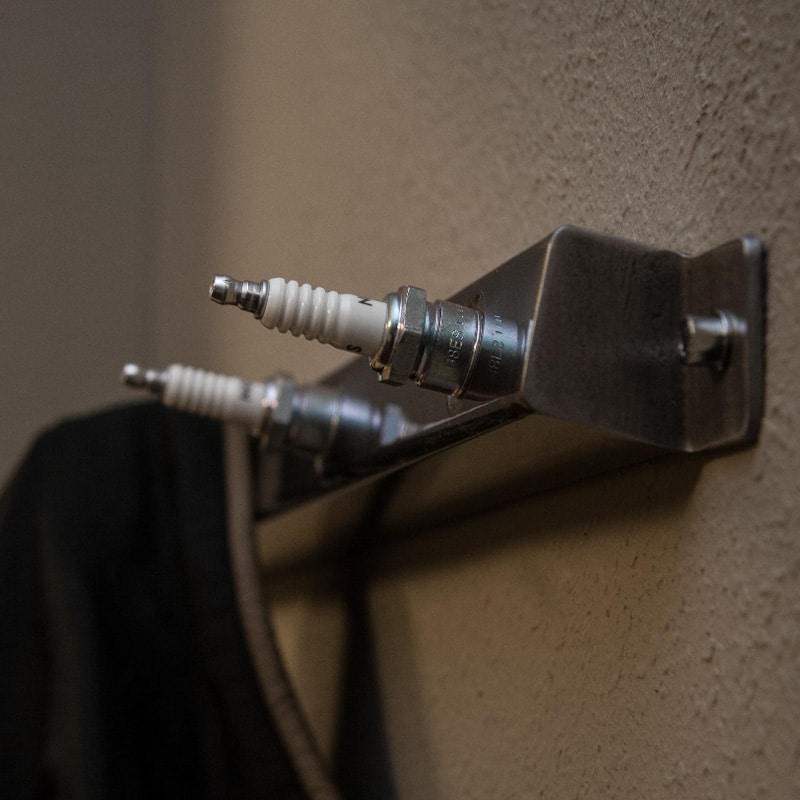
Credit: slipstreamcreations.com
Materials Needed
Gathering the right materials is the first step to create a spark plug coat rack. Choosing the correct parts and tools makes the project easier. This section breaks down everything needed to start. Focus on each category to prepare well.
Types Of Spark Plugs
Standard spark plugs are the best choice for this project. Look for used or old spark plugs in good shape. Avoid plugs with heavy rust or damage. Copper spark plugs have a classic look. Iridium or platinum plugs last longer but cost more. Select spark plugs that fit your style and size needs.
Tools Required
You will need a few basic tools to work safely and efficiently. A drill with a metal bit is necessary to make holes. A wrench or socket set helps tighten parts. Use pliers for gripping and adjusting small pieces. Sandpaper smooths sharp edges. Gloves protect your hands during assembly.
Additional Supplies
Besides spark plugs and tools, get mounting wood or metal for the base. Screws or bolts secure the spark plugs to the base. Paint or varnish can finish the rack for a polished look. Strong glue might help hold parts in place. Have a measuring tape and pencil for marking spots accurately.
Preparing The Spark Plugs
Preparing the spark plugs is the first step to make a sturdy and stylish coat rack. This part needs care and attention to get the best look and function. Clean and smooth spark plugs create a neat finish. Removing parts and safety are key to avoid damage and injury.
Cleaning And Polishing
Start by washing the spark plugs with warm, soapy water. Use a soft brush to remove dirt and grease. Dry them well using a clean cloth. Polish the metal parts with a metal polish or fine sandpaper. This makes the spark plugs shiny and smooth. Polished plugs look better and fit well in the design.
Removing Electrodes
Electrodes stick out from the spark plug and can catch on clothes. Use pliers or a small wrench to carefully remove them. Twist gently to avoid breaking the plug. Removing electrodes gives a flat surface for mounting. This step helps keep the coat rack safe and easy to use.
Safety Precautions
Wear gloves to protect your hands from sharp edges. Work in a well-lit area to see small parts clearly. Avoid using too much force to stop breaking the spark plugs. Keep tools and small parts away from children and pets. Follow these steps to stay safe and protect your project.
Designing The Rack
Designing the spark plug coat rack is an important step. It shapes how the rack looks and works. Good design helps the rack hold coats well and look nice on your wall.
Think about space, style, and how many coats you want to hang. Careful design makes the project easier and more fun.
Choosing The Layout
Pick a layout that fits your space and needs. You can arrange spark plugs in rows, circles, or random patterns. Straight lines give a clean look. Patterns add a creative touch.
Decide how many hooks you want. More hooks mean more coats but need more space. Balance style with function.
Measuring And Marking
Measure the wall space where the rack will hang. Mark spots for each spark plug carefully. Use a ruler and pencil for straight lines.
Keep equal distance between hooks. This makes the rack look neat. Double-check your marks before drilling or nailing.
Selecting The Backing Material
Choose a strong backing to hold the spark plugs and coats. Wood boards work well and look good. Metal sheets can also hold weight but may be harder to work with.
Make sure the material fits your style and wall. Smooth surfaces are easier to clean. Check the thickness to hold screws firmly.
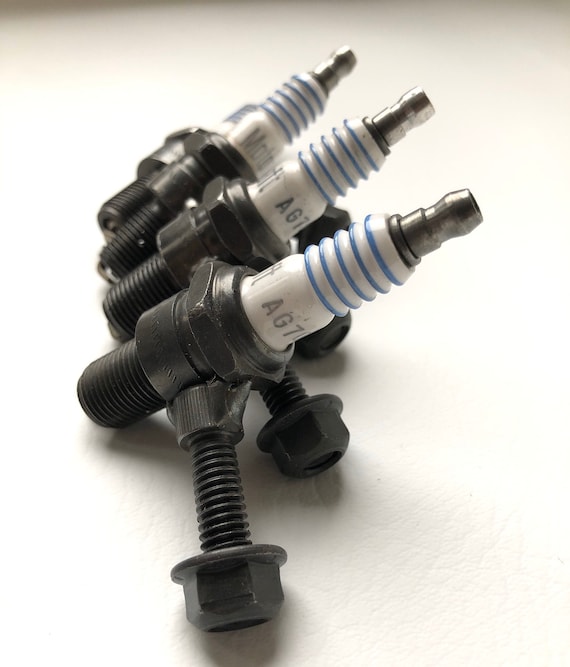
Credit: www.etsy.com
Assembling The Coat Rack
Assembling the coat rack is a fun and simple step. It brings all parts together into a useful item. Follow each step carefully to create a sturdy rack. Take your time to ensure every piece fits well.
Attaching Spark Plugs To Backing
Start by arranging the spark plugs on the backing board. Space them evenly for a balanced look. Use strong glue or screws to fix them tightly. Make sure each plug is secure and does not wobble. Let the glue dry completely before moving to the next step.
Securing Hooks Or Hangers
Choose sturdy hooks or hangers for holding coats. Attach them below or between the spark plugs. Use screws for a firm hold on the backing. Check that each hook is straight and stable. Place hooks far enough apart for easy hanging.
Ensuring Stability
Check the entire rack for stability before use. Tighten any loose screws or glue spots. Test by hanging light items first. Adjust hooks or spark plugs if needed. Make sure the rack stays firm on the wall.
Finishing Touches
Finishing touches bring your spark plug coat rack to life. They protect the wood and improve its look. These final steps make the rack strong and ready to use. Let’s explore how to paint, seal, and mount your coat rack.
Painting Or Staining
Choose paint or stain based on your room’s style. Paint adds color and hides flaws. Stain shows the wood’s natural grain. Apply thin, even coats for best results. Let each coat dry completely before the next. This helps the finish last longer and look smooth.
Adding Protective Coating
Protective coating shields the rack from water and wear. Use clear polyurethane or varnish for a strong finish. Apply with a clean brush in gentle strokes. Two or three coats work well for durability. Allow full drying time between coats to avoid sticky spots.
Mounting The Rack
Find a sturdy spot on your wall for mounting. Use a level to keep the rack straight. Mark holes for screws using the rack as a guide. Drill pilot holes to prevent wood from splitting. Secure the rack with strong screws and anchors. Check the rack’s stability before hanging items.

Credit: www.centromedicoloira.com
Creative Variations
Creative variations make your spark plug coat rack unique and eye-catching. You can change styles, add lights, or fit it into any room. These ideas help you build a rack that suits your taste and space perfectly.
Mixing Different Spark Plug Styles
Use spark plugs of various shapes and sizes. Combine old and new spark plugs for a cool, mixed look. Different colors and brands add personality. This mix creates a fun and creative design. It also shows your love for cars and DIY projects.
Incorporating Lighting Elements
Add small LED lights around the spark plugs. Lights make the rack glow softly in the dark. Use warm or cool light for different moods. Lighting highlights the spark plugs and adds charm. It also makes the rack useful at night.
Customizing For Different Spaces
Adjust the rack size to fit small or large walls. Use vertical or horizontal arrangements to save space. Choose colors that match your room decor. Add hooks or shelves for extra storage. This way, your coat rack fits perfectly anywhere in your home.
Maintenance Tips
Maintaining your spark plug coat rack keeps it strong and good-looking. Regular care helps the rack last longer and stay safe to use. Follow these simple steps to keep your rack in top shape.
Cleaning The Rack
Dust and dirt can build up on the rack. Wipe it gently with a soft cloth. Use mild soap and water for tougher spots. Avoid harsh chemicals that can damage the finish. Dry the rack well to stop rust or stains.
Checking For Wear
Look closely at the spark plugs and hooks. Check for cracks, rust, or loose parts. Make sure the rack holds weight without bending. Regular checks catch small problems early. This keeps your rack safe and strong.
Repairing Damages
Fix minor cracks with wood glue or epoxy. Tighten loose screws or bolts carefully. Replace worn spark plugs if needed. Sand rough areas and repaint for a fresh look. Quick repairs stop small issues from getting worse.
Frequently Asked Questions
What Materials Are Needed For A Spark Plug Coat Rack?
You need old spark plugs, a wooden board, screws, and hooks. Sandpaper and paint can enhance the rack’s look. Basic tools like a drill and screwdriver are also required. These materials make the coat rack durable and stylish.
How Do You Attach Spark Plugs To The Coat Rack?
Drill holes in the wooden board where you want plugs. Secure spark plugs with screws or strong adhesive. Ensure plugs are evenly spaced for balanced hanging. This method provides a sturdy and unique coat rack design.
Can I Customize The Spark Plug Coat Rack Design?
Yes, you can paint the board and spark plugs. Arrange plugs in patterns or rows for unique looks. Adding decorative elements like stencils or decals enhances style. Customization makes your coat rack fit any room decor.
Is A Spark Plug Coat Rack Durable And Functional?
Yes, spark plugs are solid and hold coats well. The wooden board adds stability and support. Proper installation ensures the rack can bear heavy items. It combines durability with a creative automotive theme.
Conclusion
Making a spark plug coat rack is simple and fun. You only need a few tools and old spark plugs. This project helps you reuse parts and save money. The rack looks unique and fits well in any room. Try this craft to add a personal touch to your space.
Enjoy creating something useful and different today.