Looking for a simple way to keep your entryway neat and organized? Creating your own door coat rack is easier than you think, and it can save you space while adding a personal touch to your home.
Imagine walking in and instantly having a spot for your coat, hat, or bag—no more clutter or lost items. In this guide, you’ll discover step-by-step how to build a sturdy, stylish coat rack that fits right on your door. Ready to transform your space with a project you’ll actually use every day?
Let’s get started!

Credit: refreshliving.us
Choosing The Right Materials
Choosing the right materials is key to making a strong and lasting door coat rack. Good materials make your project easier and the final product better. It helps your rack hold weight and look nice over time.
Focus on materials that fit your space and style. Think about how much weight the rack needs to hold. Pick items that match your skills and tools available. This way, building will be smooth and enjoyable.
Selecting Wood Types
Wood is the main part of your door coat rack. Choose wood that is strong and not too heavy. Pine is a good choice for beginners. It is soft and easy to cut. Oak is harder and lasts longer but needs more effort to work with.
Avoid very soft woods that can dent easily. Look for wood that is dry and smooth. This helps paint or stain stick well. Make sure the wood fits the size of your door and the space where you want to hang it.
Picking Hooks And Hardware
Hooks hold your coats and bags, so pick sturdy ones. Metal hooks are strong and come in many styles. Choose hooks that match your room’s look. Simple black or silver hooks fit most decors.
Check the weight limit of hooks before buying. Use screws and anchors that fit the door type. This keeps your rack safe and secure. Avoid using weak nails or glue alone for hanging hooks.
Tools Needed
Basic tools make building easier and safer. You will need a saw to cut wood. A drill helps make holes for screws and hooks. A screwdriver is needed to fix hooks in place.
Sandpaper smooths rough edges on wood. A measuring tape ensures accurate cuts and hook placement. Keep safety gear handy, like gloves and goggles. These tools help you build a neat and strong coat rack.
Measuring And Planning
Measuring and planning are the first steps to create a door coat rack. These steps help you make sure the rack fits perfectly and works well. Taking your time here saves effort later.
Start by understanding your door’s size and type. Then think about how big the rack should be. Finally, sketch your design to see how everything fits together.
Door Dimensions
Measure the door’s height and width carefully. Use a tape measure for accuracy. Note the thickness of the door too. This affects how the rack will hang.
Check if the door opens inward or outward. This helps decide the best side for the rack. Write down all these numbers before moving on.
Rack Size And Hook Placement
Decide how many hooks you need. Think about what you will hang on the rack. Place hooks evenly to avoid crowding. Leave space between hooks for large items.
Make sure the rack will not block the door handle. Keep the rack size smaller than the door width. This keeps the rack stable and balanced.
Sketching The Design
Draw a simple sketch of your rack on paper. Include the door shape and rack position. Mark where each hook will go. This visual helps avoid mistakes.
Use the sketch to check sizes again. Adjust hook spacing or rack length if needed. Keep the design clear and easy to follow.
Cutting And Preparing Wood
Cutting and preparing wood is a key step in making a door coat rack. This step shapes the wood and gets it ready for assembly. Doing this carefully ensures the rack fits well and looks great.
Marking Cut Lines
Start by measuring the wood pieces needed for your rack. Use a pencil to draw clear cut lines on the wood. Double-check measurements to avoid mistakes. Straight and accurate lines make cutting easier and cleaner.
Sanding Edges
After cutting, the wood edges will feel rough. Use sandpaper to smooth all edges and surfaces. Sand in a circular motion for even results. Smooth edges prevent splinters and give a neat finish.
Finishing Touches
Check for any leftover rough spots and sand again if needed. Wipe the wood with a dry cloth to remove dust. Now the wood is ready for staining, painting, or sealing. These finishes protect the wood and enhance its look.
Assembling The Rack
Assembling the door coat rack is a simple process that brings your project to life. This step involves adding hooks, mounting brackets, and making sure everything stays secure. Follow these clear steps to build a strong and practical rack for your door.
Attaching Hooks
Start by placing the hooks evenly along the rack. Use a pencil to mark where each hook will go. Drill small pilot holes on these marks to make screwing easier. Screw each hook tightly to the rack board. Check that all hooks face the same direction. This will make hanging coats and bags easy.
Securing Mounting Brackets
Next, attach the mounting brackets to the back of the rack. Align them so the rack will hang straight on the door. Use screws that fit the bracket holes well. Tighten screws firmly to keep the rack from moving. Make sure the brackets are strong enough to hold weight.
Ensuring Stability
Test the rack by pressing gently on different spots. It should not wobble or feel loose. Tighten any loose screws you find. Add extra screws if the rack still feels unstable. Check that the hooks and brackets hold firmly. A stable rack lasts longer and holds more items safely.
Installing On The Door
Installing a door coat rack is simple and saves space. It keeps your coats and bags organized and easy to reach. The process involves placing the rack in the right spot, attaching it securely, and making sure it holds weight well.
Positioning The Rack
Choose a spot on the door that is easy to reach. Avoid areas near the door handle or hinges. Measure the height so everyone can use the hooks comfortably. Mark the spots for screws or adhesive with a pencil. Check that the rack will not block the door from closing.
Fixing With Screws Or Adhesive
Use screws for a strong hold, especially if the rack will hold heavy items. Drill small holes in the marked spots first. Then screw the rack firmly onto the door. For lighter racks, use strong adhesive strips. Clean the door surface well before applying adhesive. Press the rack firmly and hold it for a few seconds.
Testing Weight Capacity
Hang a few coats or bags to test the rack’s strength. Make sure the door opens and closes smoothly. If the rack feels loose, tighten the screws or add more adhesive. Avoid placing too many heavy items at once. This will keep your rack safe and lasting longer.
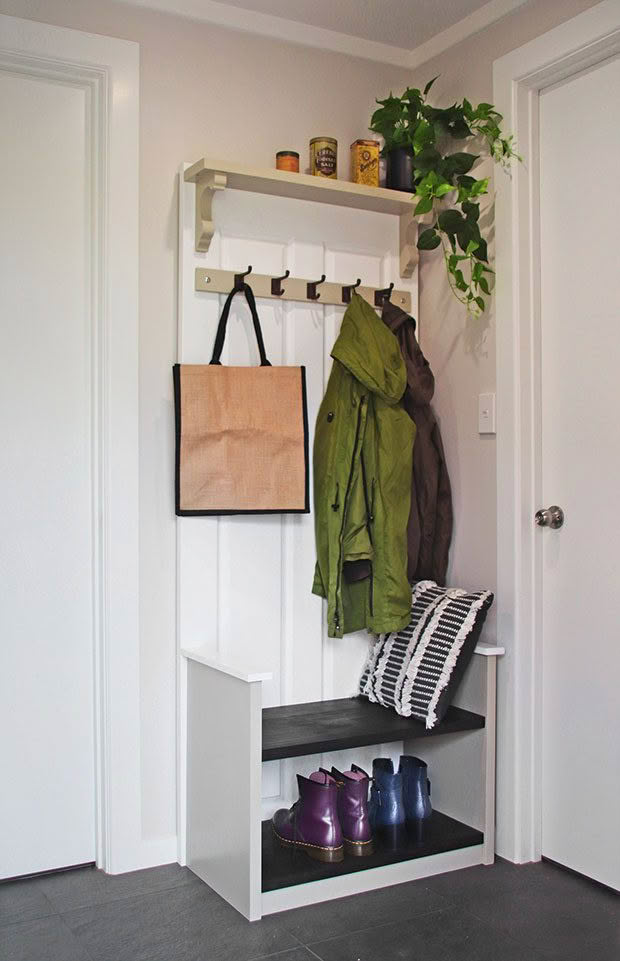
Credit: ourwayoflife.co.nz
Styling And Maintenance Tips
Styling and maintenance are key to keeping your door coat rack both useful and attractive. A well-styled rack adds charm to your space. Proper upkeep keeps it lasting longer and looking fresh. Follow these easy tips to make your rack a standout feature.
Painting And Staining Ideas
Choose paint colors that match your room’s style. Soft pastels create a calm feel. Bright colors add energy and fun. Staining wood shows its natural beauty. Use light stains for a fresh, modern look. Dark stains bring warmth and elegance. Apply a clear coat to protect the finish.
Organizing Items
Keep your rack neat by sorting items by size or use. Hang coats, hats, and scarves separately. Use hooks for bags or keys. Add small baskets for gloves or other small items. Avoid overcrowding to keep the rack tidy. A well-organized rack helps you find things fast.
Cleaning And Upkeep
Dust your rack regularly with a soft cloth. Wipe down painted or stained surfaces with mild soap and water. Dry immediately to prevent damage. Check hooks for looseness and tighten as needed. Repair scratches or chips quickly to keep it looking new. Regular care extends your rack’s life.

Credit: www.kenarry.com
Frequently Asked Questions
What Materials Do I Need For A Door Coat Rack?
You need wooden boards, hooks, screws, a drill, sandpaper, and paint or stain. These materials ensure durability and style for your rack.
How Do I Mount A Coat Rack On A Door?
Use screws or adhesive hooks to attach the rack securely. Ensure the door opens freely and the rack holds weight safely.
Can I Customize The Size Of My Door Coat Rack?
Yes, customize the rack size based on your door’s dimensions and storage needs. Measure carefully before cutting or buying materials.
What Tools Are Essential For Building A Door Coat Rack?
Essential tools include a drill, screwdriver, measuring tape, level, and a saw. These help achieve precise and sturdy assembly.
Conclusion
Creating a door coat rack is simple and useful. It saves space and keeps your home tidy. You only need basic tools and materials to start. Follow the steps carefully for best results. This project adds charm and function to any room.
Try making one yourself and enjoy the neatness it brings. A small effort can make a big difference. Your guests will notice the organized look right away. Give it a try and see how easy it is!
