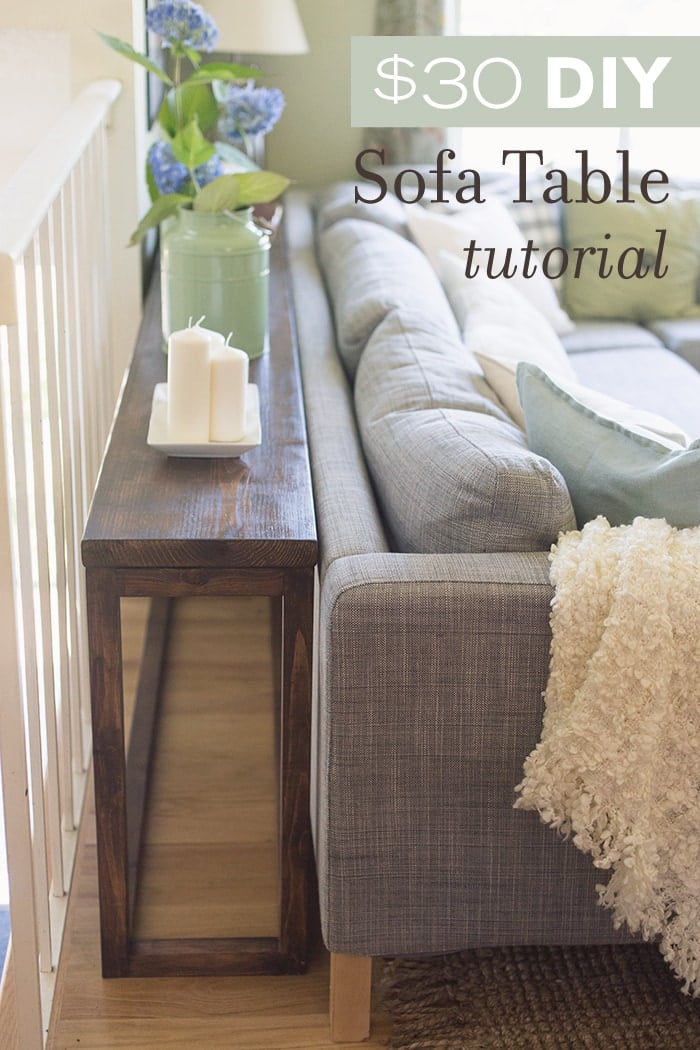
Are you looking to add a stylish touch to your space without taking up too much room? Building a skinny console table might be just what you need.
It’s a simple project that can transform any hallway, entryway, or living room corner. Imagine having a sleek, custom piece that fits perfectly in your home and shows off your personal style. In this guide, you’ll discover easy steps to create your own skinny console table, even if you’ve never built furniture before.
Ready to turn your space into something special? Let’s get started!

Credit: 100things2do.ca
Choosing The Right Materials
Choosing the right materials is key to building a skinny console table that lasts. The materials affect the table’s strength, look, and feel. Picking wood and tools carefully makes the project easier and the results better.
Selecting Wood Types
Wood choice shapes your table’s style and durability. Pine is soft, affordable, and easy to work with. Oak is strong and has a beautiful grain but costs more. Maple is smooth and hard, good for a sleek look. Choose wood that matches your budget and desired finish. Avoid very soft woods that can dent easily.
Gathering Tools And Supplies
Good tools make the building process smooth. You need a saw to cut wood precisely. A drill helps with making holes and fixing screws. Sandpaper smooths rough edges for a clean finish. Get wood glue to join parts tightly. Measuring tape and square ensure accurate dimensions. Keep safety gear like gloves and goggles ready too.
Credit: www.jennasuedesign.com
Planning Your Console Table
Planning your skinny console table is the first step to a successful build. Good planning saves time and materials. It helps you create a table that fits perfectly in your space. Focus on accurate measurements and clear design ideas. This makes the building process smooth and enjoyable.
Measuring Your Space
Start by measuring the area where the table will go. Measure the width, depth, and height of the space. Use a tape measure for accuracy. Note any nearby furniture or doorways that affect space. Write down all measurements clearly. Double-check to avoid mistakes. Consider leaving extra room for walking and movement.
Designing The Dimensions
Decide how tall, wide, and deep your table should be. Skinny tables usually have a depth of 10 to 14 inches. Height often matches other furniture, like sofas or chairs nearby. Choose a width that fits your wall or hallway. Keep proportions balanced for a neat look. Sketch your design on paper or use a drawing app. This visual helps during cutting and assembly.
Cutting And Preparing Wood
Cutting and preparing wood is the first step in building a skinny console table. This stage shapes your materials and sets the foundation for a strong, beautiful table. Proper preparation helps avoid mistakes and wasted wood.
Start by carefully measuring and marking your wood pieces. Accurate marks guide your cuts and ensure all parts fit together well. Then, smooth the edges with sanding. This step removes splinters and rough spots. Clean, smooth wood makes the table safer and nicer to touch.
Marking And Measuring Cuts
Use a tape measure to find the exact lengths needed. Mark lines clearly with a pencil on the wood surface. Double-check each measurement before cutting. Use a square to keep your lines straight and angles correct. Precise marks help you cut clean, straight pieces for the table.
Sanding For Smoothness
Start sanding with medium-grit sandpaper to remove roughness. Sand along the wood grain to avoid scratches. Finish with fine-grit sandpaper for a smooth surface. Pay attention to edges and corners. Smooth wood feels good and looks professional on your console table.
Assembling The Frame
Assembling the frame is the next step to build your skinny console table. This part gives your table its shape and strength. A well-built frame keeps the table steady and lasting. Follow simple steps to join the parts and make the frame solid.
Joining Legs And Supports
Start by preparing the legs and support pieces. Align the legs with the supports carefully. Use wood glue on the contact points for extra hold. Screw the legs to the supports using a drill. Make sure the screws go in straight. Check if the legs stand evenly after joining.
Ensuring Stability
Check the frame for any wobble or loose parts. Tighten screws if needed. Add corner braces for stronger joints. Use a level tool to keep the frame balanced. Let the glue dry fully before moving on. A stable frame means your table will last longer.
Adding The Tabletop
Adding the tabletop is a key step in building your skinny console table. The tabletop not only provides a surface but also defines the table’s look. It needs to be secure and smooth. Follow these simple steps to attach and finish the tabletop properly.
Securing The Surface
Place the tabletop on the base carefully. Make sure it fits well and is centered. Use wood screws to attach the tabletop to the frame. Drill pilot holes first to avoid splitting the wood. Tighten screws evenly to keep the surface flat and stable. Check that the tabletop does not wobble or move.
Finishing Edges
Sand the edges of the tabletop to remove rough spots. Use fine-grit sandpaper for a smooth finish. Round the corners slightly for safety and style. Apply edge banding if you want a clean, polished look. Seal the edges with paint or varnish to protect against moisture. Smooth edges give your table a neat, finished appearance.
Painting And Finishing Touches
Painting and finishing touches give your skinny console table a polished look. These steps protect the wood and improve its appearance. Choosing the right paint or stain sets the tone. Applying a protective coating keeps the surface safe and durable.
Choosing Paint Or Stain
Select paint for bold, solid colors. Paint hides wood grain and offers many color choices. Stain highlights the wood’s natural beauty. It brings out patterns and adds warmth. Consider the room’s style and your taste. Test a small area before applying fully. Use smooth, even strokes for the best results.
Applying Protective Coating
Protective coating guards against scratches and spills. Use polyurethane or varnish for strong protection. Apply thin coats with a clean brush. Let each coat dry fully before the next. Lightly sand between coats to smooth the surface. This step ensures a long-lasting finish and keeps your table looking fresh.
Styling Your Console Table
Styling your skinny console table can make a small space feel warm and inviting. The right decor adds personality without clutter. Choose items that balance function and beauty.
Keep the look simple. A few well-chosen pieces highlight the table’s slim design. Think about color, texture, and height to create interest.
Decor Ideas For Small Spaces
Use vertical decor like tall vases or slim lamps. They draw the eye up and save surface space. Small plants add life without taking much room. A stack of books or a small tray helps organize essentials. Mirrors above the table make the room look bigger. Choose light colors to keep the area bright and airy.
Maintaining Your Table
Dust your console table weekly to keep it fresh. Use a soft cloth to avoid scratches. Avoid placing wet items directly on the surface. Use coasters or mats to protect the finish. Check for loose screws or joints often. Tighten them to keep the table sturdy. Clean spills quickly to prevent stains and damage.
Credit: www.reddit.com
Frequently Asked Questions
What Materials Are Best For A Skinny Console Table?
Wood like pine or oak is ideal due to durability. Plywood is cost-effective and lightweight. Choose materials that suit your design and budget.
How Do I Measure Space For A Skinny Console Table?
Measure the wall length and available depth. Leave extra space for walking and furniture clearance. Accurate dimensions ensure a perfect fit.
Can I Customize The Height Of A Skinny Console Table?
Yes, adjust leg length or tabletop thickness. Custom height improves comfort and usability. Tailor it to match your room’s style.
What Tools Are Essential For Building A Skinny Console Table?
Basic tools include saw, drill, screws, measuring tape, and sandpaper. These ensure precise cuts and sturdy assembly. Safety gear is also important.
Conclusion
Building a skinny console table can be simple and fun. You only need a few tools and some basic wood. Take your time with each step to get good results. This table fits well in small spaces and adds style to any room.
Try customizing it with paint or stain for a personal touch. Enjoy making furniture that suits your home perfectly. Keep practicing, and your skills will grow. Start your project today and see how rewarding it feels.