Are you planning to design a bunk bed but don’t know where to start? Drawing a bunk bed in plan view might seem tricky, but with the right steps, you can create a clear and accurate design.
Whether you want to build your own or just visualize the space better, this guide will help you draw your bunk bed plan easily. By the end, you’ll have a simple, effective drawing that makes your project straightforward and stress-free.
Keep reading to discover how to turn your ideas into a perfect bunk bed plan!
Credit: store.motherearthnews.com
Choosing The Right Scale
Choosing the right scale is key to drawing a clear bunk bed plan. Scale helps show the bed’s size and space on paper. It makes the drawing easy to read and use. A good scale keeps the plan accurate and neat.
This step avoids confusion about measurements. It also helps when sharing the plan with others. Picking a scale depends on your paper size and room details. Smaller paper needs a smaller scale. Larger paper can show more detail with a bigger scale.
Common Scales For Floor Plans
Many people use 1:50 scale for floor plans. This means 1 cm on paper equals 50 cm in real life. Another popular scale is 1:100, where 1 cm shows 1 meter. Use 1:50 for more detail and 1:100 for a bigger area.
For bunk beds, 1:20 or 1:25 scales also work well. These scales show the bed clearly and fit on regular paper. Choose a scale that fits your drawing space and shows the bed’s parts.
Scaling Tips For Accuracy
Measure the bunk bed carefully before drawing. Use a ruler that matches your chosen scale. Mark key points like bed length, width, and height. Draw light lines first to adjust if needed.
Double-check measurements and scale marks often. Keep your lines straight and clean. Use a scale ruler to convert real sizes to paper size. This helps avoid mistakes and keeps your plan precise.
Gathering Necessary Tools
Gathering the right tools is the first step to draw a clear bunk bed plan. Using good tools makes the drawing accurate and neat. Both traditional and digital tools work well for this task. Choose what fits your style and skills.
Essential Drafting Tools
Start with a good pencil for easy corrections. A ruler or scale helps keep lines straight and measurements correct. Use a compass to draw circles, like bedposts or curves. A protractor measures angles accurately. Graph paper guides your drawing and keeps proportions right. An eraser cleans mistakes without damaging the paper. A sharpener keeps your pencil ready for fine details.
Software Options For Digital Plans
Drawing software makes editing and sharing easy. Programs like AutoCAD offer precise tools for detailed plans. SketchUp is simple for 3D bunk bed models. Free tools like Sweet Home 3D suit beginners. These apps allow zooming and layering for better control. Save your work often to avoid losing progress.
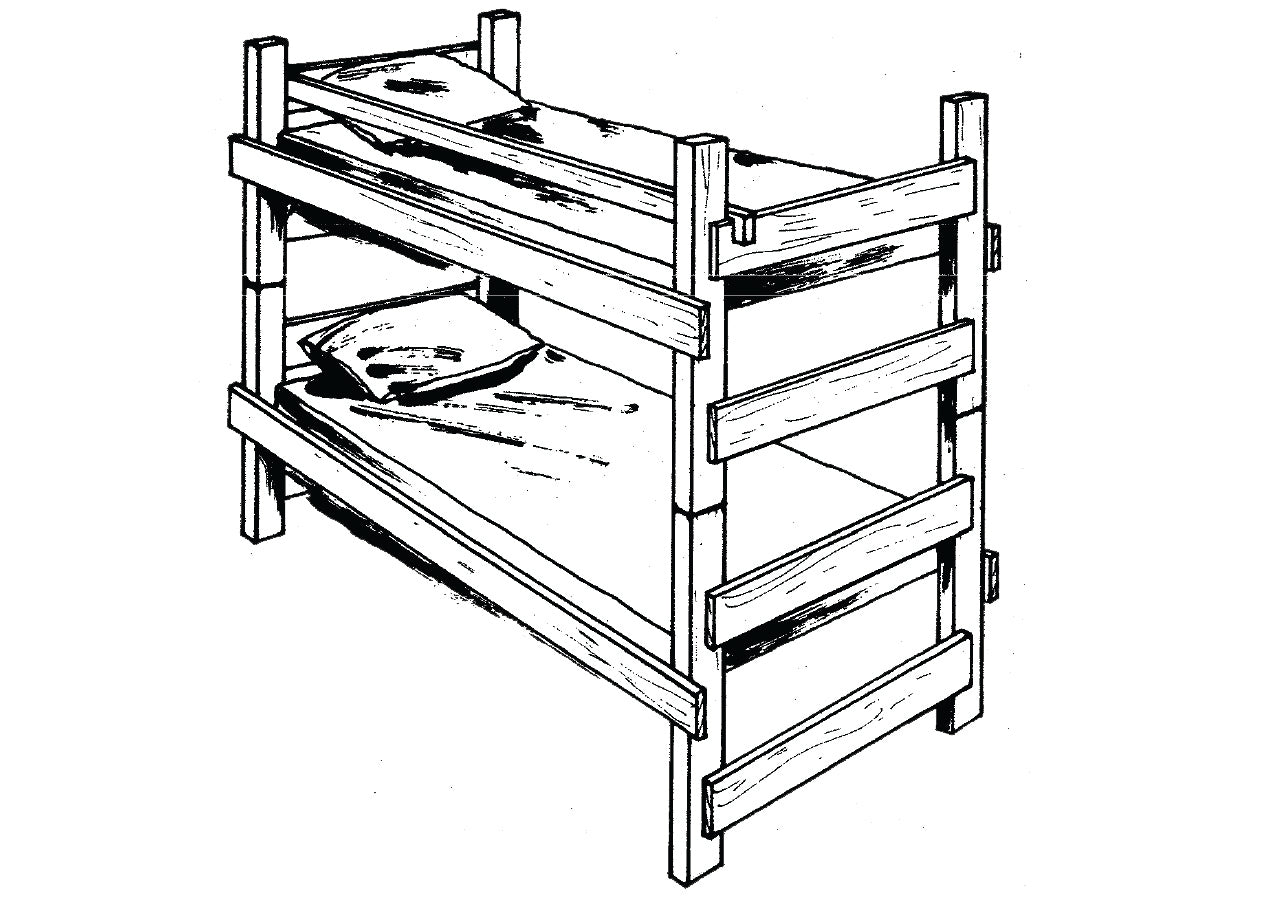
Basic Bunk Bed Components
Drawing a bunk bed plan starts with understanding its basic parts. Each component plays a key role in safety and comfort. Knowing these parts helps you create a clear, accurate drawing.
Focus on the frame, ladders, guardrails, and mattress size. These details ensure your plan looks realistic and works well for builders or buyers.
Frame And Structure
The frame is the bunk bed’s main support. It holds the entire bed steady. Usually made from wood or metal for strength. The frame includes vertical posts and horizontal beams. These parts connect to form a solid shape. Make sure to show all beams and joints in your plan. The frame’s height and width must fit the room size.
Ladders And Guardrails
Ladders let people climb to the top bunk safely. They attach firmly to the frame. Ladders can be straight or angled. Guardrails protect sleepers from falling off the top bunk. They run along the bed’s sides. Draw guardrails with enough height to keep users safe. Both ladders and guardrails need clear space around them for easy use.
Mattress Dimensions
Mattress size affects the bed’s overall dimensions. Most bunk beds fit standard twin mattresses. A twin mattress measures about 39 by 75 inches. Some designs use full-size mattresses too. Show mattress length, width, and thickness on the plan. This helps with choosing the right bedding and frame size. Accurate mattress dimensions make the bunk bed comfortable and safe.
Sketching The Outline
Sketching the outline is the first step in drawing a bunk bed plan. This step helps you set the basic shape and size. It makes the drawing clear and easy to follow. Start with light lines. They are easy to change later. Focus on the main parts of the bunk bed. This way, the plan will look neat and organized.
Keep the drawing simple. Avoid too many details at this stage. The goal is to show the structure and position of each part. You will add details after the outline is ready.
Drawing The Bed Frame
Begin by sketching two rectangles. These represent the top and bottom beds. Make sure they are the same size. Space them evenly. Draw straight lines to connect the corners. These lines form the frame. Use a ruler for accuracy. Keep the lines light. You can erase or adjust them later.
Positioning The Ladder
Next, draw the ladder on one side of the bunk bed. Use two parallel lines for the sides. Add small horizontal lines for the steps. Space the steps evenly. The ladder should be easy to climb. Position it where it does not block the bed frames. Check the height matches the top bed.
Marking Safety Features
Safety is important in bunk bed design. Draw guardrails around the top bed. Use lines parallel to the bed frame. Make sure the rails are tall enough to prevent falls. Mark the space between the rails. It should be small enough to keep children safe. Add a solid base under the bottom bed. This shows stability in your plan.
Adding Details To The Plan
Adding details to your bunk bed plan helps make the drawing clear and useful. Details show how the bed will look and what materials to use. This step improves understanding for builders or anyone who sees the plan.
Focus on small but important parts. These include mattresses, pillows, materials, and measurements. Each detail adds value and makes the plan complete.
Including Mattress And Pillows
Draw the mattress shapes on each bunk. Use simple rectangles to show their position. Add small pillow shapes at the head of each mattress. This shows comfort elements clearly. It also helps check the size and fit of the sleeping area.
Indicating Materials
Mark the materials on the plan. Use labels or simple notes for wood, metal, or other supplies. This tells builders what to buy and use. It avoids confusion about the bed’s strength and style. Different materials change the look and feel of the bed.
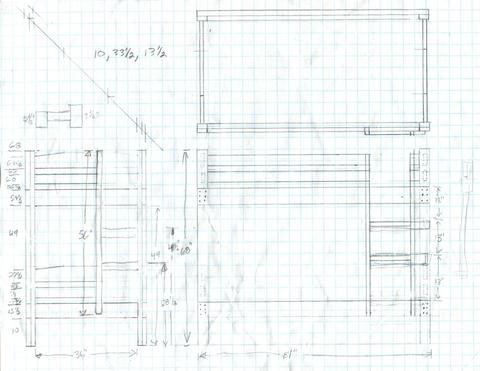
Labeling Dimensions
Write the exact length, width, and height of each part. Use arrows and lines to point out measurements. Clear dimensions ensure the bed fits the room. They help avoid mistakes during construction. Always double-check numbers for accuracy.

Credit: www.tamifaulknerdesign.com
Ensuring Proportions And Spacing
Ensuring proportions and spacing is key when drawing a bunk bed in plan. Proper spacing makes the design safe and comfortable. It also helps the bed fit well in the room. Every part must have the right size and distance. This section covers clearance between beds and headroom considerations.
Clearance Between Beds
Clearance between the top and bottom bed is very important. It should be enough for a person to sit up comfortably. A gap of at least 30 inches is ideal. This space prevents a cramped feeling and avoids bumps. Measure carefully to keep this distance consistent across the plan. Mark this clearance clearly in your drawing.
Headroom Considerations
Headroom is the space above the top bunk. It must allow a person to sit or move without hitting the ceiling. A minimum of 33 to 36 inches is recommended. Check the room’s ceiling height before drawing. Adjust the bunk bed height to fit well with the ceiling. Proper headroom improves comfort and safety in the plan.
Finalizing The Design
Finalizing the design of your bunk bed plan is a crucial step. This phase ensures your drawing is clear and ready for use. It involves checking details, making necessary changes, and preparing the design for sharing or building.
Reviewing For Accuracy
Check all measurements carefully. Verify the height, width, and length match your needs. Look for any missing details like ladder placement or guardrails. Confirm all parts fit well together. Accuracy prevents mistakes during construction.
Making Adjustments
Fix any errors found during the review. Adjust the size or position of components as needed. Ensure the design is safe and comfortable. Simplify complex areas to make building easier. Small changes improve the overall plan quality.
Preparing For Presentation
Clean up your drawing by removing extra marks. Use clear labels for each part of the bunk bed. Choose a neat layout to make the plan easy to read. Add notes if needed to explain special features. A well-presented plan helps others understand your design.
Credit: woodgears.ca
Frequently Asked Questions
How To Start Drawing A Bunk Bed In Plan View?
Begin by sketching the outer frame to scale. Add mattress outlines and ladder placement. Use clear lines for headboards and guardrails to enhance detail.
What Are The Key Dimensions For Bunk Bed Plans?
Include overall length, width, and height. Note mattress sizes and clearance between beds. Ensure ladder width and safe guardrail heights are shown accurately.
How To Represent Ladder And Guardrails In Plan Drawing?
Draw the ladder as a series of parallel lines beside the bed frame. Mark guardrails with thicker lines or shaded areas along the top bunk’s edges.
Which Tools Help Create Accurate Bunk Bed Plans?
Use graph paper or CAD software for precision. A ruler, pencil, and eraser help refine sketches. Digital tools allow easy scaling and adjustments.
Conclusion
Drawing a bunk bed in plan does not have to be hard. Follow the simple steps to create a clear, accurate design. Focus on measurements and basic shapes for the best results. Practice helps you improve your drawing skills over time.
Use this guide to build your confidence and complete your project. Keep your plan neat and easy to read. Soon, you will draw bunk beds like a pro. Enjoy the process and keep learning new techniques.