Are you looking to save space and create a cool, functional area in your room? Building a bunk bed with a desk underneath is a smart way to do just that.
Imagine having a cozy bed above and a handy workspace below—all in one piece of furniture you built yourself. This setup not only maximizes your room but also gives you a personal spot for studying, working, or hobbies. In this guide, you’ll discover simple steps and tips to build your own bunk bed with a desk, even if you’re new to DIY projects.
Ready to transform your space? Let’s get started!
Choosing The Right Design
Choosing the right design for your bunk bed with a desk is a key step. The design affects comfort, space use, and style. Picking a design that fits your room and needs makes the build easier and more functional.
Types Of Bunk Bed Desk Combos
Bunk bed desk combos come in many styles. Loft beds raise the sleeping area to create room below for a desk. Some have desks attached to the side. Others include shelves or drawers. Choose a type that fits your daily tasks and room shape.
Measuring Your Space
Measure the room carefully before picking a design. Note the height, width, and length available. Leave space for movement and chair placement. Small rooms need compact designs. Larger spaces allow more options and extra storage.
Selecting Materials
Pick materials that are strong and safe. Wood is common and offers durability and warmth. Metal frames are sturdy and modern-looking. Consider smooth finishes to avoid splinters. Materials should suit your budget and style preference.
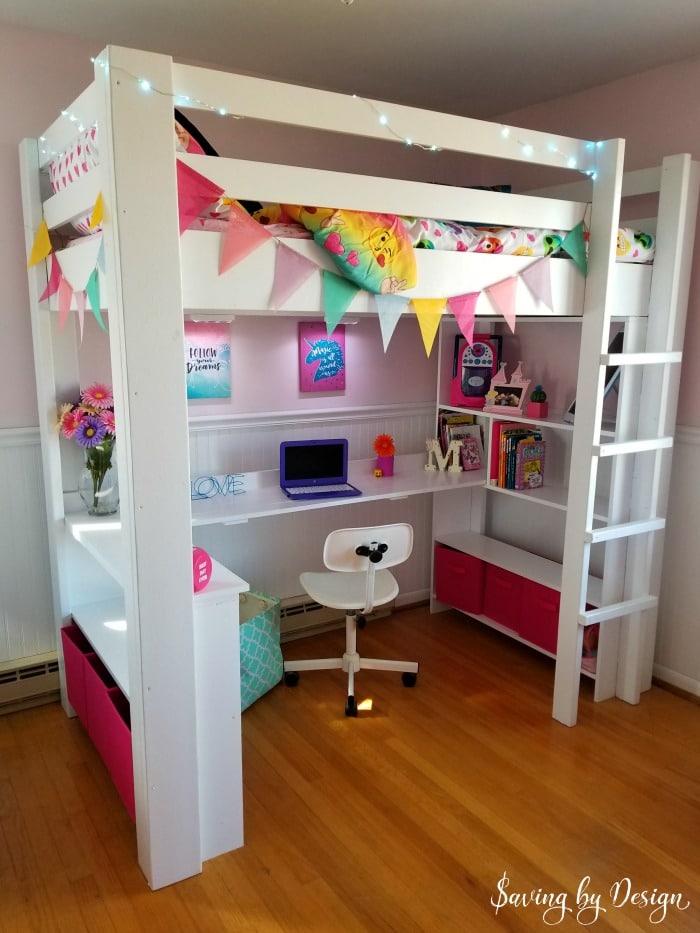
Credit: savingbydesign.com
Gathering Tools And Supplies
Gathering the right tools and supplies is the first step to build a bunk bed with a desk. Having everything ready saves time and makes the project smoother. It also helps avoid trips to the store during work. Knowing what you need keeps the process clear and simple.
Prepare your workspace before starting. A clean, flat area is best. Organize tools and materials for easy access. This helps you stay focused and work safely.
Essential Tools List
- Measuring tape for accurate dimensions
- Power drill to make holes and drive screws
- Screwdriver set for tightening screws
- Hand saw or circular saw to cut wood
- Level to ensure surfaces are even
- Clamps to hold pieces together securely
- Sandpaper or electric sander for smooth edges
- Carpenter’s square to check right angles
Materials Checklist
- Wood boards for the bed frame and desk
- Wood screws and bolts for strong joints
- Wood glue for added strength
- Paint or wood stain for finishing
- Desk surface material (wood or laminate)
- Safety brackets or guardrails for the bed
- Drawer slides or shelves if adding storage
- Wood filler to cover holes or imperfections
Safety Equipment
- Safety goggles to protect your eyes
- Work gloves to protect your hands
- Dust mask to avoid breathing sawdust
- Ear protection if using loud power tools
- Proper footwear to protect your feet
- First aid kit nearby for emergencies
Preparing The Workspace
Preparing the workspace is the first step to building a bunk bed with a desk. A clean and organized area makes the process easier and safer. Taking time to set up properly helps avoid mistakes and saves time later.
Clearing The Area
Start by removing all items from the building space. Clear away furniture, toys, and other objects. Make sure the floor is clean and free of dust. A clear area allows you to move freely and handle materials safely. It also prevents damage to your belongings.
Organizing Materials
Gather all tools and materials before starting. Sort wood, screws, nails, and brackets by type. Keep similar items together in containers or boxes. Having everything ready saves time during construction. It also reduces the chance of losing small parts.
Setting Up Workstations
Create different zones for cutting, drilling, and assembling. Use a sturdy table or workbench for cutting wood. Keep your tools within easy reach. Set up a clean area for assembling the bunk bed. A well-planned workspace helps keep the project smooth and organized.
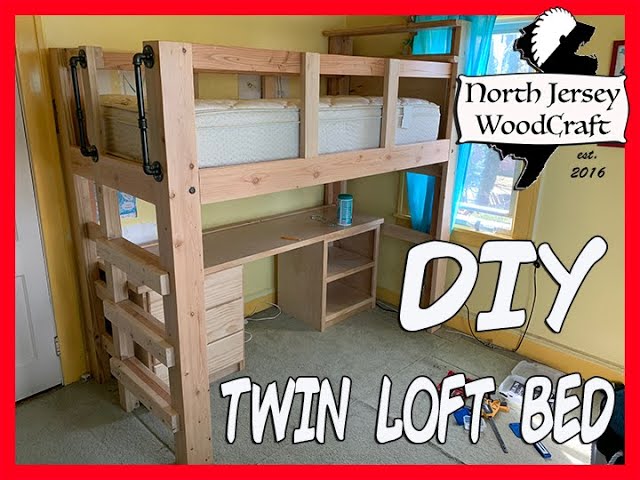
Credit: www.youtube.com
Building The Bed Frame
Building the bed frame is the first big step in creating a bunk bed with a desk. A strong frame ensures safety and durability. Take your time to measure and cut wood carefully. Follow each step to build a stable base for the bed and desk.
Cutting Wood Pieces
Start by measuring all wood pieces according to your plan. Use a saw to cut the wood to the right sizes. Cut the side rails, legs, slats, and desk parts. Label each piece to keep track. Smooth the edges with sandpaper to avoid splinters.
Assembling The Frame
Lay out the cut wood pieces on a flat surface. Begin by joining the side rails to the legs. Use clamps to hold pieces in place. Attach the horizontal slats where the mattress will rest. Make sure the frame is square and level before moving on.
Securing Joints
Use screws and wood glue to secure all joints tightly. Drive screws slowly to avoid splitting the wood. Double-check each corner for firmness. Reinforce the desk area with extra supports. Strong joints keep the bed safe for use.
Constructing The Desk Area
Constructing the desk area for your bunk bed adds both function and style. This space saves room and gives a cozy spot for work or study. You will build the desk surface first, then add shelves and storage. Lastly, you attach the desk to the bunk bed frame. Each step is simple to follow.
Desk Surface Assembly
Start by cutting a sturdy board for the desk surface. Use wood that is smooth and strong. Sand all edges to avoid splinters. Drill holes for screws at even intervals. Attach support beams under the desk for stability. Make sure the desk surface is level and secure.
Adding Shelves And Storage
Measure the space around the desk for shelves. Cut shelves from the same wood type as the desk surface. Attach brackets to the wall or frame for support. Place shelves at different heights for easy access. Consider adding small cubbies or drawers for extra storage. This keeps the desk area neat and organized.
Attaching Desk To Frame
Align the desk surface with the bunk bed frame carefully. Use strong screws to attach the desk securely. Check that the desk does not wobble or move. Reinforce corners with metal brackets if needed. Confirm the desk supports weight without bending. This step ensures safety and durability.
Finishing Touches
Building a bunk bed with a desk is a smart way to save space in a small room. It combines sleeping and working areas without taking extra space. To make this setup more useful, focus on organizing and adding features that improve both space and function.
Maximizing space and functionality means using every inch wisely. Think about storage, lighting, and keeping the desk neat. These small changes make the space easier to use and more comfortable.
Organizing Desk Accessories
Keep the desk clear by using small containers for pens, papers, and tools. Use drawer dividers to separate items and avoid clutter. A clean desk helps you focus and work better. Store only what you need daily on the desk surface. This keeps the area open and inviting.
Using Vertical Storage
Use the wall space above the desk for shelves or pegboards. Hang baskets or hooks to hold books and supplies. Vertical storage frees up the desk and floor space. It also makes it easy to find things without searching. Choose tall shelves to use the height of the room well.
Lighting Options
Good lighting is key for a desk area. Use a small desk lamp with adjustable brightness. Clip-on lights save space and can be moved as needed. Natural light is best, so place the bed near a window if possible. Soft, warm light reduces eye strain and creates a cozy space.
Maximizing Space And Functionality
Building a bunk bed with a desk is a smart space saver. Keeping it safe and in good shape is key. Regular care helps the bed last longer and keeps everyone safe. Follow these simple tips to maintain your bunk bed and desk combo.
Regular Inspections
Check the bed and desk parts often. Look for loose screws, cracks, or worn-out pieces. Tighten any loose bolts or screws. Fix or replace broken parts right away. This stops accidents and keeps the bed sturdy.
Weight Limits
Know the weight limit of your bunk bed. Do not let anyone go over this limit. Too much weight can cause the bed to break. This is especially important for the top bunk. Follow the manufacturer’s guidelines carefully.
Cleaning Recommendations
Keep the bunk bed and desk clean. Dust and dirt can wear down the materials. Use a soft cloth and mild soap for cleaning. Avoid harsh chemicals that can damage the finish. Clean regularly to keep the bed looking new and safe.
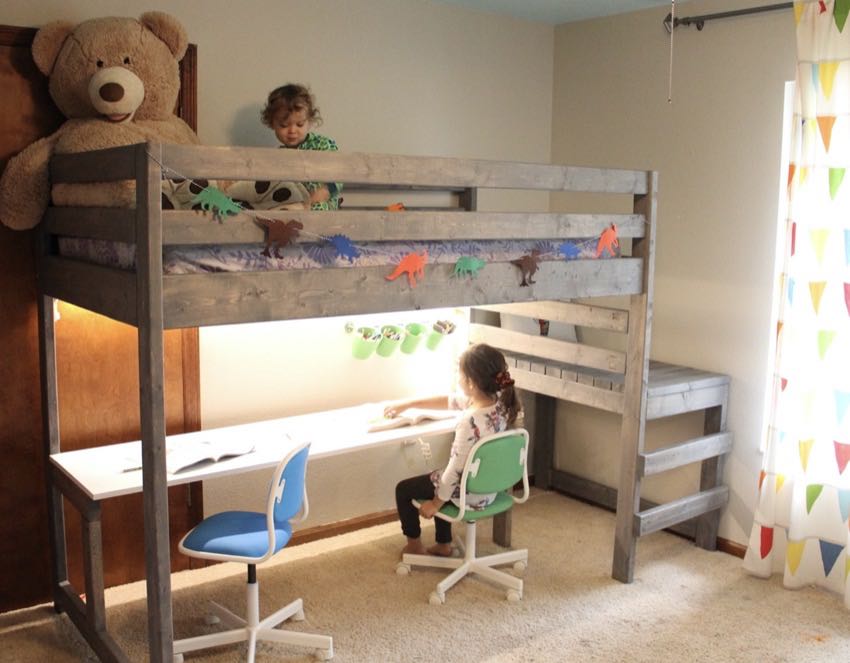
Credit: www.protoolreviews.com
Frequently Asked Questions
What Materials Do I Need To Build A Bunk Bed With A Desk?
You need plywood or solid wood, screws, wood glue, paint, and brackets. Also, gather tools like a drill, saw, measuring tape, and sandpaper. Choosing sturdy materials ensures safety and durability for both the bed and desk.
How Long Does It Take To Build A Bunk Bed With Desk?
Building a bunk bed with a desk usually takes 1 to 3 days. This depends on your skill level, tools, and complexity of the design. Planning and preparation can reduce construction time significantly.
What Safety Tips Should I Follow When Building A Bunk Bed?
Ensure all joints are secure and use sturdy wood. Sand all surfaces to avoid splinters. Install guardrails on the top bunk and check weight limits. Always double-check stability before use.
Can I Customize The Desk Size Under The Bunk Bed?
Yes, customizing the desk size is possible to fit your space. Measure the available area carefully and adjust desk dimensions accordingly. Custom desks improve comfort and functionality.
Conclusion
Building a bunk bed with a desk saves space and adds function. It gives kids a cozy place to sleep and study. Follow each step carefully for a safe, sturdy result. Use quality materials and check all connections often. This project brings comfort and order to any room.
Enjoy the pride that comes with making furniture yourself. Now, your room feels bigger and more organized. Simple tools and patience make the job easier. Give it a try and see the difference!