Looking for a simple way to organize your books without spending a lot? You’re in the right place.
Making a small, cheap adjustable bookshelf is easier than you think. Imagine having a custom shelf that fits perfectly in your space and changes as your collection grows. In this guide, you’ll learn step-by-step how to build one using affordable materials.
By the end, you’ll have a practical, stylish bookshelf that feels like it was made just for you. Ready to start? Let’s dive in!

Credit: www.youtube.com
Materials And Tools
Gathering the right materials and tools is key to building a small, cheap adjustable bookshelf. Choosing affordable wood and basic tools keeps the project simple. The right supplies make assembly smooth and fast. This section breaks down what you need.
Affordable Wood Options
Pine is a popular choice for budget shelves. It is soft, easy to cut, and widely available. plywood offers strength and cost-efficiency. Look for 3/4-inch thickness for sturdy shelves. MDF is smooth and cheap but heavier. Choose wood that fits your budget and skills.
Essential Tools List
A saw is necessary to cut wood to size. A power drill speeds up screwing and hole making. A screwdriver works for small adjustments. Sandpaper smooths rough edges and surfaces. A tape measure ensures accurate cuts. Clamps hold pieces together during assembly.
Additional Supplies
Screws and nails hold the bookshelf parts firmly. Wood glue adds extra strength to joints. Shelf pins allow adjustable shelf heights. Paint or wood stain improves the look and protects wood. Brushes or rags help apply finishes evenly.
Planning Your Bookshelf
Planning your bookshelf is the first step to a successful project. It helps save time and money. Careful planning ensures the bookshelf fits your space and needs. It also makes the building process easier and more enjoyable.
Choosing The Right Dimensions
Measure the space where the bookshelf will go. Think about the height, width, and depth. Keep in mind the size of your books. Make sure the shelves are not too deep or too tall. This helps use space well and keeps the shelf stable.
Designing Adjustable Shelves
Adjustable shelves let you change the height between shelves. This is useful for big and small books. Use shelf pins or brackets that fit into holes on the sides. Space the holes evenly for more options. Make sure the shelves are strong enough to hold your books.
Sketching Your Project
Draw a simple sketch of your bookshelf design. Include the overall size and shelf positions. Mark where the adjustable holes will go. Use a pencil so you can change the drawing. A clear plan helps avoid mistakes during building.
Cutting And Preparing Wood
Cutting and preparing wood is the first step in building your adjustable bookshelf. This stage shapes the wood pieces that will hold your books. Proper preparation makes assembly easier and ensures a strong, neat shelf.
Take your time with measurements and cuts. Precision now saves effort later. Safety matters during cutting. Smooth edges prevent splinters and improve the look of your shelf.
Measuring And Marking
Use a tape measure to get exact lengths. Double-check each measurement before marking. Draw clear, straight lines with a pencil. Mark all wood pieces for shelves and sides. Accurate marks guide clean, straight cuts.
Safe Cutting Techniques
Wear safety goggles and gloves to protect yourself. Use a saw suitable for the wood type. Cut slowly and steadily along the marked lines. Keep your fingers away from the blade. Secure the wood to avoid slipping during cuts.
Sanding And Finishing Edges
Sand all cut edges with medium-grit sandpaper first. Smooth rough spots and remove splinters. Follow with fine-grit sandpaper for a polished finish. Rounded edges prevent scratches and improve shelf safety. Clean dust before moving to assembly.
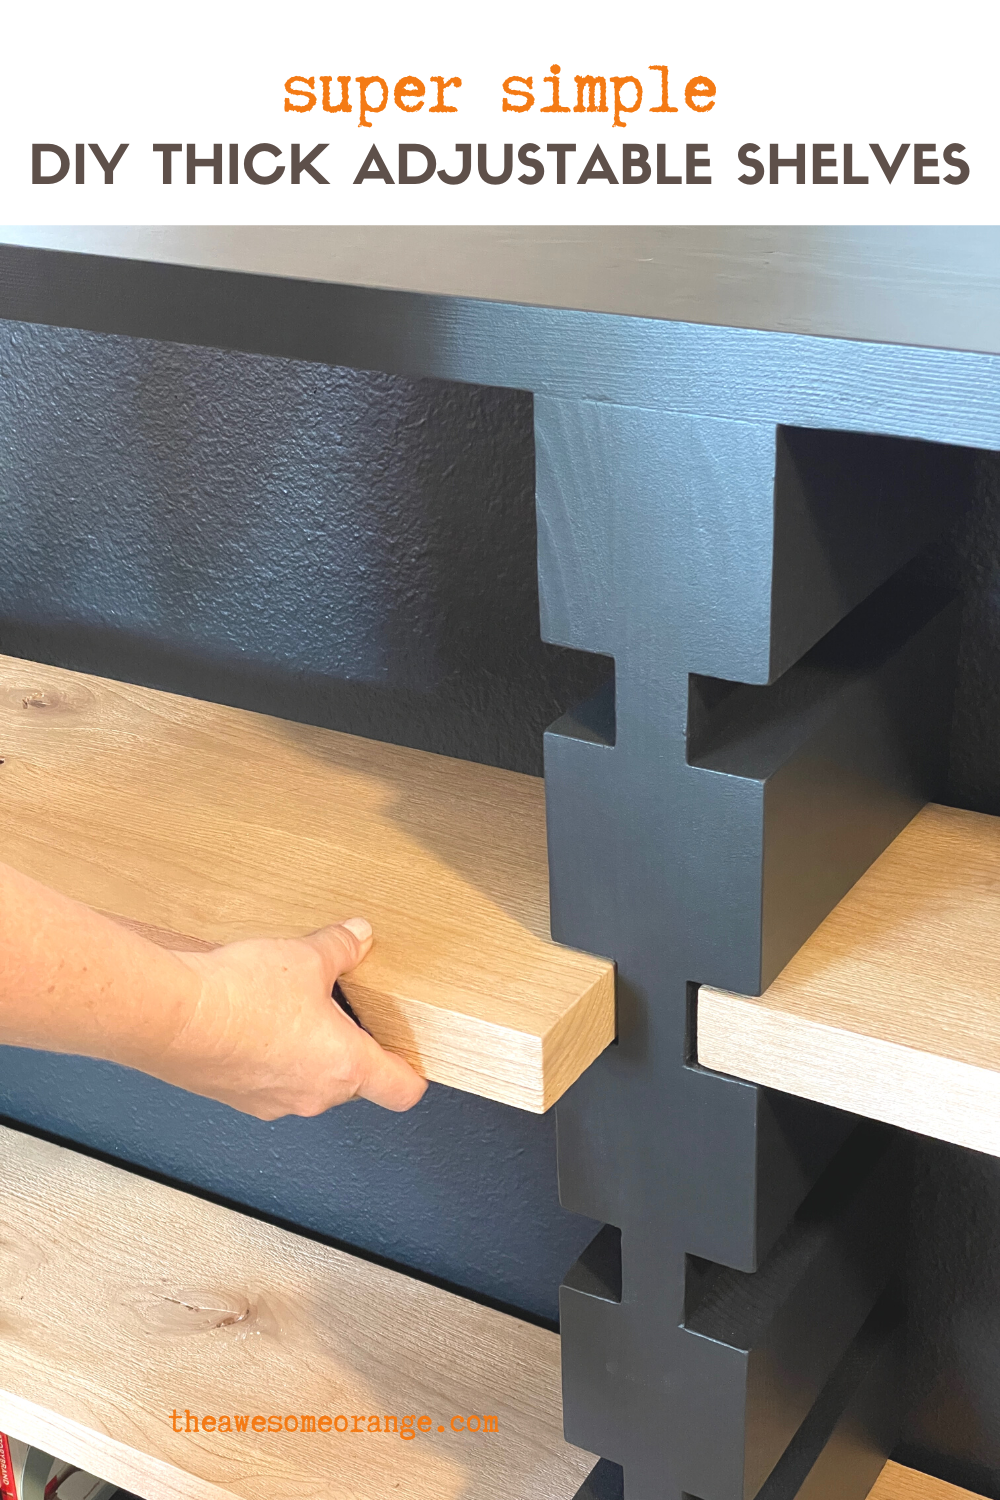
Credit: www.theawesomeorange.com
Assembling The Frame
Assembling the frame is the first step to build your adjustable bookshelf. It creates the basic structure that holds everything together. Follow these simple steps to make a strong and stable frame.
Building The Side Panels
Start by cutting two side panels from plywood or MDF. Make sure they are the same size. Drill holes evenly spaced for shelf supports. Sand the edges smooth for a clean finish. These panels will hold the shelves in place and support the weight.
Attaching The Top And Bottom
Next, connect the top and bottom pieces to the side panels. Use wood screws and glue for a tight fit. Check that all corners are square before tightening. This step forms a box frame that keeps the bookshelf sturdy. Let the glue dry completely.
Reinforcing With Support Braces
Add support braces inside the frame corners. Cut small wooden strips to fit diagonally between sides and top or bottom. Screw them in place to prevent wobbling. These braces increase strength and help the frame hold heavy books. Make sure braces fit snugly.
Installing Adjustable Shelves
Installing adjustable shelves lets you customize your bookshelf easily. It helps hold books of different sizes. You can change shelf height any time. This section guides you through installing shelves step-by-step.
Choosing Shelf Support Systems
Pick shelf supports that fit your budget and skill level. Metal shelf pins are cheap and easy to install. Plastic clips work well for light loads. Brackets give strong support but need more work. Choose supports that fit your bookshelf material and weight needs.
Drilling Shelf Pin Holes
Measure and mark holes carefully for shelf pins. Use a drill bit matching pin size for tight fit. Space holes evenly, usually 2 inches apart vertically. Drill straight holes to avoid wobbling shelves. Clean dust after drilling for a neat finish.
Placing And Securing Shelves
Insert shelf pins into drilled holes securely. Place shelves on top of pins gently. Check shelf level with a small spirit level. Adjust pins if shelves tilt or feel loose. For extra hold, add small brackets under shelves if needed.
Finishing Touches
Finishing touches make your small adjustable bookshelf look complete and last longer. These steps protect the wood and give it a neat, polished look. Take time to do these well for a better result.
Painting Or Staining Options
Choose paint for bright colors and full coverage. Paint hides wood grain and adds a smooth surface. Use a brush or spray for even coats. Let each coat dry before applying the next.
Stain keeps the wood’s natural look. It shows the grain and adds warm tones. Use a cloth or brush to apply stain. Wipe off extra stain to avoid blotches. Pick a color that matches your room style.
Adding Protective Coating
Protect your bookshelf with a clear coating. It stops scratches and water damage. Use polyurethane, varnish, or lacquer. Apply thin layers with a brush. Let each layer dry well before the next. Sand lightly between coats for smoothness.
Final Inspection And Adjustments
Check the bookshelf for any rough spots or uneven edges. Sand these areas gently until smooth. Test the shelves to ensure they fit and move easily. Tighten screws and fix any loose parts. Make sure the bookshelf stands stable and straight.
Tips For Customization
Customizing a small, cheap adjustable bookshelf makes it unique and practical. Personal touches improve both look and function. Simple changes can fit your space and style. Below are easy tips to help you customize your bookshelf.
Decorative Elements
Use paint or stain to change the color and feel. Add patterned contact paper on the shelves for a fresh look. Attach small knobs or handles on the sides for style. Place decorative trim along edges to make it stand out. Use washi tape for an easy, removable design.
Maximizing Storage Space
Adjust shelf heights to fit different sized items. Add small baskets or bins for loose items. Use vertical dividers to organize books or magazines. Install hooks on the sides for hanging small accessories. Stack items carefully to save space and keep it tidy.
Adapting For Different Room Styles
For a modern room, use sleek paint colors like black or white. Rustic rooms benefit from a natural wood finish. Bright, bold colors work well in children’s rooms. Use soft pastels for a calm, cozy bedroom feel. Match the bookshelf’s style to your room’s theme for harmony.

Credit: www.youtube.com
Frequently Asked Questions
How Do I Choose Materials For A Cheap Adjustable Bookshelf?
Select affordable, durable materials like plywood or MDF. These options are budget-friendly and easy to work with. Avoid expensive hardwoods to keep costs low. Prioritize materials that support weight and fit your space.
What Tools Are Needed To Build An Adjustable Bookshelf?
Basic tools include a saw, drill, screwdriver, measuring tape, and level. These help cut, assemble, and ensure the shelf is sturdy. Having clamps and sandpaper can improve finishing and safety.
How Can I Make The Bookshelf Height Adjustable?
Use shelf pins or brackets that fit into pre-drilled holes. This allows shelves to be moved up or down easily. Adjustable tracks or grooves also offer flexibility for different book sizes.
What Is The Best Design For Small Spaces?
Opt for vertical, narrow shelves to maximize space. Adjustable shelves allow customization for different items. Keep the design simple to avoid overcrowding the area.
Conclusion
Building a small, cheap adjustable bookshelf is simple and useful. You can fit it in any room without spending much money. Changing shelf heights helps hold books of different sizes. This project saves space and keeps your items organized. Plus, it gives you a chance to use basic tools and materials.
Try making one yourself and enjoy a neat, tidy space. Small changes like this make a big difference at home. Give it a go and see how easy it can be!