Have you ever wished your guitar could do more than just sit in the corner? What if it could also hold your favorite books, adding a unique touch to your space?
Making a guitar bookshelf is easier than you think, and it’s a perfect way to combine your love for music and reading. In this guide, you’ll discover simple steps to transform a guitar into a stylish, functional bookshelf that will impress your friends and organize your collection.
Ready to create something truly unique? Let’s get started!
Materials Needed
Gathering the right materials is key to building a sturdy guitar bookshelf. The choice of guitar, wood, and tools affects both the look and function. Prepare everything before starting the project. This saves time and prevents frustration.
Selecting The Right Guitar
Choose a guitar that fits the bookshelf size and style. Acoustic guitars work well due to their hollow body. Electric guitars can also be used if they suit your design. Consider the guitar’s shape and size carefully.
Wood And Tools Required
Pick strong, smooth wood for the shelves and frame. Pine, oak, or plywood are good options. Use wood that resists warping and holds screws well. Basic tools include a saw, drill, screwdriver, and measuring tape. Sandpaper and clamps help with finishing and assembly.
Additional Supplies
Have wood glue and screws ready for secure joints. Paint or wood stain can improve the look. Use brushes or rags for applying finishes. Protective gear like gloves and goggles keeps you safe during work. Lastly, sandpaper of different grits smooths the surfaces.
Credit: www.youtube.com
Preparing The Guitar
Preparing the guitar is the first step to creating a unique bookshelf. You must get the guitar ready for changes. This process helps ensure the guitar is safe and usable as a shelf.
Focus on cleaning and removing parts that are not needed. Then, modify the body to fit books properly. Both steps need care and patience.
Cleaning And Removing Strings
Start by wiping the guitar’s surface with a soft cloth. Remove dust, dirt, and fingerprints. This makes the guitar look neat and ready to work on.
Next, carefully take off all the strings. Use a string winder or your hands. Remove the bridge pins if the guitar has them. Keep the strings away to avoid injury.
Cutting And Modifying The Body
Mark the guitar body where you want to cut. Use a pencil to draw clear lines. Cut slowly with a jigsaw or handsaw. Follow the lines carefully to avoid mistakes.
Create shelves inside the guitar body by removing wood pieces. Sand the cut edges to make them smooth. This step helps the guitar hold books safely.
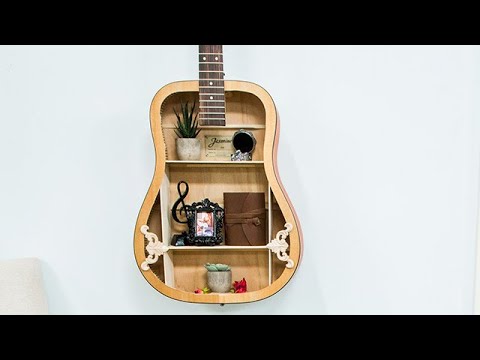
Building The Shelves
Building the shelves inside your guitar bookshelf is a key step. These shelves hold your books and give the guitar a new life. Careful planning and precise work make the shelves strong and neat.
Start by measuring the inside space of the guitar. This helps you know the size of each shelf. Then, cut the wood pieces to fit perfectly inside.
Measuring And Cutting Wood
Use a tape measure to find the width and depth of the guitar body. Write down the numbers to avoid mistakes. Measure twice to be sure. Choose wood that is sturdy but not too thick. Mark the wood with a pencil to match your measurements. Use a saw to cut along the marks. Smooth the edges with sandpaper. This avoids splinters and gives a clean look.
Attaching Shelves Inside Guitar
Place the cut wood pieces inside the guitar to check the fit. Make small adjustments if needed. Use wood glue or small brackets to fix the shelves. Press firmly and hold until secure. Let the glue dry fully before adding books. The shelves must be steady to hold weight. Double-check the shelves for balance and strength.
Assembling The Bookshelf
Assembling the guitar bookshelf is a crucial step. This process brings together the unique parts to form a functional piece. Careful assembly ensures durability and a great look. Follow clear steps for a smooth build. Take your time and work carefully.
Securing Guitar Parts
Start by attaching the guitar body pieces firmly. Use wood glue on edges for strong bonds. Clamp parts tightly and let glue dry well. Screw in brackets or small nails for extra hold. Avoid gaps between parts for neatness.
Attach the neck and headstock pieces securely. Align them straight before fixing. Check for balance to keep the shelf stable. Tighten screws but do not overdo it. Proper securing prevents wobbling and damage.
Reinforcing Structure For Stability
Add wooden braces inside the shelf for support. Place them where weight will press most. Screw braces into both sides for strength. Use corner brackets on edges for extra firmness.
Check the bookshelf on a flat surface. Make sure it does not lean or shake. Adjust screws or braces as needed. Stability is key to protect books and decorations.
Finishing Touches
Finishing touches bring your guitar bookshelf to life. They make it smooth, strong, and stylish. Taking time with these details improves the final look. The right finish also protects the wood. Let’s explore how to complete your project perfectly.
Sanding And Smoothing Edges
Start by sanding all surfaces with fine-grit sandpaper. This removes rough spots and splinters. Focus on edges and corners to avoid sharpness. Smooth edges make the shelf safer and nicer to touch. Wipe dust off with a clean cloth before the next step.
Painting Or Staining Options
Choose paint or stain to match your room’s style. Paint adds color and hides wood grain. Stain highlights the natural wood beauty. Apply thin coats and let each dry fully. Use a brush or cloth for an even finish. Seal with a clear topcoat to protect the surface.
Adding Decorative Elements
Decorate your shelf with knobs, decals, or inlays. Small touches add personality and charm. Use guitar picks or strings as creative accents. Attach hooks for hanging keys or small items. These details turn your shelf into a unique piece.
Placement And Use
The placement and use of a guitar bookshelf affect both its look and function. Choosing the right spot helps your room feel balanced and inviting. Using the shelves smartly keeps your space neat and shows off your style.
Choosing The Best Location
Pick a spot with enough light but not direct sunlight. Sunlight can damage both books and wood. Place the bookshelf where it does not block walkways. Near a reading chair or music corner works well. Make sure the wall is strong enough to hold the shelf safely.
Organizing Books And Decor
Arrange books by size or color for a clean look. Mix in small decor like plants or guitar picks. Keep heavier items on lower shelves to avoid tipping. Leave some empty space to avoid a crowded feel. This balance makes the shelf both useful and attractive.
Tips For Customization
Customizing your guitar bookshelf makes it truly yours. Small changes can show your style and make the shelf fit your room better. Personal touches turn a simple shelf into a special piece. Below are practical tips to help you customize with ease and creativity.
Incorporating Lighting
Lighting adds warmth and highlights your guitar and books. Use LED strip lights inside the shelves for a soft glow. Battery-operated lights work well if no power outlet is nearby. Choose warm white or color-changing lights for different moods. Position lights so they do not cause glare or shadows on your items.
Personalizing With Art Or Decals
Decorate the shelf with art or decals to express your personality. Stick music-themed decals on the sides or back panel. Use removable wall stickers if you want to change designs later. Paint simple patterns or shapes with colors that match your room. These touches bring charm and make your shelf stand out.

Credit: www.reddit.com

Credit: www.youtube.com
Frequently Asked Questions
What Materials Are Needed To Make A Guitar Bookshelf?
You need wood planks, screws, wood glue, sandpaper, paint or stain, and brackets. Choose sturdy wood for durability. Also, gather tools like a saw, drill, screwdriver, and measuring tape for accurate cuts and assembly.
How Do You Prepare A Guitar For Bookshelf Conversion?
Remove all strings, tuning pegs, and hardware carefully. Clean the guitar body and ensure it’s free of dust. This preparation helps create a stable surface for mounting shelves inside the guitar body.
What Are The Best Design Tips For A Guitar Bookshelf?
Use the guitar’s hollow body to create shelves. Secure shelves with brackets or glue inside. Match shelf size to guitar shape and your book sizes. Finish with paint or varnish for a polished look.
How Long Does Building A Guitar Bookshelf Take?
Building a guitar bookshelf usually takes 3 to 5 hours. Time depends on your woodworking skills and drying time for paint or glue. Proper planning speeds up the process.
Conclusion
Building a guitar bookshelf brings style and function together. It saves space and keeps your books neat. You only need basic tools and simple steps. Personalize it to match your room’s look. Enjoy the pride of creating something useful yourself.
Keep your favorite books and music gear close. This project suits beginners and skilled makers alike. Give it a try and see how it fits your space. A homemade guitar bookshelf can brighten any room. Simple, practical, and fun to build.