Are you looking to give your bookshelf a fresh new look or hide clutter in style? Making a cover for your bookshelf is easier than you think—and it can completely transform the way your space feels.
Imagine turning your plain shelves into a sleek, personalized feature that matches your room perfectly. In this guide, you’ll discover simple steps and smart tips to create a cover that fits your style and needs. Ready to make your bookshelf stand out?
Keep reading, and let’s get started!
Materials Needed
Making a cover for a bookshelf is a simple project. The right materials make it easier and ensure a good result. This section lists all the materials needed for your bookshelf cover.
Choose materials that fit your style and budget. Basic tools and supplies help you work faster and safer. Prepare everything before starting your project.
Wood Or Plywood Panels
Select wood or plywood for the main cover. Plywood is light and easy to cut. Wood offers a classic look and strong structure. Measure your bookshelf first to get the right size.
Sandpaper
Sandpaper smooths the wood surface. Use medium grit first, then fine grit for finishing. This step helps paint or stain stick better.
Paint Or Wood Stain
Choose paint or stain to match your room. Paint gives bright, solid colors. Stain shows the wood grain and adds warmth. Pick water-based types for easy cleanup.
Brushes And Rollers
Use brushes for small areas and rollers for large surfaces. Clean tools after use to keep them in good shape. Good brushes help you apply paint evenly.
Hinges Or Sliding Tracks
Attach hinges for a door-style cover. Sliding tracks work well for smooth, space-saving covers. Pick hardware that fits your bookshelf size and weight.
Screws And Screwdriver
Secure the cover with screws. Use a screwdriver or power drill for quick work. Make sure screws are the right length for strong hold.
Measuring Tape And Pencil
Measure everything twice before cutting. Mark lines with a pencil for precise cuts. Accurate measurements prevent mistakes and wasted materials.
Safety Gear
Wear safety glasses and gloves. Protect your eyes and hands from dust and splinters. Safety comes first in all DIY projects.
Credit: www.fromhousetohome.com
Measuring Your Bookshelf
Measuring your bookshelf is the first step to making a perfect cover. Precise measurements ensure the cover fits well. This helps protect your books and keeps your shelf looking neat.
Take your time and measure carefully. Use a tape measure or a ruler for accuracy. Write down each measurement before you start cutting any material.
Measuring The Height Of The Bookshelf
Measure from the bottom to the top of the bookshelf. Include any trim or molding if it will be covered. Record the height in inches or centimeters.
Measuring The Width Of The Bookshelf
Measure across the front of the shelf from one side to the other. Measure at the top, middle, and bottom to check for any differences. Use the largest measurement for the cover width.
Measuring The Depth Of The Bookshelf
Measure from the front edge to the back wall of the shelf. Check if the bookshelf has any overhang or irregular shapes. Note the deepest point for the cover depth.
Double-checking Your Measurements
Measure each dimension twice to avoid mistakes. Compare your notes for any differences. Confirm all measurements before cutting your materials.
Choosing The Cover Style
Choosing the right cover style for your bookshelf changes its look and function. The cover should match your room’s style and protect your books well. Think about how you use the shelf and what fits your space best. Below are some simple and popular cover styles to consider.
Sliding Doors
Sliding doors save space because they do not open outward. They slide along a track, making access easy. These doors can be made from wood or metal. They give a clean, modern look to any bookshelf. Sliding doors keep dust away and protect books well.
Curtains
Curtains are soft and easy to change. They add color and texture to the room. You can choose light or heavy fabric depending on your needs. Curtains are simple to install and remove. They protect books from dust but allow easy access.
Panels
Panels are solid covers that attach to the bookshelf front. They can be made from wood, metal, or plastic. Panels give a sturdy and classic look. They can be painted or decorated to match your room. Panels protect books fully from dust and light.
Glass Covers
Glass covers show your books while keeping them safe. They allow you to see the titles without opening the cover. Glass is easy to clean and looks elegant. It protects books from dust and dirt. Choose clear or frosted glass for different styles.
Cutting And Preparing Materials
Cutting and preparing materials is the first key step in making a cover for a bookshelf. This step ensures all pieces fit perfectly and the cover looks neat. Careful measuring and cutting help avoid mistakes later.
Choose the right materials for your cover. Common options include plywood, MDF, or thick cardboard. Each material has its own cutting needs and tools.
Start by measuring the height, width, and depth of your bookshelf. Write down these numbers clearly. Double-check each measurement to avoid errors. Accurate measurements guide your cutting process.
Selecting The Right Tools
Use a saw suitable for your chosen material. A hand saw works well for thin wood or cardboard. For thicker wood, a power saw provides cleaner cuts. Also, have a measuring tape, pencil, and straight edge ready.
Marking The Cut Lines
Mark cut lines on the material using a pencil and ruler. Draw straight, clear lines to follow. Mark both sides if needed for better guidance. Precise lines help you cut accurately.
Cutting The Material
Cut slowly along the marked lines. Keep the saw steady and follow the line closely. Smooth edges improve the final look. Sand rough edges if necessary for a clean finish.
Preparing For Assembly
After cutting, check each piece against your bookshelf measurements. Make any small adjustments before assembly. Clean off sawdust and debris. Ready pieces make the next step easier.
Assembly Steps
Making a cover for your bookshelf can protect your books and give a fresh look. The assembly steps help you fit the cover neatly and securely. Follow each step carefully for a smooth process.
Attaching Hinges Or Tracks
Start by fixing hinges or tracks to the bookshelf frame. Use a screwdriver to attach hinges on one side. Tracks require screws along the top and bottom edges. Check that hinges or tracks align well for smooth opening and closing.
Securing Fabric Or Panels
Cut fabric or panels to fit the cover size exactly. Attach the material to the frame using staples or screws. Pull fabric tight to avoid wrinkles or sagging. For panels, ensure they fit snugly within the frame without gaps.
Finishing Touches
Inspect the cover for loose parts or uneven edges. Sand any rough wooden edges for safety and neatness. Add handles or knobs if desired for easier use. Clean the cover surface to remove dust or fingerprints before use.
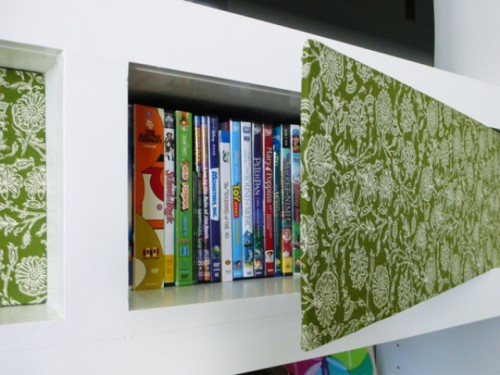
Credit: www.shelterness.com
Painting And Decorating
Painting and decorating a bookshelf cover makes it unique and fits your room style. This step lets you show creativity and protect the wood from damage. Simple paint or creative designs can change plain wood into an eye-catching piece.
Choose paint types that match your bookshelf material. Acrylic paint works well on wood and dries fast. Use light colors to brighten a room or dark colors for a cozy feel. Adding patterns or stencils can bring fun and personality.
Preparing The Surface
Clean the cover with a damp cloth to remove dust. Sand the surface lightly to help paint stick better. Wipe again to remove sanding dust. Use primer for smooth and lasting paint results. Let primer dry completely before painting.
Choosing Paint And Tools
Select acrylic or latex paint for easy use and quick drying. Use brushes with soft bristles for smooth strokes. Foam rollers help cover large areas evenly. Keep a small brush for edges and details. Have water and cloth ready for quick cleanups.
Applying Paint And Decorations
Start with thin coats of paint to avoid drips. Let each coat dry before adding another. Use painter’s tape to create clean lines or patterns. Add stickers or stencils for shapes and designs. Finish with a clear sealant to protect your artwork and keep it bright.
Maintenance Tips
Maintaining a bookshelf cover keeps it looking new and lasting longer. Simple care routines protect the material and keep dust away. Regular checks prevent damage and help you fix small problems early.
Cleaning The Bookshelf Cover
Use a soft cloth to wipe dust off the cover. Avoid harsh chemicals that can damage the surface. For fabric covers, vacuum gently to remove dirt and crumbs.
Protecting From Sunlight
Place the bookshelf away from direct sunlight. Sunlight can cause colors to fade and materials to weaken. Use curtains or blinds to reduce sun exposure.
Handling Spills And Stains
Blot spills immediately with a clean cloth. Do not rub, as it can spread the stain. Use mild soap and water for cleaning, then dry the area well.
Checking For Wear And Tear
Inspect the cover regularly for signs of damage. Look for loose stitches, tears, or fading. Repair small issues quickly to avoid bigger problems.
Storing The Cover Properly
Remove the cover if you move the bookshelf. Store it in a cool, dry place to avoid mold and mildew. Fold it gently to prevent creases or damage.

Credit: www.youtube.com
Frequently Asked Questions
What Materials Are Best For Making A Bookshelf Cover?
Choose durable fabrics like canvas or vinyl for easy cleaning. Wood panels or acrylic sheets also work well for a sturdy cover. Select materials that match your décor and protect your books from dust and damage.
How Do I Measure My Bookshelf For A Cover?
Measure the height, width, and depth of the bookshelf carefully. Note any protruding parts or shelves that may affect the cover size. Accurate measurements ensure a snug, custom fit for your bookshelf cover.
Can I Make A Bookshelf Cover Without Sewing?
Yes, use adhesive fabrics, Velcro strips, or snap buttons for easy assembly. No-sew covers save time and are simple to remove for cleaning. Choose materials that are flexible and easy to work with for no-sew options.
How To Attach A Cover Securely To A Bookshelf?
Use Velcro, magnets, or hooks for a strong, removable attachment. Ensure the attachment method suits your bookshelf’s material and cover type. A secure cover protects books and adds a clean look.
Conclusion
Making a cover for your bookshelf can protect and refresh it. Choose materials that fit your style and budget. Measure carefully to ensure a good fit. Simple tools and steps make the process easy and fun. Enjoy a neat, clean look in your room.
This small project adds charm and keeps books safe. Try it today and see the difference yourself.