Are you looking for a simple and stylish way to organize your books and add a personal touch to your space? Making a wooden crate bookshelf might be exactly what you need.
It’s a fun project that anyone can do, even if you’re not an expert with tools. Imagine turning plain wooden crates into a unique shelf that fits perfectly in your room and shows off your favorite reads. In this guide, you’ll discover easy steps to build your own wooden crate bookshelf that looks great and saves you money.
Ready to create something both useful and beautiful? Let’s get started!

Credit: smokymountainfarmhouse.com
Materials And Tools Needed
Building a wooden crate bookshelf is a fun and simple project. Gathering the right materials and tools makes the process smooth. This section covers what you need to start your bookshelf.
Choosing The Right Wood Crates
Select crates made from sturdy wood like pine or oak. Check for smooth surfaces and no cracks. Size matters; pick crates that fit your space. Uniform sizes create a neat and stable bookshelf. Avoid crates with loose nails or splinters to stay safe.
Essential Tools For Assembly
Use a power drill to fasten screws easily. A screwdriver helps tighten small screws by hand. Sandpaper smooths rough edges and surfaces. A measuring tape ensures correct spacing between crates. A level keeps your bookshelf straight and balanced.
Additional Supplies
Wood screws secure the crates together firmly. Wood glue adds extra strength to joints. Paint or wood stain can protect and decorate your bookshelf. Brushes or rags help apply finishes evenly. Safety gear like gloves and goggles protect your hands and eyes.
Preparing The Crates
Preparing the crates is a key step in building your wooden crate bookshelf. Clean and smooth surfaces help the wood last longer. Proper preparation also improves the shelf’s look. Take your time with this part for the best results.
Each crate needs attention before assembly. Follow these simple steps to get your crates ready.
Cleaning And Sanding
Start by removing dirt and dust from the crates. Use a brush or cloth to clean the wood well. Check for any nails or staples and take them out carefully.
Next, sand the crates to smooth rough spots. Use medium-grit sandpaper first, then fine-grit for a smooth finish. Sand all surfaces, edges, and corners. This step helps paint or stain stick better and prevents splinters.
Optional Painting Or Staining
Painting or staining is not required but can improve the shelf’s style. Choose colors or stains that match your room’s decor. Apply paint or stain evenly using a brush or cloth. Allow each coat to dry fully before adding another.
Painting bright colors can make your bookshelf stand out. Staining highlights the natural wood grain for a classic look.
Adding Protective Finish
Protect your crates with a clear finish. Use polyurethane, varnish, or wax for durability. Apply the finish in thin layers with a brush. Let each layer dry before applying the next one.
This step shields the wood from moisture and wear. It also gives the shelf a polished appearance. A good finish keeps your bookshelf looking new for years.
Designing Your Bookshelf
Designing your wooden crate bookshelf is an important step. It helps you create a strong and useful piece. A good design makes sure your bookshelf fits your space and holds your books well. You can make it simple or add creative touches. Planning carefully saves time and materials.
Start by thinking about where you want to place the bookshelf. Consider the style of your room. Also, think about how many books or items you want to store. This way, your bookshelf will be both practical and beautiful.
Planning The Layout
First, decide how many crates you need. Arrange them on the floor to see different shapes. You can stack them vertically, place them side by side, or mix both. Think about balance and stability. Make sure the layout fits your space well.
Measuring And Marking
Measure the space where the bookshelf will go. Write down the height, width, and depth. Mark these measurements on the crates with a pencil. Check twice before cutting or joining. Accurate measuring helps avoid mistakes and saves materials.
Customizing Size And Shape
You can cut crates to make smaller shelves or unique shapes. Add extra crates for larger storage. Paint or stain the wood to match your room. Add backs or dividers inside crates for more support. Customize it to fit your needs and style.

Credit: smokymountainfarmhouse.com
Assembling The Bookshelf
Assembling the wooden crate bookshelf is an exciting step. This part brings your project to life. It requires focus and patience. Follow the steps carefully to build a strong and functional shelf. Each step helps the crates fit perfectly and stay secure.
Arranging The Crates
Start by placing the crates on a flat surface. Try different layouts to find the best design. Stack crates vertically or horizontally based on your space. Check that the edges align well. A neat arrangement makes the shelf look balanced and tidy.
Securing With Screws And Brackets
Use screws and metal brackets to join the crates firmly. Drill pilot holes to avoid splitting the wood. Attach brackets inside the corners of each crate connection. Tighten screws until the crates hold tight. This step keeps the shelf strong and safe to use.
Ensuring Stability
Test the bookshelf by gently shaking it. Add extra screws or brackets if it feels loose. Place heavier items on the bottom crates for better balance. Use wall anchors to fix the shelf if needed. A stable bookshelf prevents accidents and lasts longer.
Adding Functional Features
Adding functional features to your wooden crate bookshelf makes it practical and stable. These features improve usability and give the shelf a polished look. Small upgrades can make a big difference in how your bookshelf works and lasts.
Installing Back Panels
Back panels give your bookshelf extra strength. They stop the crates from wobbling or twisting. Use thin plywood or hardboard for the panel. Cut it to fit the back of the crates exactly. Attach it with nails or screws for a solid hold. A back panel also keeps books from falling behind the shelf.
Attaching Feet Or Casters
Feet lift the bookshelf off the floor, protecting it from moisture. Choose wooden blocks or metal feet to match your style. Secure them to the bottom corners with screws. Casters add mobility, letting you move the shelf easily. Lockable casters keep it steady once placed. Feet or casters improve cleaning access under the shelf too.
Incorporating Shelves Or Dividers
Shelves or dividers create smaller spaces inside the crates. They help organize books and other items neatly. Measure the inside width and depth to cut shelves that fit well. Secure shelves with brackets or wood glue for stability. Dividers work well for separating different book sizes or items. This customization keeps your bookshelf tidy and practical.
Styling And Decorating
Styling and decorating your wooden crate bookshelf turns it from simple storage into a charming feature. It lets you show your personality and keep things neat. Careful styling makes the space feel warm and inviting.
Balance is key. Too many items look messy, too few seem empty. Use style to highlight your favorite books and treasures.
Organizing Books And Items
Sort books by size, color, or theme. This creates a neat and easy-to-navigate look. Place taller books on the bottom crates for stability. Smaller books fit well on top shelves.
Mix books with other items. Keep frequently used books within reach. Less used books can go in less visible spots. Use baskets or boxes inside crates to hold small objects.
Incorporating Decorative Elements
Add plants to bring life and color. Small pots fit nicely on crate edges or inside. Use framed photos or artwork to personalize the space. Sculptures, candles, or vintage items add interest.
Keep decorations simple to avoid clutter. Leave some space empty for a clean feel. Change decorations seasonally to refresh the look.
Maintaining Your Bookshelf
Dust your bookshelf regularly to keep it fresh. Check for any loose screws or nails and tighten them. Clean wood with a soft cloth and mild cleaner.
Avoid placing the shelf in direct sunlight to prevent fading. Rotate items now and then to avoid wear in one spot. Keep the area around the shelf tidy to protect it.
Safety Tips And Troubleshooting
Building a wooden crate bookshelf can be fun and rewarding. Safety is very important during the project. Problems may happen, but most can be fixed easily. This section helps you stay safe and solve common issues. Follow these tips for a strong, safe bookshelf.
Handling Tools Safely
Always wear safety goggles to protect your eyes. Use gloves to keep your hands safe. Keep tools sharp; dull blades can slip. Hold tools firmly and cut away from your body. Work in a clean, well-lit area. Turn off and unplug power tools when not in use. Keep children and pets away from your workspace.
Common Assembly Issues
Check that all crate pieces fit before nailing or screwing. If crates do not align, sand edges gently. Use a level to ensure shelves are straight. Tighten screws but avoid over-tightening, which can crack wood. Glue joints need time to dry fully before moving the shelf. Fix loose boards by adding extra screws or nails.
Maintaining Structural Integrity
Use wood glue along with screws for a stronger hold. Attach the bookshelf to the wall for extra support. Avoid placing heavy items on the top shelf. Inspect the bookshelf regularly for loose screws or cracks. Sand rough spots to prevent splinters. Reapply wood finish to protect from moisture and wear.
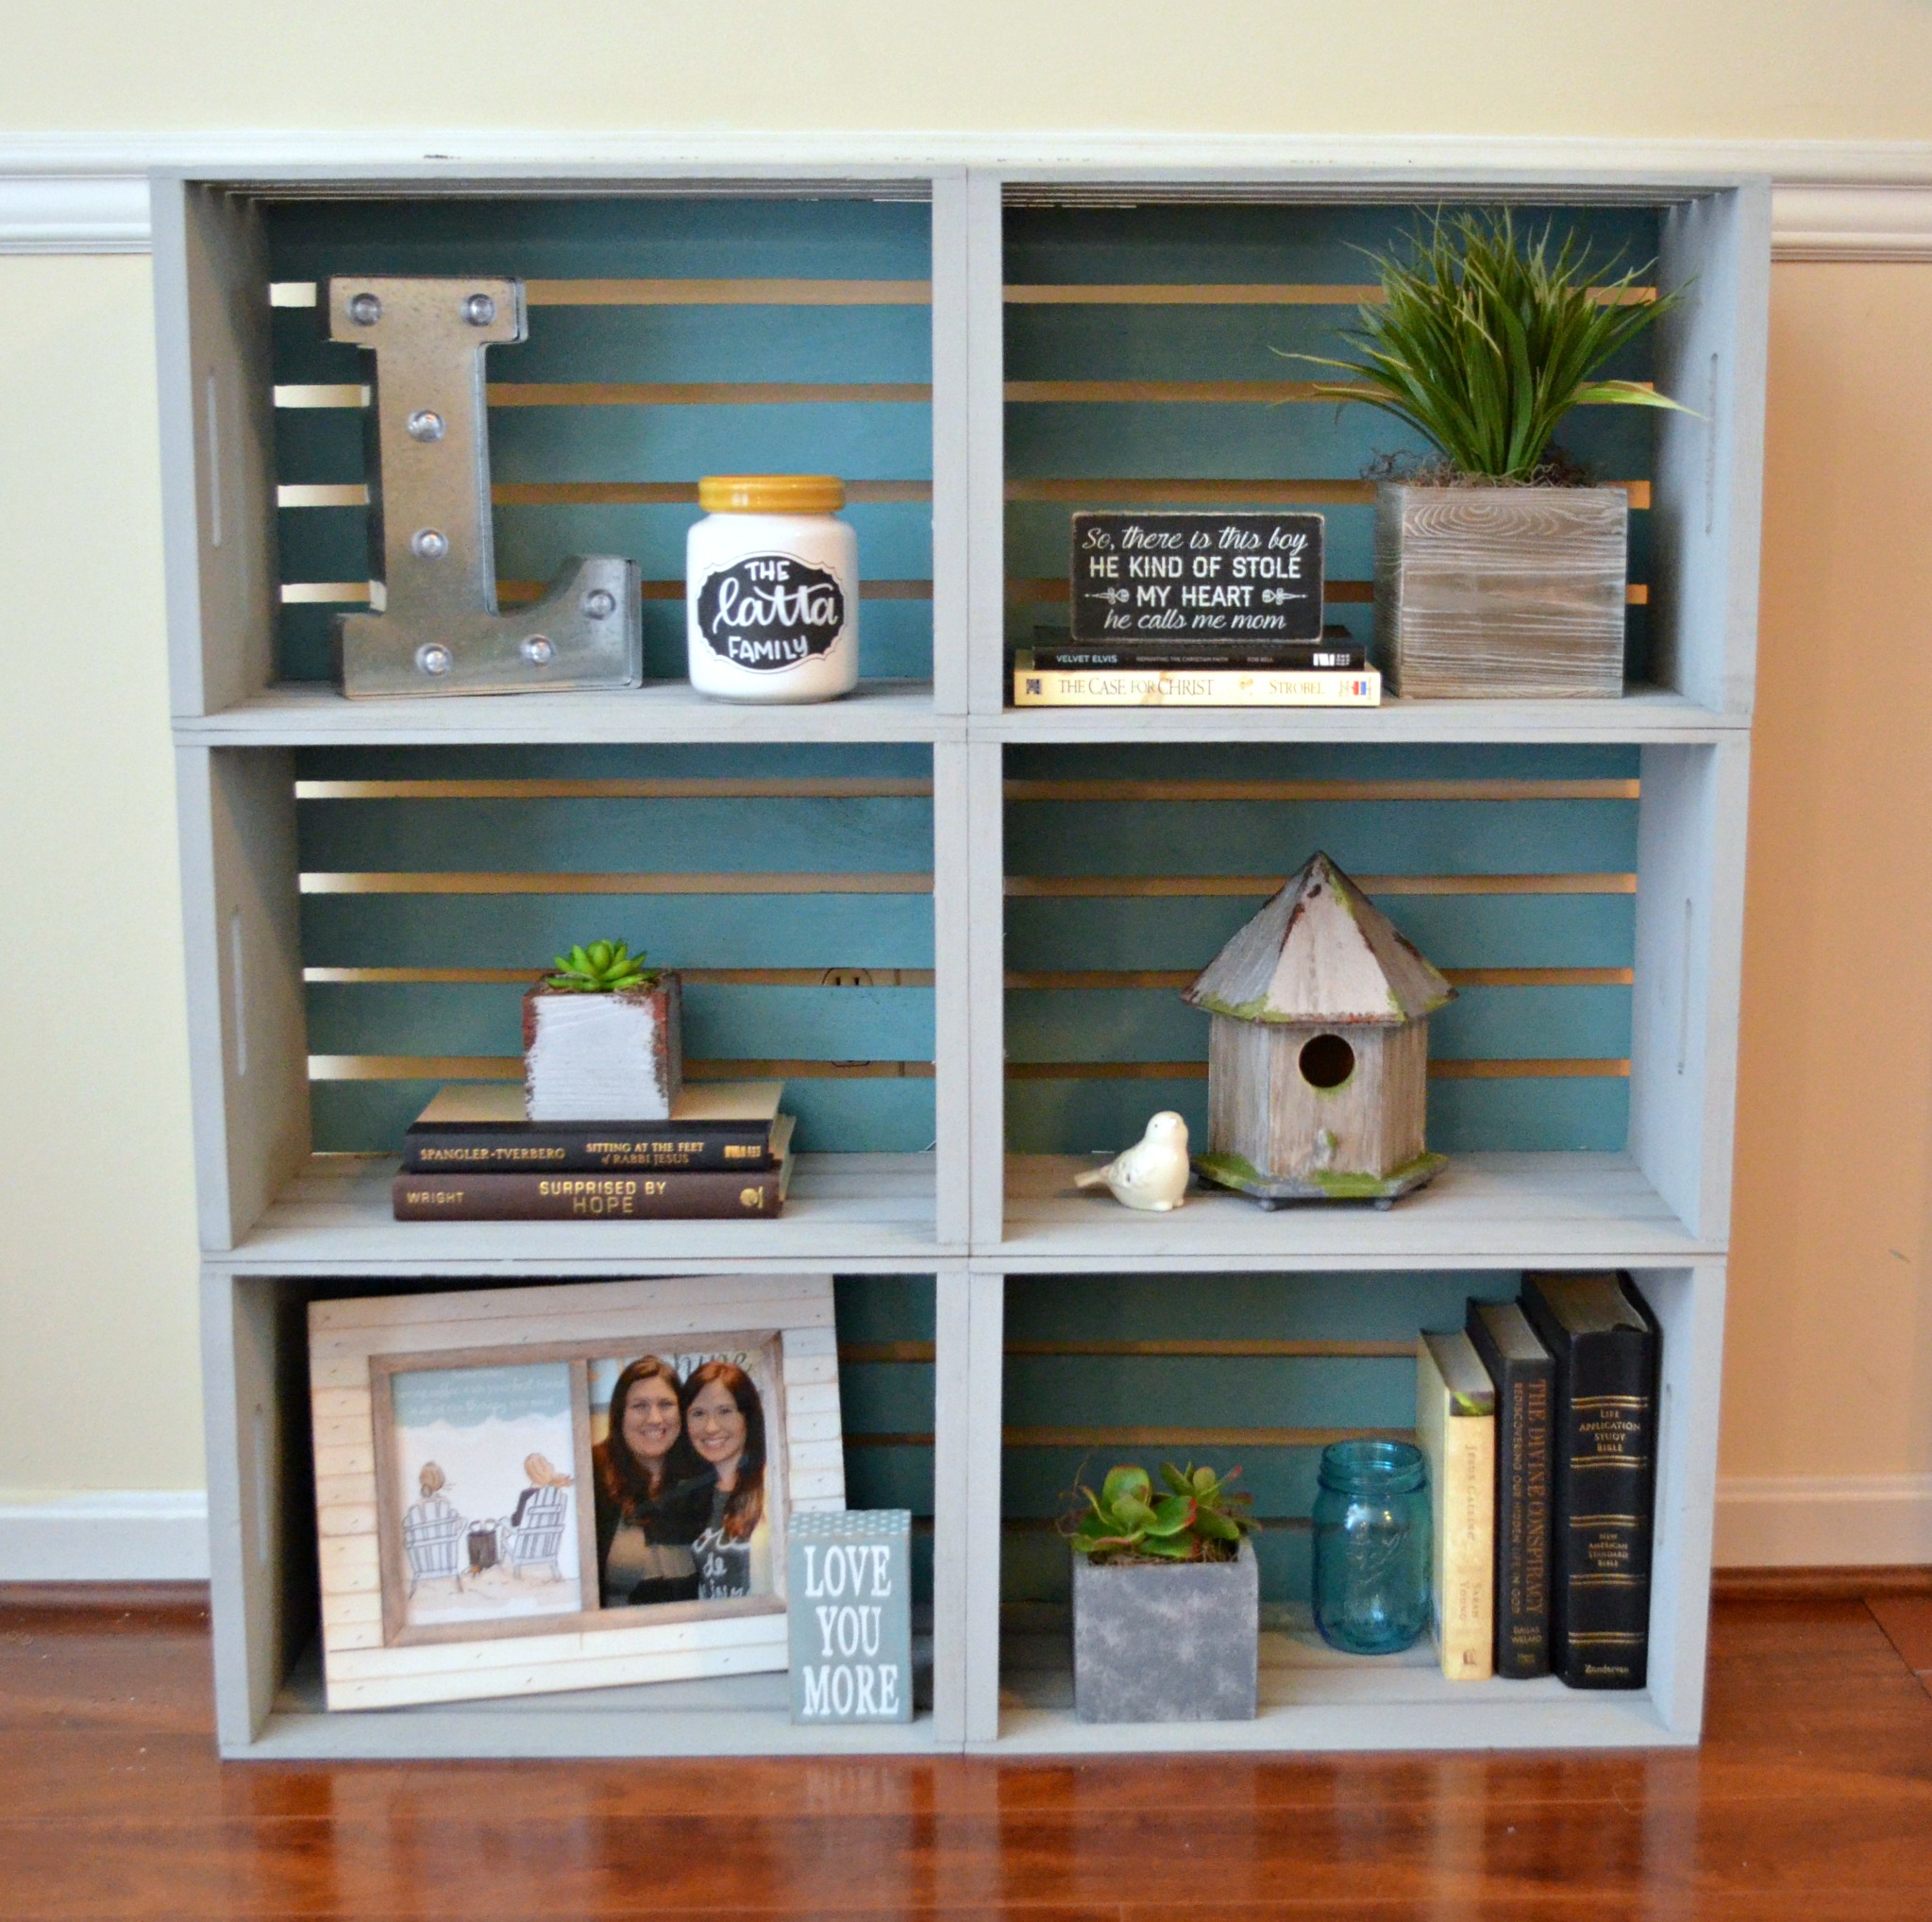
Credit: www.amylattacreations.com
Frequently Asked Questions
What Materials Are Needed For A Wooden Crate Bookshelf?
You need wooden crates, screws, sandpaper, wood glue, paint or stain, and a drill. Choose crates that are sturdy and uniform in size for a balanced bookshelf.
How Do You Assemble Wooden Crates Into A Bookshelf?
Stack crates in your desired arrangement, then secure them with screws or wood glue. Pre-drill holes to avoid splitting the wood and ensure stability.
Can I Customize The Size Of My Crate Bookshelf?
Yes, you can adjust the number and arrangement of crates to fit your space. Customize by painting or staining crates to match your décor.
How Do I Make The Wooden Crate Bookshelf More Durable?
Use high-quality wood and apply a protective finish like varnish. Secure crates firmly with screws and avoid overloading shelves to increase durability.
Conclusion
Building a wooden crate bookshelf is simple and fun. You get to create a unique piece for your home. Using basic tools and materials keeps the process easy. This project saves money and adds charm to any room. You can customize the size and look to fit your style.
A handmade bookshelf also brings a sense of pride. Try this project to enjoy crafting and organizing your books. It’s a great way to add personality to your space.