Are you looking to save space and add style to your home? Building your own bunk bed can be a smart and rewarding project.
Imagine having a sturdy, custom-made bed that fits perfectly in your room—without spending a fortune. In this guide, you’ll find easy-to-follow, free plans that make building a bunk bed simple, even if you’re new to woodworking. Keep reading, and you’ll discover step-by-step instructions that turn your idea into reality, giving you the confidence to create a safe and beautiful bunk bed for your family.
Ready to get started? Let’s dive in!
Materials And Tools Needed
Building a bunk bed requires the right materials and tools. Choosing quality supplies ensures a sturdy and safe bed. This section lists the essential lumber, hardware, and tools needed for your project. Prepare everything before starting to save time and avoid interruptions.
Lumber And Hardware
Select strong, smooth lumber like pine or fir. Use 2x4s for the bed frame and guardrails. A 3/4 inch plywood sheet works well for the mattress supports. Sand all wood pieces for a smooth finish.
Use wood screws for secure joints. Include metal brackets for extra strength at corners. Purchase wood glue for added stability. Also, get safety hardware like corner braces and guardrail bolts.
Essential Tools
Gather basic tools before starting. A power drill with drill bits is necessary for screws and pilot holes. Use a circular saw or hand saw to cut lumber to size. A measuring tape and carpenter’s square ensure accurate cuts.
Have a screwdriver set for hardware assembly. Sandpaper or an electric sander smooths rough edges. A pencil and clamps help mark and hold pieces during work. Safety gear like goggles and gloves protect you while building.
Design And Measurements
Design and measurements are the foundation of a strong and safe bunk bed. Accurate planning helps avoid costly mistakes. This section explains how to choose the right size and sketch the frame. These steps make the building process smoother and more efficient.
Choosing The Right Size
Decide who will use the bunk bed. Measure the room space carefully. Standard bunk beds fit twin mattresses, about 39 by 75 inches. Larger mattresses need more space. Allow extra height between the top and bottom bed for comfort. Check ceiling height to ensure enough clearance. Leave space around the bed for easy movement. Small rooms may need custom sizes or narrower frames.
Sketching The Frame
Start with a rough drawing of the bunk bed frame. Include top and bottom bed positions. Mark mattress size and support locations clearly. Plan for safety features like guardrails and ladders. Use simple lines and shapes to visualize parts. Label all measurements on your sketch. Review and adjust your design for balance and stability. This drawing guides you during cutting and assembly.
Cutting The Wood
Cutting the wood is a key step in building your bunk bed. Accurate cuts ensure the bed fits well and stays strong. Take your time and prepare carefully. Follow safety rules to avoid accidents.
Measuring And Marking
Start by measuring the wood pieces with a tape measure. Double-check each measurement for accuracy. Use a pencil to mark clear cutting lines. Draw straight lines with a ruler or square. Clear marks help you cut precisely and avoid mistakes.
Safe Cutting Techniques
Wear safety goggles and gloves before cutting. Use clamps to hold the wood steady on your work surface. Choose the right saw for your wood type and size. Cut slowly along the marked line for a clean edge. Keep fingers away from the blade at all times. Turn off tools immediately after use and store them safely.
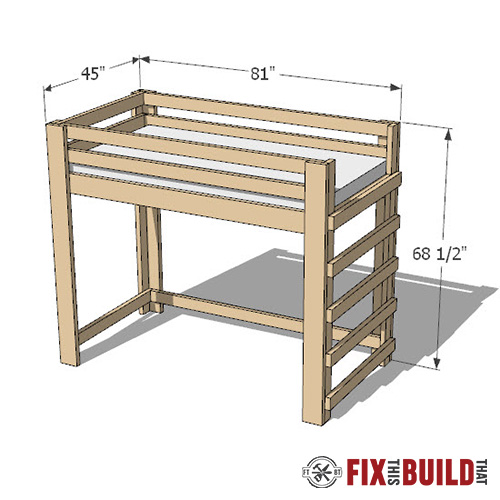
Credit: fixthisbuildthat.com
Assembling The Frame
Assembling the frame is a key step in building your bunk bed. It creates the strong base that holds everything together. Follow clear steps to build a safe and sturdy frame. Take your time to make sure each part fits well.
Building The Bed Posts
Start by cutting four strong wooden posts. These will hold the bed up high. Make sure they are the same length for balance. Sand the edges to avoid splinters. Drill holes in the right places to join other parts later. The posts must stand firm and straight.
Attaching The Side Rails
Next, connect the side rails to the bed posts. Use screws and wood glue for a tight fit. The rails hold the mattress and keep it from falling. Check the height carefully for both top and bottom beds. Measure twice before fixing the rails in place.
Securing The Slats
Lay the slats evenly across the side rails. They support the mattress and stop it from sagging. Space the slats about two to three inches apart. Screw each slat securely to the rails. This step adds strength and safety to the bed frame.
Constructing The Ladder
Building the ladder for your bunk bed is a key step. The ladder must be strong and safe. It should also be easy to climb for kids. A good ladder design makes the whole bunk bed better. Follow simple steps to create a solid ladder that fits well.
Designing The Steps
Start by deciding the ladder height and width. Each step should be wide enough for small feet. Use sturdy wood for the steps, like pine or oak. Space the steps evenly, about 10 to 12 inches apart. Sand the edges smooth to avoid splinters. You can add a non-slip surface for extra safety. Keep the design simple and practical.
Attaching The Ladder Safely
Attach the ladder firmly to the bunk bed frame. Use strong screws or bolts for support. Check that the ladder is stable and does not wobble. Secure the top of the ladder to the bed’s side rail. Add metal brackets for extra strength if needed. Make sure the ladder angle is not too steep. Test the ladder before use to ensure safety.

Credit: www.youtube.com
Sanding And Finishing
Sanding and finishing are key steps in building a bunk bed. These steps make the wood smooth and safe for kids. They also protect the wood from damage and give it a nice look. Taking time to sand and finish well will make your bunk bed last longer.
Smoothing Rough Edges
Start by sanding all wooden surfaces. Use medium-grit sandpaper to remove splinters and rough spots. Sand corners and edges carefully to avoid sharp points. Then, switch to fine-grit sandpaper for a smooth finish. Always sand along the wood grain. This prevents scratches and keeps the surface even.
Applying Paint Or Stain
Choose a non-toxic paint or wood stain for safety. Apply a thin, even coat with a brush or cloth. Let the first coat dry completely before adding another. Two or three coats give the best protection and color. Finish with a clear sealant to guard against scratches and moisture. This step keeps the bunk bed looking fresh for years.
Safety Tips
Building a bunk bed with free plans is fun and rewarding. Safety is very important. A safe bunk bed keeps everyone secure and happy. Follow these tips to make sure your bunk bed is strong and safe for use.
Ensuring Stability
Start by choosing strong, quality wood. Use screws and bolts, not just nails. Tighten all connections firmly. Check for any wobbling before use. Add corner braces for extra support. Place the bunk bed on a flat floor to prevent tilting.
Checking Weight Limits
Know the maximum weight your bunk bed can hold. Include the weight of the mattress and the person. Do not let kids jump on the bed. Use weight limits suggested in your plans. Regularly inspect the bed for any cracks or weak spots. Replace parts if needed to keep it safe.

Credit: topshelfdiy.com
Frequently Asked Questions
What Materials Are Needed To Build A Bunk Bed?
You need quality wood, screws, nails, wood glue, sandpaper, and paint. Choose sturdy lumber like pine or oak for safety. Proper tools include a saw, drill, measuring tape, and clamps. Using free plans ensures you gather all necessary materials before starting.
How Long Does It Take To Build A Bunk Bed?
Building a bunk bed typically takes 1 to 3 days. Time depends on your skill level and tools. Following free plans helps streamline the process. Allow extra time for sanding, assembling, and painting for a professional finish.
Are Free Bunk Bed Plans Safe To Use?
Yes, reputable free plans are designed with safety in mind. Always double-check measurements and materials. Use sturdy wood and secure fasteners. Adding guardrails and proper ladder design enhances safety. Inspect your work thoroughly before use.
Can Beginners Build A Bunk Bed With Free Plans?
Absolutely, free plans are beginner-friendly with clear instructions. Start with basic tools and take your time. Follow step-by-step guides carefully. Watch tutorial videos if needed. Safety is key, so ask for help if unsure.
Conclusion
Building a bunk bed with free plans saves money and gives you pride. Follow each step carefully to ensure safety and durability. Using simple tools and materials makes the project easier. Take your time and measure twice before cutting wood.
A well-built bunk bed adds space and fun to any room. Enjoy the process and the final result with your family. Start today and create a sturdy bed everyone will love.