Are you tired of your ski gear cluttering your entryway every winter? Building your own ski coat rack is a simple and smart way to keep your space organized and your gear ready to go.
Imagine having a spot where your coats, helmets, and gloves hang neatly, saving you time and frustration before hitting the slopes. In this guide, you’ll discover easy steps to create a sturdy and stylish ski coat rack that fits your space and needs.
Keep reading, and you’ll have your very own rack ready in no time.

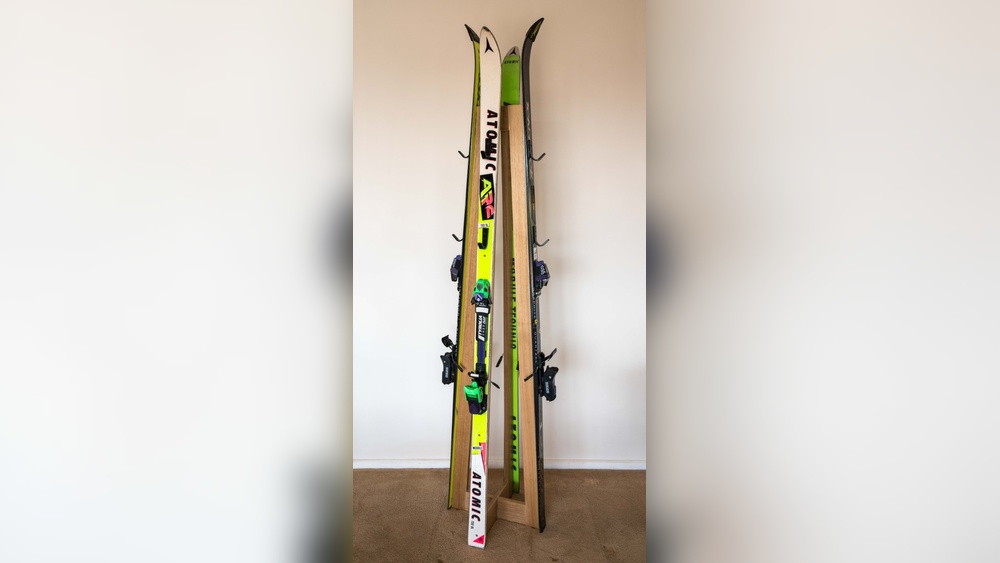
Credit: www.today.pl
Materials Needed
Building a ski coat rack starts with gathering the right materials. Good materials make your project easier and last longer. Choose sturdy and weather-resistant items. This ensures the rack holds heavy coats and skis well. Prepare all tools and parts before you begin.
Wood Or Metal For The Frame
Choose wood for a warm, natural look. Pine or oak works well. Metal adds strength and a modern style. Pick materials that resist moisture and cold. Cut them to the size you want for your rack.
Coat Hooks Or Hangers
Strong hooks hold heavy ski coats securely. Look for metal hooks with a smooth finish. Space hooks evenly for easy coat hanging. Decide how many hooks you need before buying.
Mounting Hardware
Use screws and wall anchors to fix the rack to a wall. Pick hardware that fits your wall type. Make sure screws are long enough for stability. Have a drill and screwdriver ready for installation.
Finishing Supplies
Sandpaper smooths rough edges on wood. Paint or sealant protects the rack from water damage. Choose outdoor-grade finishes for longer life. Apply finish in a well-ventilated area.
Choosing The Right Location
Choosing the right location for your ski coat rack is very important. The right spot keeps your coats dry and easy to reach. It also helps keep your home tidy and organized.
Think about where you usually take off your ski gear. This place should be close to your coat rack. It will save time and effort every day.
Near The Entrance
Placing the coat rack near the entrance is a smart choice. It makes hanging coats quick and simple. You won’t have to carry wet coats through the house. This keeps your floors clean and dry.
Away From Heat Sources
Keep the coat rack away from heaters and fireplaces. Heat can damage your coats and make the area uncomfortable. A cool, dry spot is best to protect your gear.
Room For Air Circulation
Good air flow helps coats dry faster. Choose a spot with space around it. Avoid tight corners or crowded areas. Air circulation stops mold and bad smells.
Accessible For Everyone
Make sure everyone in the family can reach the rack easily. Place it at a height that works for all ages. This helps keep the space neat and encourages use.
Designing Your Coat Rack
Designing your ski coat rack is the first step to making a useful and stylish storage solution. It helps keep your coats organized and your entryway tidy. Focus on size and style to match your space and needs.
Think about how many coats and gear you want to hang. Also, consider the look that fits your home’s style. A well-designed rack makes a great first impression and lasts for years.
Size And Capacity
Measure the space where you want to place the rack. Choose a size that fits without crowding the area. Count the number of coats, hats, and scarves you need to hang. Add extra hooks for guests and future use. A rack that holds enough items keeps everything neat and easy to find.
Style And Finish
Pick a style that matches your home’s decor. Rustic wood adds warmth, while metal looks modern and sleek. Use paint or stain to protect the rack from moisture. A smooth finish makes cleaning easier and keeps the rack looking new. Simple designs often work best for busy entryways.
Cutting And Preparing Wood
Cutting and preparing wood is the first step in building your ski coat rack. This stage shapes the wood pieces you will use. Good preparation makes assembly easier and ensures a strong rack.
Measure each piece carefully. Use a pencil and ruler to mark where to cut. Accuracy here saves time later. Choose wood that is sturdy but easy to cut, like pine or cedar.
Gathering The Right Tools
Use a saw that fits the size of your wood. A handsaw works well for small pieces. For larger wood, a circular saw helps cut quickly. Sandpaper smooths edges and removes splinters.
Measuring And Marking Wood Pieces
Measure twice, cut once. Mark each cut line clearly. Use a square tool to keep lines straight. This avoids mistakes and wasted wood. Label each piece to keep track.
Cutting The Wood Safely
Wear safety glasses and gloves. Cut on a stable surface. Follow your marks slowly and steadily. Let the saw do the work; don’t force it. Check each piece after cutting.
Sanding And Smoothing Edges
Sand all edges to prevent splinters. Use fine-grit sandpaper for a smooth finish. Wipe dust off with a cloth. Smooth wood looks better and is safer to handle.
Assembling The Frame
Assembling the frame is the first step in building your ski coat rack. A strong frame ensures the rack will hold heavy coats without tipping over. Focus on creating a stable base and solid sides. This will keep the rack steady and durable for years.
Work on the frame with care. Use the right tools and materials. Follow the steps carefully for a smooth assembly process. This part sets the foundation for the entire project.
Gathering Materials And Tools
Start by collecting all necessary materials. You will need wood boards, screws, brackets, and wood glue. Also, prepare tools like a drill, screwdriver, measuring tape, and a level. Having everything ready saves time and reduces errors.
Cutting The Wood Pieces
Measure each piece of wood carefully. Cut the boards to the size needed for the base, sides, and top frame. Use a saw for straight, clean cuts. Accurate cuts make the frame fit tightly together.
Joining The Frame Pieces
Attach the base pieces first. Use screws and wood glue for strong joints. Next, fix the side boards upright on the base. Check that each piece is level and square. Tighten screws firmly but avoid splitting the wood.
Checking Stability And Alignment
After assembling, test the frame’s stability. Press gently on different parts to see if it wobbles. Adjust screws or add corner brackets to strengthen weak spots. Make sure the frame stands straight and secure.
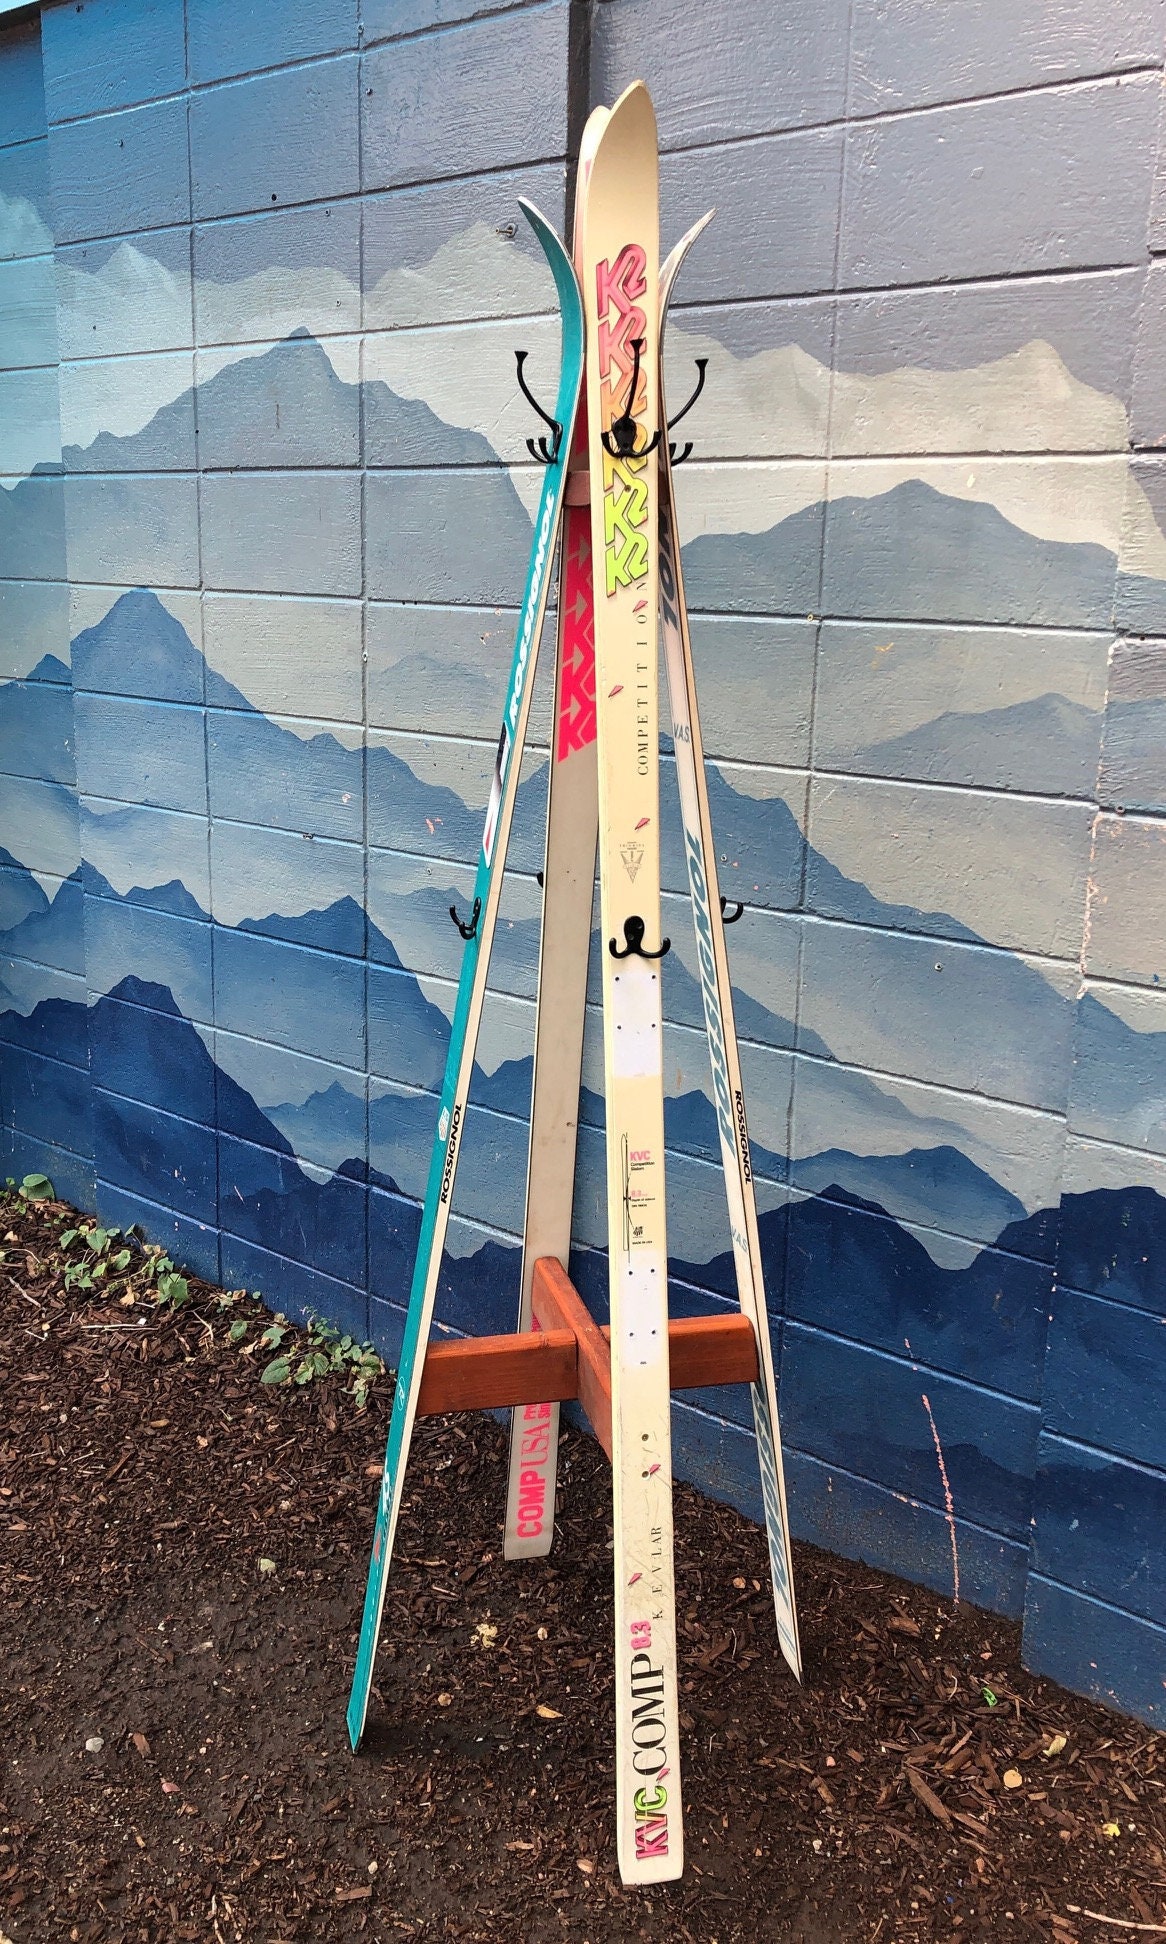
Credit: www.etsy.com
Installing Hooks And Hangers
Installing hooks and hangers is a key step in building a ski coat rack. These parts hold your coats, hats, and gloves safely. Proper installation makes the rack strong and easy to use. Follow clear steps to place hooks in the right spots. Choose hangers that fit your space and needs.
Choosing The Right Hooks
Select hooks that are strong and durable. Metal hooks work well for heavy coats. Plastic hooks can break under weight. Pick hooks with smooth edges to avoid damage. The size of hooks should match the coat thickness. Small hooks may not hold bulky winter gear.
Marking Hook Positions
Measure the space on your rack board carefully. Use a pencil to mark where each hook will go. Keep equal distance between hooks for neatness. Place hooks high enough for long coats. Avoid placing hooks too close to each other.
Securing Hooks Firmly
Use screws or nails to attach hooks. Pre-drill holes to prevent wood splitting. Tighten screws until hooks feel stable. Check each hook by pulling gently. Loose hooks can cause coats to fall. Make sure all hooks are level and straight.
Adding Finishing Touches
Adding finishing touches to your ski coat rack makes a big difference. These steps improve both look and durability. Take your time here for the best results. Small details matter.
Sanding And Painting
Sanding smooths the wood surface. It removes rough spots and splinters. Use fine-grit sandpaper for a gentle finish. Sand along the wood grain for best results.
Choose paint that matches your style. You can pick bright or neutral colors. Apply thin coats for even coverage. Let each coat dry fully before the next.
Protective Coating
Protective coating shields your rack from wear and tear. Use clear varnish or polyurethane for strong protection. Apply with a clean brush in smooth strokes. Wait for it to dry completely before use.
This layer helps your rack resist moisture and scratches. It keeps the paint looking fresh longer. Your ski coat rack will stay beautiful through many seasons.

Credit: prospectmtnfurniture.com
Mounting The Coat Rack
Mounting the ski coat rack securely is key to its function and safety. Proper installation ensures the rack holds all your gear without falling. This section covers important steps for a strong, lasting mount.
Choose The Right Wall
Select a wall near your entryway or mudroom for easy access. The wall should be flat and free from obstructions. Avoid drywall alone; studs provide the best support.
Locate Wall Studs
Use a stud finder to find wooden studs behind the wall. Mark their positions with a pencil. Screwing into studs makes the rack more stable and safer.
Mark Mounting Points
Hold the coat rack at the desired height. Use a level to keep it straight. Mark the holes for screws on the wall, aligning with studs if possible.
Drill Pilot Holes
Drill small pilot holes into the marked spots. This step prevents the wall and rack from splitting. Match the drill bit size to your screws.
Install Wall Anchors If Needed
If no studs are available, use wall anchors for extra support. Insert anchors into the pilot holes. They help hold screws tightly in drywall.
Screw In The Coat Rack
Use screws long enough to go through the rack and into the wall or anchors. Tighten screws firmly but avoid over-tightening. Check the rack’s stability by gently pulling on it.
Organizing Winter Gear
Organizing winter gear helps keep your space tidy and ready for cold days. Winter items like ski coats, gloves, and hats can clutter your home quickly. A dedicated place for these items saves time and reduces mess. Building a ski coat rack creates a simple, effective storage solution. It keeps everything in one spot and easy to grab before heading outside.
Choose The Right Location
Select a spot near the door or mudroom. This makes it easy to hang coats right after coming inside. Avoid places that block walkways or feel crowded. A clear, accessible area keeps winter gear organized and out of the way.
Use Hooks And Shelves
Install strong hooks to hold heavy ski coats and bags. Add shelves above hooks for hats, gloves, and scarves. This setup uses vertical space well. It keeps small items visible and easy to find.
Label Sections For Each Item
Labels help everyone know where to put their gear. Mark spots for coats, boots, and accessories. This simple step keeps the rack neat and organized. It also helps kids remember where to hang their items.
Include A Boot Tray
A boot tray catches snow and mud from wet boots. It protects your floor from damage and dirt. Choose a tray that fits the space under your rack. This keeps the area clean and safe during winter.
Maintenance Tips
Maintaining your ski coat rack keeps it sturdy and looking fresh. Regular care helps it last longer and hold heavy coats well. Simple steps can protect the wood or metal from damage. Clean, check, and tighten parts often for the best results.
Cleaning Your Ski Coat Rack
Dust the rack with a soft cloth every week. Use a damp cloth for sticky spots. Avoid harsh chemicals that can damage the finish. Dry it well to stop water marks or rust.
Checking For Loose Screws
Look over screws and hooks monthly. Tighten any that feel loose. Loose parts can cause the rack to wobble or break. Use the right screwdriver to avoid stripping screws.
Protecting Wood Surfaces
Apply a wood polish or wax every few months. This keeps the wood smooth and shiny. It also guards against scratches and spills. Wipe off dust before applying polish for best effect.
Preventing Rust On Metal Parts
Keep metal hooks dry to stop rust. Use a rust remover if spots appear. A light coat of oil can protect metal from moisture. Store the rack away from damp areas.
Frequently Asked Questions
How Do I Choose Materials For A Ski Coat Rack?
Select durable wood like pine or oak for strength. Use sturdy hooks to hold heavy coats securely. Choose moisture-resistant finishes to protect against snow and water damage.
What Tools Are Needed To Build A Ski Coat Rack?
Common tools include a saw, drill, screws, measuring tape, level, and sandpaper. These help cut, assemble, and finish the rack precisely and safely.
How Can I Mount A Ski Coat Rack On Drywall?
Locate wall studs for secure mounting. Use heavy-duty anchors if studs aren’t available. Ensure screws and hooks support the rack’s weight and hanging coats safely.
What Design Features Improve A Ski Coat Rack’s Functionality?
Include multiple sturdy hooks spaced evenly. Add a shelf for gloves or hats. Ensure the rack is tall enough for long coats to hang freely.
Conclusion
Building a ski coat rack is simple and practical. You can organize your winter gear with ease. Choose materials that suit your style and space. Follow clear steps to create a sturdy rack. This project saves money and adds personal touch.
Enjoy a tidy entryway and easy access to coats. Try it yourself and see the difference. A small effort brings big benefits for your home.

