Are you ready to create a cozy and safe space for your little one to sleep? Building a toddler bed yourself is easier than you might think—and it gives you the chance to customize every detail for your child’s comfort and style.
Imagine the pride you’ll feel when your toddler climbs into a bed you made with your own hands. In this guide, you’ll find simple, step-by-step plans that anyone can follow, even if you’re new to woodworking. Keep reading, and you’ll discover how to build a toddler bed that’s not just practical, but a special part of your child’s growing-up years.
Choosing The Right Materials
Choosing the right materials is the first step in building a safe toddler bed. The bed must be strong, smooth, and free from harmful chemicals. Using the right wood and finishes helps protect your child. The tools you use can make the project easier and better. This section guides you through selecting materials that keep your toddler safe and comfortable.
Selecting Safe Wood Types
Choose wood that is sturdy and non-toxic. Pine, maple, and birch are good options. Avoid wood with knots or splinters. Sand the wood smooth to prevent scratches. Hardwoods last longer and resist dents. Softwoods are easier to work with but need extra care. Always pick wood that is untreated or labeled safe for children.
Picking Non-toxic Finishes
Non-toxic finishes protect the wood without harming your toddler. Look for water-based paints and varnishes. These dry fast and have low fumes. Avoid finishes with strong smells or harmful chemicals. Natural oils like beeswax and linseed oil are safe choices. Apply finishes in a well-ventilated area. Let the bed dry completely before use.
Gathering Necessary Tools
Having the right tools saves time and effort. Basic tools include a saw, drill, hammer, and screwdriver. Sandpaper or an electric sander smooths rough edges. Clamps hold pieces steady while working. A tape measure and pencil help with accurate cuts. Use safety gear like gloves and goggles. Prepare all tools before starting the project.
Credit: thewoodworkersplans.com
Designing The Bed Frame
Designing the bed frame is the first step in building a toddler bed. It sets the foundation for a safe and comfortable sleep space. A well-designed frame supports the mattress and fits the room size. It also ensures the bed lasts for years.
Careful planning helps avoid mistakes and saves materials. Focus on simple, sturdy designs that suit toddlers’ needs. Keep the frame low to the ground for easy access and safety.
Measuring Toddler Bed Dimensions
Start by measuring the mattress size. Most toddler mattresses are 28 by 52 inches. Add extra space for the frame around the mattress. The frame should be about 1 to 2 inches larger on each side.
Measure the height carefully. The bed should be low, about 10 to 14 inches from the floor. This height helps toddlers climb in and out safely. Check your room space to ensure the bed fits well.
Sketching The Frame Layout
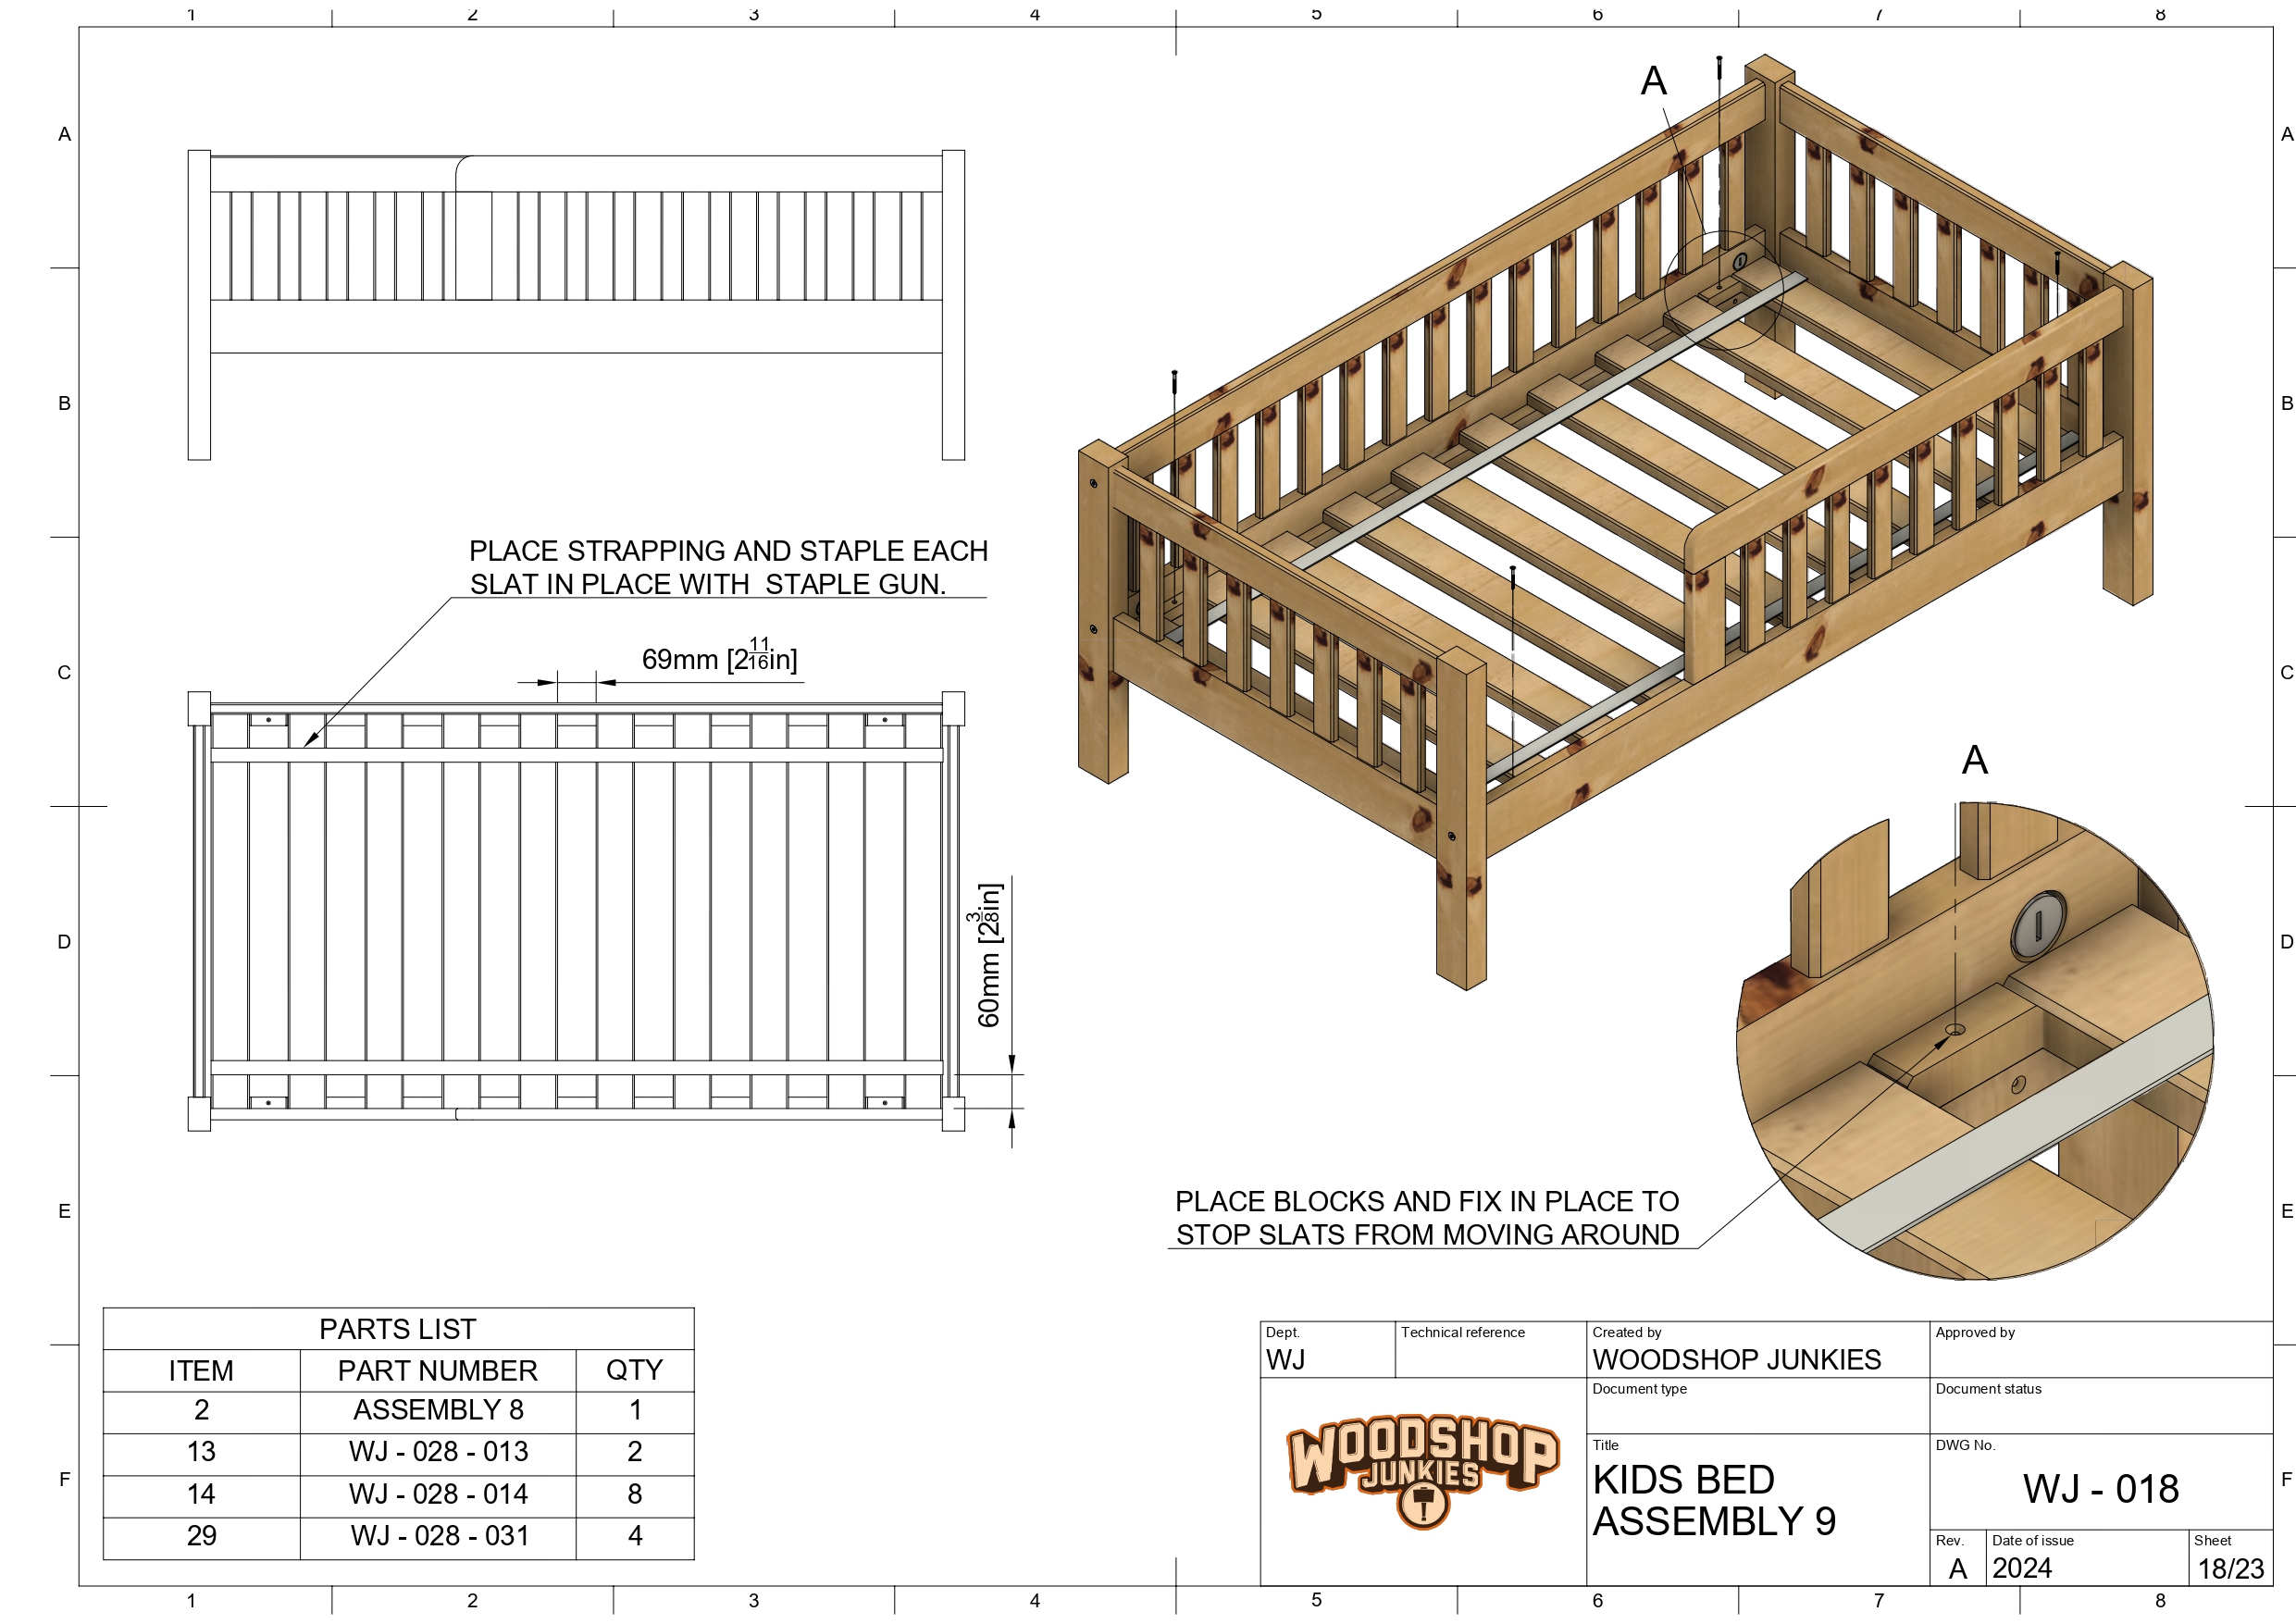
Draw a simple sketch of the bed frame on paper. Show the top view and side view. Mark the mattress position and frame parts clearly. Include slats or supports in the design.
Use straight lines and clear labels. Sketching helps plan cuts and assembly steps. It also shows where screws and joints will go. Keep the design simple for easy building.
Planning For Safety Features
Safety is very important in toddler beds. Plan guardrails to stop falls. Make rails about 5 to 7 inches above the mattress. Ensure there are no sharp edges or gaps.
Choose non-toxic paint or finish. Sand all surfaces smooth to avoid splinters. Check that screws and nails are flush or hidden. These steps protect your child during sleep.
Cutting And Preparing Wood
Cutting and preparing wood is a key step in building toddler bed plans. Precise cuts ensure the bed fits together well and stays safe for your child. Taking time to prepare wood correctly helps avoid mistakes and keeps the project smooth.
Marking Cut Lines
Start by measuring each piece of wood carefully. Use a pencil to draw clear, straight lines where you will cut. Double-check your measurements before marking. Accurate lines guide your saw and make cuts clean. Use a square tool for perfect right angles.
Using Power Tools Safely
Power tools make cutting faster but need care. Always wear safety goggles and ear protection. Keep your hands away from the blade. Use clamps to hold wood steady while cutting. Follow the tool’s instructions and work slowly. Never rush or force the saw.
Sanding For Smooth Edges
After cutting, the wood edges might feel rough or splintered. Sand all cut edges with fine-grit sandpaper. This removes splinters and creates a smooth finish. Smooth edges protect your toddler from scratches. Sand until the wood feels safe to touch.
Credit: thewoodworkersplans.com
Assembling The Bed
Assembling the toddler bed is the exciting part where the project comes to life. This step turns all the cut wood pieces into a sturdy bed your child will love. Careful assembly ensures safety and durability for years of use. Follow each step slowly and check your work as you go.
Joining Frame Pieces
Start by connecting the side rails to the headboard and footboard. Use screws and wood glue for a strong bond. Align the edges properly to keep the frame square. Tighten the screws firmly but avoid over-tightening to prevent wood damage. Double-check the corners with a square tool for accuracy.
Installing Slats And Supports
Place the slats evenly across the frame to support the mattress. Use screws or nails to fix them in place. Add center supports if your plan includes them for extra strength. Make sure the slats lie flat and do not wobble. Proper support prevents mattress sagging and keeps the bed safe.
Securing Headboard And Footboard
Attach the headboard and footboard securely to the frame using bolts or screws. Tighten all fasteners firmly to prevent movement. Check that both pieces stand straight and do not lean. This step completes the bed’s structure and adds style. A sturdy headboard and footboard protect your toddler from falls.
Finishing Touches
Finishing touches make the toddler bed safe and beautiful. They protect the wood and add comfort for your child. Small details improve the bed’s look and function. These final steps help the bed last longer and keep your toddler secure.
Applying Paint Or Stain
Choose a non-toxic paint or stain made for children’s furniture. Use light coats and let each dry completely. This protects the wood from spills and wear. A smooth finish also feels nice to touch. Paint adds color, while stain shows wood grain.
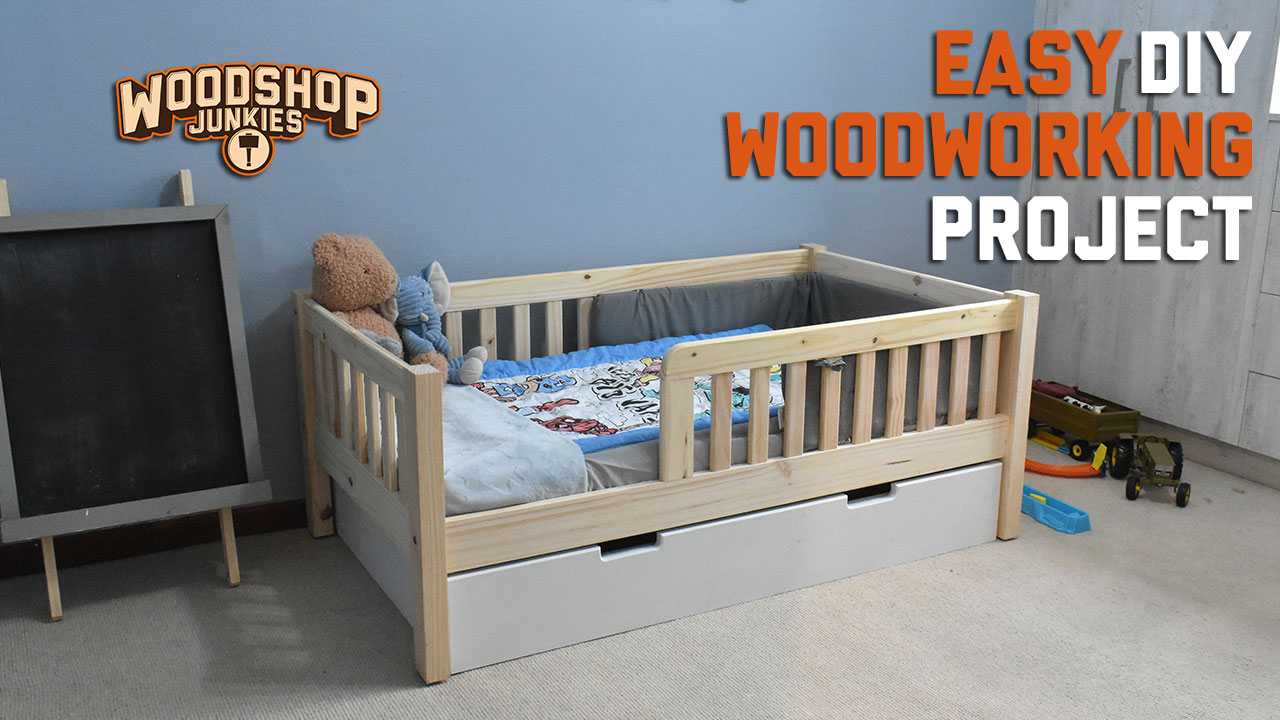
Adding Safety Rails
Safety rails stop toddlers from falling out of bed. Attach rails firmly on both sides of the bed. Make sure rails are high enough but easy to climb over. Sand all edges to avoid splinters or sharp spots. Good rails give parents peace of mind.
Ensuring Stability And Durability
Check all screws and joints are tight and secure. Use strong bolts instead of nails for better hold. Test the bed by pressing and shaking gently. A sturdy bed stays firm through active play and sleep. This keeps your toddler safe every night.

Credit: www.youtube.com
Maintaining The Toddler Bed
Maintaining your toddler bed is key for safety and comfort. Regular care keeps the bed strong and clean. It also helps your child sleep well every night.
Simple steps make maintenance easy. Checking the bed often prevents accidents. Cleaning keeps it fresh. Fixing small problems stops bigger damage.
Regular Safety Checks
Look at the bed parts regularly. Check screws and bolts. Tighten any that are loose. Inspect the frame for cracks or splinters. Make sure rails are secure. Keep the bed sturdy and safe.
Cleaning Tips
Wipe the bed frame with a damp cloth weekly. Use mild soap for stains. Avoid harsh chemicals that can harm the wood. Wash the mattress cover often. Let the bed dry fully before use. Clean bedding helps prevent allergies and germs.
Repairing Minor Damages
Fix small cracks or dents quickly. Use wood glue or filler for repairs. Sand rough spots gently to avoid splinters. Replace broken parts if needed. Small fixes keep the bed in good shape. Act early to keep the bed safe for your toddler.
Frequently Asked Questions
What Materials Are Needed For Toddler Bed Plans?
You need wood, screws, sandpaper, paint, and safety rails. Choose sturdy wood like pine or plywood for durability. Use child-safe paint and smooth edges to ensure safety. Having the right tools like a saw and drill is essential for assembly.
How Long Does It Take To Build A Toddler Bed?
Building a toddler bed typically takes 4 to 6 hours. This depends on your woodworking skills and tools available. Preparing materials and following detailed plans can speed up the process. Allow extra time for sanding and painting for a smooth finish.
What Safety Features Should Toddler Beds Include?
Toddler beds must have guardrails to prevent falls. Rounded edges and smooth finishes reduce injury risk. Ensure the mattress fits snugly to avoid gaps. Use non-toxic paint and secure all parts tightly for child safety.
Can I Customize Toddler Bed Plans Easily?
Yes, toddler bed plans are highly customizable. You can change dimensions, colors, and add storage features. Customizing helps fit the bed to your room and child’s preferences. Always maintain safety standards when making modifications.
Conclusion
Building a toddler bed can be a fun and rewarding project. Simple plans make the process clear and easy. You save money and create a safe, cozy bed for your child. Taking time to measure and cut carefully ensures a good fit.
Using quality materials keeps the bed sturdy and lasting. Enjoy watching your toddler sleep comfortably in a bed you built. Give it a try—you might surprise yourself with what you can do.