Are you staring at that old bookshelf and wondering if it could become something more useful? What if you could turn it into a stylish cabinet that fits perfectly in your space?
You don’t need to be a woodworking expert or spend a fortune. With a few simple steps, some basic tools, and a little creativity, you can transform your bookshelf into a beautiful cabinet that organizes your things and adds charm to your room.
Keep reading, and you’ll discover how easy and satisfying this project can be—plus, you’ll get insider tips to make your cabinet look professional every time. Ready to give your bookshelf a new life? Let’s dive in!
Choosing The Right Bookshelf
Choosing the right bookshelf is the first step in making a cabinet. This choice affects how your final piece will look and function. A good bookshelf will give you a strong base and enough space for storage. Think about what you want your cabinet to do. This will guide your choice.
Materials To Consider
Wood is the most common material for bookshelves. Solid wood is strong and lasts long. Plywood can work too. It is lighter and cheaper. Metal bookshelves are less common but very sturdy. Choose a material that fits your needs and budget. Also, consider how easy it is to work with the material.
Size And Shape Factors
Measure the space where you will put your cabinet. The bookshelf should fit well in this space. Tall bookshelves give more storage but may need extra support. Wide shelves offer more surface area. Think about the shape too. A square or rectangular bookshelf is easier to change into a cabinet. Avoid odd shapes unless you like a unique look.
Style Matching
Match the bookshelf style with your room decor. A classic wooden shelf fits well in traditional rooms. Modern metal or glass shelves suit contemporary spaces. The finish and color matter too. Pick a bookshelf that blends with your furniture. This keeps the room looking balanced and neat.

Credit: www.youtube.com
Preparing Your Workspace
Preparing your workspace is the first step to a smooth cabinet-making project. A clean, organized area helps you work faster and safer. It also keeps your tools and materials easy to find. Before starting, make sure you have enough space to move around and handle the bookshelf comfortably.
Tools Needed
Gather all tools before you start. Basic tools include a screwdriver, hammer, drill, measuring tape, and sandpaper. You might also need wood glue and clamps. Having everything ready saves time and avoids interruptions. Check each tool to ensure it works well.
Safety Precautions
Safety is important. Wear safety glasses to protect your eyes. Use gloves to guard your hands from splinters and sharp edges. Work in a well-ventilated space to avoid breathing dust. Keep a first aid kit nearby. Follow all tool instructions carefully.
Clearing The Area
Remove all items around your workspace. Clear the floor to prevent tripping hazards. Make sure pets and children stay away from the work zone. Organize your materials in one spot. A clutter-free area helps you focus and work better.
Removing Unnecessary Parts
Removing unnecessary parts is the first step to turn a bookshelf into a cabinet. This process helps create the right shape and space for your new cabinet. It also makes the piece look clean and ready for the next steps. Take time to remove parts carefully to avoid damage.
Taking Out Shelves
Start by removing all the shelves you don’t need. Most shelves are held by small pins or brackets. Gently lift or slide the shelves out. Keep the shelves you want to reuse or store them safely. This step opens up the space and makes the cabinet area bigger.
Sanding Surfaces
Sanding smooths rough edges left after removing shelves. Use medium-grit sandpaper for best results. Sand the inside and outside surfaces evenly. This step helps paint or stain stick better later. It also removes any old glue or dirt stuck to the wood.
Cleaning The Bookshelf
Clean the entire bookshelf before moving on. Use a damp cloth to wipe away dust and dirt. For sticky spots, use mild soap and water. Let the bookshelf dry completely. A clean surface ensures paint or finish looks nice and lasts longer.
:max_bytes(150000):strip_icc()/thediyplaybook-ba520e3afbdf4a81b3602f70f486e2f2.jpg)
Credit: www.thespruce.com
Adding Cabinet Doors
Adding cabinet doors transforms a plain bookshelf into a stylish storage unit. Doors protect your items from dust and create a clean look. This step is simple with the right tools and materials.
Choosing Door Types
Select door styles that fit your room’s design and bookshelf size. Common options include solid wood, glass, or framed doors. Solid doors hide clutter, while glass doors show off your items. Sliding doors save space, and hinged doors offer easy access. Pick doors that match your skill level and budget.
Measuring And Cutting
Measure the bookshelf opening carefully. Note height, width, and depth. Mark these dimensions on your door material. Use a saw to cut the doors to size. Smooth edges with sandpaper. Accurate measurements prevent gaps or tight fits.
Installing Hinges
Choose hinges that support your door weight and style. Position them evenly on the door edge. Mark hinge locations on the bookshelf frame. Attach hinges to doors first, then to the bookshelf. Test doors by opening and closing gently. Adjust screws for smooth movement and proper alignment.
Enhancing Storage Features
Enhancing storage features transforms a basic bookshelf into a functional cabinet. It improves organization and maximizes space use. Simple changes can make a big difference in how you store items.
Adding Interior Shelves
Adding shelves inside your bookshelf creates more storage levels. Use wood or metal shelves that fit the space well. Adjustable shelves allow flexibility for items of different sizes. Secure shelves firmly to avoid wobbling or falling.
Installing Drawers
Drawers add hidden storage and keep things tidy. You can install sliding drawers inside the bookshelf frame. Choose drawers that fit the depth and width of your shelf. Drawers help store small items that often get lost on open shelves.
Using Organizers And Dividers
Organizers and dividers keep items separated and easy to find. Use bins, baskets, or trays on shelves to group similar things. Dividers can create sections for books, papers, or tools. This makes the cabinet neat and clutter-free.
Finishing Touches
Finishing touches make your cabinet look complete and polished. These steps improve the cabinet’s appearance and protect it from damage. A well-finished cabinet feels like a new piece of furniture.
Painting And Staining
Choose paint or stain that matches your room’s style. Paint gives a smooth, solid color. Stain shows the wood’s natural grain. Apply thin, even coats for the best result. Let each coat dry before adding the next. Sand lightly between coats for smoothness.
Adding Handles And Knobs
Pick handles or knobs that fit your cabinet’s design. Measure and mark the spots carefully. Drill holes straight to avoid damage. Attach the handles tightly but gently. Handles make the cabinet easy to open and add style.
Sealing For Durability
Seal the cabinet with a clear finish. This protects from water, scratches, and wear. Use a brush or spray for an even layer. Allow the sealant to dry fully before use. Sealing extends your cabinet’s life and keeps it looking fresh.
Maintaining Your New Cabinet
Maintaining your new cabinet is key to keeping it useful and looking good. A little care goes a long way. Follow simple steps to protect your cabinet from wear and damage. Keep it clean, fix small problems early, and protect its surface. These habits help your cabinet last longer and stay attractive.
Regular Cleaning Tips
Dust the cabinet often with a soft cloth. Avoid using wet or harsh cleaners. Use a dry or slightly damp cloth for best results. Clean spills immediately to stop stains. Wipe shelves and doors gently to keep the finish intact. Regular cleaning keeps your cabinet fresh and neat.
Preventing Damage
Place your cabinet away from direct sunlight and heat sources. Use coasters or mats under items to avoid scratches. Do not overload shelves; this can cause sagging or breaks. Open and close doors slowly to protect hinges. Avoid placing wet or heavy objects directly on the surface. These steps help keep your cabinet strong and safe.
Periodic Repairs
Check hinges and screws every few months. Tighten any loose parts to keep doors aligned. Fix scratches or chips with touch-up paint or wood filler. Replace worn-out handles or knobs to maintain function. Repair small issues quickly to prevent bigger problems. Regular upkeep keeps your cabinet working well for years.
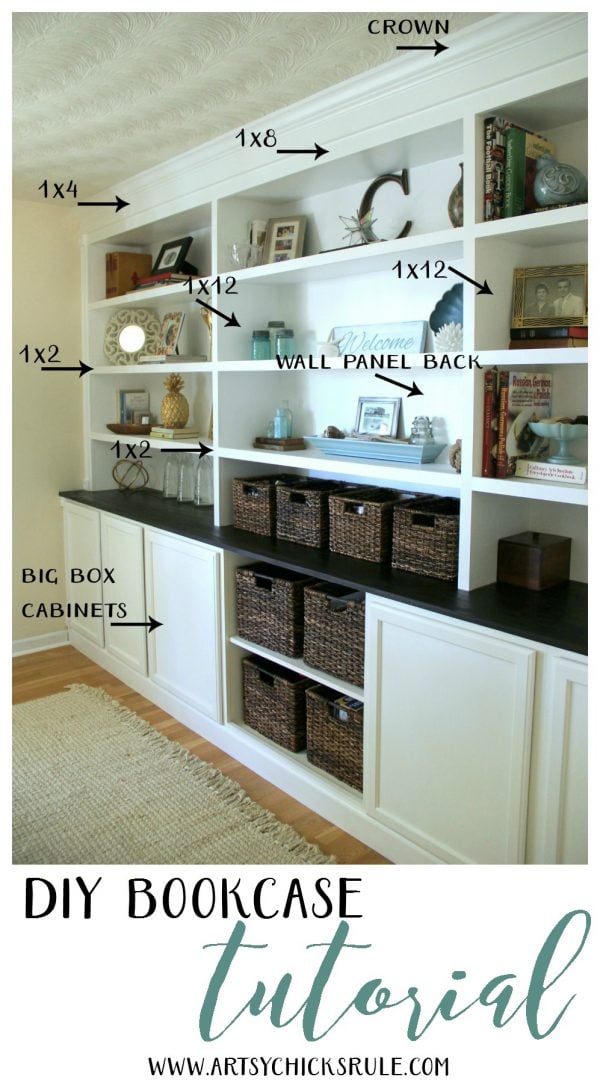
Credit: www.artsychicksrule.com
Frequently Asked Questions
How Can I Convert A Bookshelf Into A Cabinet?
To convert a bookshelf into a cabinet, add doors and shelves inside. Secure hinges and handles, then paint or stain for a finished look.
What Materials Are Needed To Make A Cabinet From A Bookshelf?
You need hinges, cabinet doors, screws, a drill, handles, sandpaper, paint or stain, and optional shelves for extra storage.
How Do I Install Cabinet Doors On A Bookshelf?
Measure and mark door placement, attach hinges to doors first, then secure hinges to the bookshelf frame carefully for proper alignment.
Can I Customize The Interior Of A Bookshelf Cabinet?
Yes, you can add adjustable shelves, drawer inserts, or dividers to organize items inside your new cabinet efficiently.
Conclusion
Transforming a bookshelf into a cabinet saves money and space. It also gives your room a fresh, new look. The steps are simple and clear to follow. Just take your time and enjoy the process. You can add shelves or doors as you like.
This project suits beginners and helps build skills. Try it yourself and see how easy it can be. A custom cabinet made by you feels special and useful. Start today and create something unique for your home.