Are you looking for a simple way to turn your old bookshelf into a stylish cabinet? Imagine having extra storage space without buying new furniture.
You can do this yourself with just a few steps. This guide will show you how to transform your bookshelf into a functional cabinet that fits your space and style. Keep reading, and you’ll discover easy tips that save you money and give your room a fresh look.
Ready to get started? Let’s dive in!
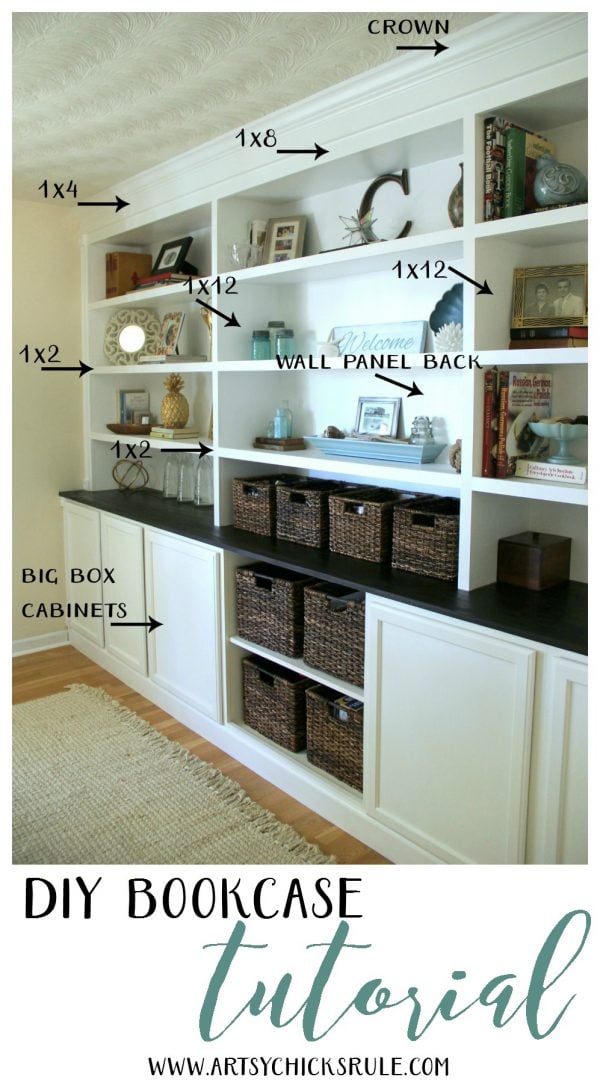
Credit: www.artsychicksrule.com
Choosing The Right Bookshelf
Choosing the right bookshelf is key to making a great cabinet. The right base saves time and effort. It also ensures the final piece looks and works well. Focus on three main points. Material and build quality, size and shape, and style and design matching.
Material And Build Quality
Strong materials hold up better over time. Solid wood is a top choice. It is sturdy and easy to work with. Particleboard or MDF may be cheaper but often less durable. Check how well the bookshelf is made. Tight joints and smooth surfaces show good quality. Avoid shelves that feel weak or wobbly.
Size And Shape Considerations
Measure the space where the cabinet will go. The bookshelf should fit well without crowding. Consider height, width, and depth. Tall shelves create vertical storage but may be harder to reach. Shorter shelves offer easier access. Square or rectangular shapes work best. Odd shapes can be tricky to modify.
Style And Design Matching
Match the bookshelf style to your room decor. Simple designs suit modern rooms. Ornate or carved shelves fit classic spaces. Choose a color or finish that blends well. A matching style helps the cabinet look like a natural part of the room. It also makes the transformation smoother and more attractive.
Gathering Essential Tools And Materials
Starting a cabinet project from a bookshelf needs careful planning. Gathering the right tools and materials saves time and effort. It helps create a strong, good-looking cabinet. This section covers the essential items you need before starting.
Basic Tools Needed
Basic tools form the foundation of your project. You will need a screwdriver for removing and attaching screws. A drill is important for making holes and driving screws faster. A saw helps cut wood to the right size. Sandpaper smooths rough edges for a neat finish. A tape measure ensures accurate measurements. A pencil marks cutting lines and placement spots.
Additional Supplies For Cabinet Features
Extra supplies depend on your cabinet design. Hinges are needed for doors to open and close. Handles or knobs make the cabinet easy to use. Wood glue adds strength to joints. Paint or wood stain improves the look and protects the surface. Screws and nails hold parts together firmly. A level helps keep shelves and doors straight.
Safety Gear
Safety gear protects you during the project. Wear safety glasses to guard your eyes from dust and debris. Use gloves to protect your hands from splinters and sharp tools. A dust mask prevents inhaling harmful dust particles. Ear protection is important when using loud power tools. Always work in a well-ventilated area to avoid breathing fumes from paint or glue.
Preparing The Bookshelf For Transformation
Preparing the bookshelf for transformation is the first step to create a beautiful cabinet. This stage sets the foundation for a strong and polished final piece. Taking time to prepare ensures the cabinet will last longer and look great.
Cleaning And Sanding
Start by cleaning the bookshelf thoroughly. Remove all dust, dirt, and grease using a damp cloth or mild cleaner. This helps the paint or finish stick better.
After cleaning, sand the entire surface. Use medium-grit sandpaper to smooth rough spots and remove old paint or varnish. Sanding also opens the wood grain for better adhesion.
Removing Or Adjusting Shelves
Decide which shelves to keep or remove based on your cabinet design. Some shelves may need to be taken out to fit cabinet doors or drawers.
If shelves are adjustable, remove the pins and reposition them as needed. For fixed shelves, use a saw or pry bar carefully to remove them without damaging the frame.
Fixing Structural Issues
Check the bookshelf for any loose joints, cracks, or damage. Tighten screws and use wood glue to secure weak parts.
Fill small holes or dents with wood filler. Let it dry, then sand smooth. This strengthens the structure and improves the cabinet’s look.
Adding Cabinet Doors
Adding cabinet doors to your bookshelf gives it a fresh, clean look. Doors help hide clutter and protect your items from dust. This step changes the bookshelf into a practical cabinet.
Follow simple steps to add doors that fit well and open smoothly. Choose the right door style, measure carefully, and install the hardware securely. This makes your project both functional and attractive.
Selecting Door Types
Pick doors that match your room’s style. Flat panel doors are simple and modern. Glass doors show items inside but keep dust out. Wood doors give a classic, warm feel. Consider your skill level and tools before choosing.
Measuring And Cutting Doors
Measure your bookshelf openings twice before cutting. Use a tape measure to get exact height and width. Cut doors slightly smaller than the opening for easy movement. Smooth edges with sandpaper to avoid splinters and rough spots.
Installing Hinges And Handles
Attach hinges to the door first, then to the bookshelf frame. Use a drill for precise holes and screws. Place handles where they feel natural to open. Test the doors to ensure they swing open and close easily without gaps.
Enhancing Interior Storage
Transforming a bookshelf into a cabinet can greatly improve your storage space. Enhancing the interior storage makes the cabinet more useful and organized. Small changes inside can help store many items neatly. Customizing the inside lets you fit different types of things. It also helps keep everything easy to find and access.
Adding Shelves Or Dividers
Adding extra shelves creates more layers for storage. Shelves let you separate tall and short items. Dividers help keep books or tools upright and tidy. You can use wood or plastic to make dividers. These small sections stop items from falling over. Adjust shelves to match the height of your items. This way, you use every inch inside the cabinet.
Installing Drawers Or Baskets
Drawers add hidden storage for small or loose items. Baskets offer a simple way to store things you use often. Both drawers and baskets keep clutter out of sight. They slide out easily for quick access. Choose baskets with handles for easy pulling. Installing a few drawers separates different types of items. This keeps your cabinet neat and organized.
Incorporating Lighting
Lighting inside the cabinet brightens the space and improves visibility. LED strip lights are easy to install and use little power. Good lighting helps find items in dark corners. Battery-operated lights work if no outlet is nearby. Lights make your cabinet look modern and clean. They also add a soft glow that makes the space inviting.
:max_bytes(150000):strip_icc()/thediyplaybook-ba520e3afbdf4a81b3602f70f486e2f2.jpg)
Credit: www.thespruce.com
Finishing Touches
Finishing touches transform your cabinet from a simple bookshelf into a beautiful piece. These final steps improve durability and add style. They make the cabinet look complete and protect it from damage.
Painting And Staining Options
Choose paint or stain to match your room’s style. Paint offers many colors and hides old marks. Stain shows the wood’s natural beauty and grain. Light stains brighten the space. Dark stains give a rich, classic look. Use smooth, even strokes for the best finish.
Applying Protective Coatings
Protective coatings keep your cabinet safe from scratches and spills. Clear polyurethane or varnish works well. They add shine and strength. Apply thin layers and let each dry fully. Sand lightly between coats for a smooth feel. This step helps your cabinet last longer.
Decorative Elements
Decorative touches add personality and charm. Try new handles or knobs for a fresh look. Add trim or molding to create depth. Use wallpaper or fabric on the back panel for color. Small details make your cabinet unique and inviting.
Maintenance Tips For Longevity
Keeping your cabinet made from a bookshelf in good shape helps it last longer. Proper care makes sure it stays strong and looks nice. Small efforts every now and then prevent big problems later. Follow these simple tips to maintain your cabinet well.
Cleaning Techniques
Dust your cabinet often to stop dirt buildup. Use a soft cloth or a feather duster for gentle cleaning. Avoid wet cloths as water can damage the wood. For sticky spots, use a damp cloth with mild soap. Dry the area immediately after cleaning to prevent moisture harm.
Repairing Common Issues
Check for loose screws and tighten them regularly. Fix small scratches with a wood repair marker or wax stick. For dents, try a damp cloth with a warm iron to lift the wood fibers. Replace broken hinges or handles quickly to keep the cabinet functional. Early repairs stop issues from getting worse.
Periodic Upkeep
Apply wood polish or wax every few months to protect the surface. Inspect the cabinet for signs of wear or damage often. Keep the cabinet away from direct sunlight and damp areas. Use felt pads under objects to avoid scratches. Regular care helps your cabinet stay sturdy and beautiful.

Credit: www.youtube.com
Frequently Asked Questions
How Do I Convert A Bookshelf Into A Cabinet?
To convert a bookshelf into a cabinet, add doors and shelves. Install hinges and handles for functionality. Paint or stain for a finished look. This transforms open storage into concealed, organized space.
What Materials Are Needed To Make A Cabinet From A Bookshelf?
You need hinges, handles, screws, wood glue, sandpaper, paint or stain. Also, use doors or panels to cover the shelves. Basic tools like a drill and screwdriver are essential.
How Long Does It Take To Build A Cabinet From A Bookshelf?
Building a cabinet from a bookshelf typically takes 2 to 4 hours. Time depends on skill level and complexity of doors and finishes. Preparation and drying times may extend the project duration.
Can I Customize The Cabinet Size From My Bookshelf?
Yes, customize by adjusting shelves or cutting the bookshelf to size. Add or remove shelves for desired storage space. Custom doors can also fit your specific dimensions.
Conclusion
Transforming a bookshelf into a cabinet saves money and space. You gain extra storage without buying new furniture. The steps are simple and easy to follow. Just gather tools, plan your design, and start building. This project suits beginners and experienced DIYers alike.
Enjoy a unique cabinet made by your own hands. Try this idea and see how useful it can be. Keep improving your skills with small projects like this. Your home will look better and stay organized too.