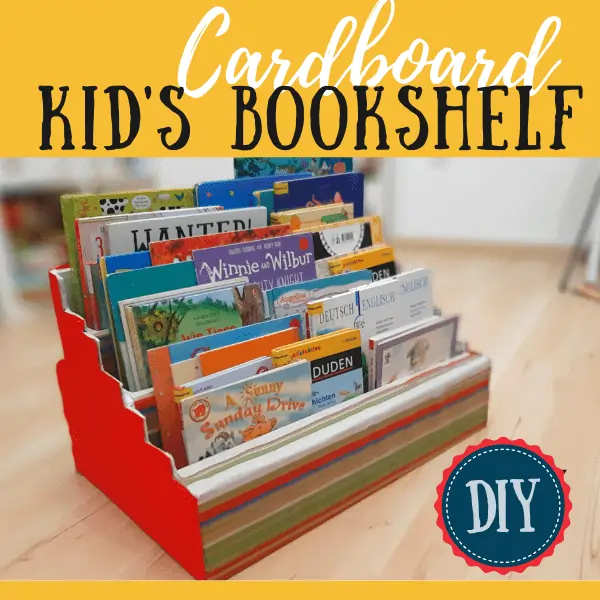
Are you looking for a simple and affordable way to organize your books? Making a cardboard bookshelf might be the perfect solution for you.
It’s easy, budget-friendly, and lets you create a custom storage space that fits your style. Imagine having a unique shelf that not only holds your favorite reads but also adds a personal touch to your room. In this guide, you’ll discover step-by-step how to build your own sturdy cardboard bookshelf.
Keep reading to turn ordinary cardboard into something truly useful and eye-catching!
Credit: www.buckdencamping.co.uk
Materials Needed
Gathering the right materials makes building a cardboard bookshelf easier. Using proper items helps the shelf stay strong and last longer. Organizing your supplies before starting saves time and effort.
Types Of Cardboard
Choose thick, sturdy cardboard for the best results. Double-wall or triple-wall cardboard works well. Avoid thin or flimsy sheets that bend or tear easily. Large flat pieces help create smooth shelves and sides. Recycled boxes can work if they are strong and clean.
Tools Required
Use a sharp utility knife to cut the cardboard precisely. A metal ruler helps make straight lines. A pencil marks where to cut or fold. A cutting mat protects your surface and keeps cuts neat. Scissors can help with small or curved cuts.
Additional Supplies
Strong glue or hot glue sticks hold parts firmly together. Packing tape can add extra support on edges. Sandpaper smooths rough edges for a clean finish. Paint or markers decorate the shelf and make it look nice. Clamps or heavy books keep pieces in place while drying.

Credit: www.youtube.com
Planning Your Bookshelf
Planning your cardboard bookshelf is the first step to a successful project. It helps you avoid mistakes and saves time. Careful planning ensures your bookshelf fits your space and holds your books well.
Think about what you need before cutting any cardboard. Consider size, shape, and how many shelves you want. Clear plans make the building process easier and more fun.
Choosing The Size
Decide where your bookshelf will go. Measure the space carefully. Choose a size that fits well without crowding the room. Think about how many books you want to store. Leave extra space for future books or decorations.
Design And Shape Ideas
Simple rectangular shelves are easy to make and strong. You can also try creative shapes like triangles or hexagons. Think about what looks good in your room. Sketch a few designs on paper. Choose one that is both nice and practical.
Measuring And Marking
Use a ruler or tape measure for accuracy. Mark your cardboard with a pencil. Draw straight lines for cuts and folds. Double-check measurements before cutting. Clear markings help keep your pieces even and fit well.
Cutting The Cardboard
Cutting the cardboard is the first step in making a sturdy bookshelf. It shapes the parts you need. This step needs care and precision. You want clean edges and the right sizes. The cardboard must be cut to fit perfectly.
Safety Tips
Use a sharp utility knife for clean cuts. Always cut away from your body. Keep your fingers clear of the blade path. Work on a flat, stable surface. Use a cutting mat to protect your table. Wear gloves if you feel it helps. Take your time to avoid mistakes and injuries.
Cutting Techniques
Score the cardboard lightly before cutting through. This helps you make straight lines. Use a ruler or a straight edge as a guide. Cut slowly with steady pressure. Avoid rushing to keep edges neat. For thick cardboard, make several light passes. This reduces tearing or bending.
Creating Shelf Panels
Measure the width and height of each panel. Mark the cardboard with a pencil for accuracy. Cut the bottom, top, and side panels first. Make sure all pieces match your design. Double-check measurements before cutting. Label each panel to avoid confusion later.
Assembling The Bookshelf
Assembling a cardboard bookshelf is a fun and rewarding project. It involves carefully putting parts together to create a sturdy shelf. Taking time during assembly ensures the bookshelf holds your books well. Follow each step carefully for a strong result.
Joining Panels Together
Start by lining up the panels. Use strong tape or glue to join edges. Press panels firmly to avoid gaps. Make sure corners form right angles. This step sets the base for your shelf.
Reinforcing Structure
Add extra cardboard strips along the inside corners. Glue or tape these strips tightly. They stop the shelf from bending or wobbling. Reinforcement helps the shelf last longer and hold more weight.
Adding Support Beams
Cut support beams from thick cardboard. Place them under each shelf level. Secure beams with glue or tape. These beams give extra strength to hold books safely. Check that all beams are straight and steady.
Finishing Touches
Finishing touches make your cardboard bookshelf look neat and last longer. These steps improve both safety and style. Let’s explore how to smooth, decorate, and protect your project.
Sanding Edges
Use fine sandpaper to smooth all the edges. This removes rough spots and small tears. Sand gently to avoid damaging the cardboard. Smooth edges prevent paper cuts and give a clean look. Take your time for the best finish.
Painting And Decorating
Choose paint that works on cardboard, like acrylic or tempera. Apply thin, even coats to avoid soaking the cardboard. Let each coat dry fully before adding the next. Add patterns, stencils, or stickers for a personal touch. Decorating makes your shelf unique and eye-catching.
Waterproofing Options
Protect your bookshelf from spills and humidity with a sealant. Use clear acrylic spray or a water-based varnish. Apply in a well-ventilated area and follow the instructions. Waterproofing extends the shelf’s life and keeps it strong. It also makes cleaning easier and safer.
Maintenance And Care
Taking care of your cardboard bookshelf helps it last longer. Proper maintenance keeps the shelf strong and looking good. Follow easy steps to clean, handle, and fix your shelf.
Cleaning Tips
Use a dry cloth to wipe dust from the shelf. Avoid using water or wet cleaners. Moisture can weaken the cardboard. For stubborn dirt, gently brush with a soft brush. Keep the shelf in a dry place to prevent damage.
Handling Weight Limits
Do not overload the shelf with heavy books. Cardboard has a weight limit that must be respected. Spread books evenly across the shelves. Place heavier items on the bottom shelf for balance. Avoid pushing or pulling the shelf roughly.
Repairing Damages
Small tears can be fixed with strong tape or glue. Use cardboard pieces to support weak spots. Replace damaged parts if possible to keep the shelf stable. Repair cracks quickly to stop them from growing. Handle repairs gently to avoid more harm.

Credit: upcyclemystuff.com
Frequently Asked Questions
What Materials Are Needed To Make A Cardboard Bookshelf?
You need sturdy cardboard, a cutting tool, ruler, pencil, glue, and tape. These ensure a strong, durable bookshelf that holds books safely.
How Long Does It Take To Build A Cardboard Bookshelf?
Building a cardboard bookshelf usually takes 2 to 4 hours. Time varies by design complexity and your crafting experience.
Is A Cardboard Bookshelf Strong Enough For Heavy Books?
Yes, if made with thick cardboard and reinforced properly. Adding extra layers and supports increases weight capacity significantly.
Can I Customize The Size Of The Cardboard Bookshelf?
Absolutely! Cardboard allows easy customization. You can adjust height, width, and shelf spacing to fit your space.
Conclusion
Building a cardboard bookshelf is simple and fun. It saves money and helps the environment. You only need a few materials and some time. This project works well for beginners and kids. It also lets you customize your shelf size and shape.
Try adding colors or patterns to make it unique. Keep your books organized and easy to find. Enjoy your new, lightweight bookshelf made from recycled cardboard. Give this easy craft a try today!