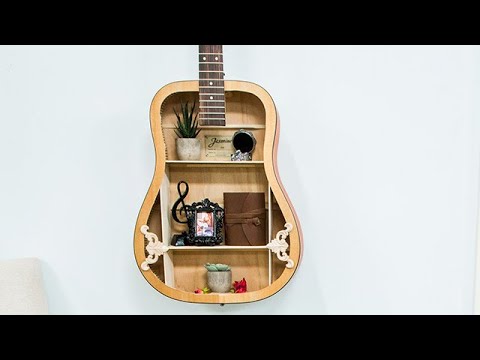
Looking for a unique way to show off your love for music and books? Imagine turning your old guitar into a stylish bookshelf that grabs attention and sparks conversation.
You don’t need to be a woodworking expert or spend a fortune to create this eye-catching piece. In this guide, you’ll discover simple steps to transform a guitar into a functional and beautiful bookshelf that fits perfectly in your space.
Ready to impress your friends and organize your favorite reads with a touch of rock ’n’ roll? Keep reading, and let’s get started!

Credit: www.youtube.com
Choosing The Right Guitar
Choosing the right guitar is key when making a guitar bookshelf. The guitar will be the main part of your project. Its style and size affect the design and function of the bookshelf.
Consider what type of guitar fits your space and needs. Think about how the guitar’s shape will influence the bookshelf’s look. This step helps you build a shelf that works well and looks great.
Acoustic Vs Electric Options
Acoustic guitars have a hollow body and are usually larger. They offer a classic look with natural wood tones. Their shape can add a warm, rustic feel to your shelf.
Electric guitars are smaller and solid-bodied. They come in many shapes and colors. Electric guitars create a modern, edgy style for your bookshelf. Choose the guitar type that fits your room’s style.
Size And Shape Considerations
Measure the guitar’s length, width, and depth. These numbers guide how big your shelf should be. A larger guitar needs more space and stronger support.
Look at the guitar’s body shape. Some shapes are easy to build around. Others may need custom cuts or adjustments. Keep the guitar balanced on the shelf to avoid tipping.
Gathering Materials And Tools
Gathering the right materials and tools is the first step to build a guitar bookshelf. This phase sets the foundation for your project. Picking good wood and having the correct tools ensures a smooth build and a sturdy shelf.
Careful selection helps avoid mistakes and saves time. It also makes the final product look professional and last longer. Prepare everything before you start cutting or assembling.
Essential Wood Types
Choose wood that is strong but easy to work with. Pine is affordable and simple to shape. Oak is harder and more durable for a lasting shelf. Birch offers a smooth finish and a nice look. Avoid wood that bends or cracks easily. Use wood with no knots or big holes to keep the shelf stable.
Required Tools Checklist
Gather all tools before starting your project. You will need a saw to cut the wood pieces. A drill helps make holes for screws. Sandpaper smooths rough edges and surfaces. A screwdriver tightens screws firmly. Measuring tape ensures accurate cuts and fitting. Clamps hold pieces in place while glue dries. Wood glue adds extra strength to joints.
Designing Your Bookshelf
Designing a guitar bookshelf needs careful thought. It should fit your space and hold your guitar safely. The design must balance style and function. Planning helps avoid mistakes and saves time.
Think about your room’s style and size. Your bookshelf can be modern, rustic, or simple. Make sure it blends well with your other furniture. A well-designed shelf can become a room’s highlight.
Measuring And Planning
Start by measuring the space for your bookshelf. Measure height, width, and depth carefully. Your guitar’s size matters too. Leave extra space for easy access and protection.
Draw a simple sketch with these measurements. Mark where shelves and supports will go. Plan the weight the shelf needs to hold. This helps choose the right materials.
Incorporating Storage Features
Think about extra storage needs. You may want space for books, picks, or music sheets. Add small drawers or cubbies for accessories. Open shelves work well for books and decor.
Ensure storage spots do not block the guitar. Keep shelves adjustable for flexibility. Good storage keeps your space tidy and organized.

Credit: www.reddit.com
Preparing The Guitar
Preparing the guitar is the first step in creating a unique bookshelf. You start by making sure the guitar is clean and ready to be changed. This step is important for safety and for the final look of your project. Taking time here helps the rest of the work go smoothly.
Cleaning And Modifying
Remove all strings carefully. Use a cloth to clean dust and dirt. Check for stickers or labels that need to be taken off. Sand any rough edges lightly to avoid splinters. If needed, remove hardware like tuning pegs and pickups. These parts can get in the way when cutting the guitar.
Decide where to cut the guitar body for shelves. Mark these areas with a pencil for accuracy. A clear plan makes the cutting step safer and easier.
Safety Tips For Cutting
Wear safety glasses to protect your eyes. Use gloves to keep your hands safe from sharp edges. Work in a well-ventilated area to avoid dust buildup. Secure the guitar firmly to prevent slipping during cuts. Use the right saw for the material and follow instructions carefully. Take breaks if you feel tired to avoid mistakes.
Keep a first aid kit nearby, just in case. Safety is key to a successful and enjoyable project.
Building The Frame
Building the frame is the first step to making your guitar bookshelf sturdy. The frame holds everything together and supports the guitar body. Focus on careful measurements and strong joints to create a solid base. Use quality wood to ensure durability and a nice finish. Take your time cutting and assembling the pieces accurately.
A well-built frame makes the whole project easier. It also keeps your guitar safe and stable while holding books. Follow the instructions below for a strong and neat frame.
Cutting And Assembling Wood
Start by measuring the wood pieces you need for the frame. Use a tape measure and mark each cut line clearly. Cut the wood with a saw, making straight and smooth edges. Sand the edges to avoid splinters and rough spots.
Lay out the pieces on a flat surface in the shape of the frame. Join the pieces using wood glue and screws for extra strength. Use clamps to hold the wood while the glue dries. Check the corners with a square tool to keep angles perfect. The frame should feel solid and not wobble.
Securing The Guitar Body
Place the guitar body inside the frame carefully. Make sure it fits snugly without forcing it. Use small brackets or wooden blocks to hold the guitar in place. Attach these supports to the frame with screws or glue. Avoid damaging the guitar by using soft padding where the frame touches it.
Test the stability by gently shaking the frame. The guitar should stay firmly in place. Adjust the supports if needed to keep the guitar safe. This step protects your instrument and makes the bookshelf functional and stylish.
Credit: www.youtube.com
Adding Shelves And Supports
Adding shelves and supports is a key step in making your guitar bookshelf both useful and strong. Shelves hold your books and decorations. Supports keep the shelves steady and safe from sagging. Careful planning here helps your bookshelf last long and look good.
Shelf Placement Ideas
Place shelves at different heights. This fits books of various sizes. Leave space for tall books or guitars. You can also create smaller sections for CDs or accessories. Balance the shelf spacing to spread weight evenly.
Consider the guitar shape when placing shelves. Avoid shelves that block guitar curves or straps. Keep some open space for display. Use adjustable shelves for flexibility. This lets you change shelf height anytime.
Ensuring Stability
Use strong wood or plywood for shelves. Attach shelves firmly to the guitar frame. Use screws and brackets for extra support. Check each shelf for wobbling after installation. Add corner braces inside shelves to stop sagging.
Distribute weight evenly across shelves. Avoid putting heavy items on one side. Use wall anchors if your bookshelf is tall. This prevents tipping and keeps the shelf safe. Test stability before loading many items.
Finishing Touches
Finishing touches give your guitar bookshelf a polished, complete look. They protect the wood and add style. Small details make a big difference. Take time to perfect these steps for a beautiful result.
Sanding And Painting
Start by sanding the entire bookshelf. Use fine-grit sandpaper for a smooth surface. Sand in the direction of the wood grain. Remove all dust with a damp cloth before painting.
Choose paint that suits your room style. Use a brush or spray paint evenly. Apply thin coats to avoid drips. Let each layer dry fully before the next coat. Consider a clear sealant for extra protection.
Decorative Elements
Decorate your bookshelf with simple elements. Add metal corner brackets for a vintage look. Use stencils to paint music notes or guitar shapes. Attach small hooks for hanging guitar picks or accessories.
Personalize with stickers or decals that match your taste. Use wood stain to highlight the grain. Small decorations give your bookshelf character and charm.
Maintaining Your Bookshelf
Keeping your guitar bookshelf in great shape takes some care. Regular maintenance helps the wood stay strong and the shelves look neat. A well-kept bookshelf lasts longer and keeps your books safe.
Small habits make a big difference. Clean it often and protect it from damage. This section shares easy tips to keep your bookshelf looking its best.
Cleaning Tips
Dust the shelves with a soft cloth every week. Use a dry or slightly damp cloth for best results. Avoid using too much water. It can harm the wood. Clean spills right away to stop stains. For stubborn spots, use mild soap and water. Wipe dry immediately after cleaning.
Preventing Damage
Place your bookshelf away from direct sunlight. Sun can fade and dry the wood. Avoid placing it near heaters or air conditioners. These can cause cracks or warping. Use coasters or mats under heavy items. Do not overload shelves with too many books. Balance the weight evenly. Check for loose screws or joints often. Tighten them to keep the shelf stable.
Frequently Asked Questions
What Tools Do I Need To Make A Guitar Bookshelf?
You need a saw, drill, screws, measuring tape, sandpaper, wood glue, and clamps. These tools help cut, assemble, and finish the bookshelf efficiently.
How Do I Prepare An Old Guitar For Shelving?
Remove the guitar’s strings and internal parts carefully. Clean and sand the surface to ensure smoothness before assembly.
What Type Of Wood Is Best For A Guitar Bookshelf?
Choose sturdy hardwood like oak, maple, or plywood for durability. These woods support weight and provide a polished look.
How Do I Secure Shelves Inside The Guitar Body?
Use wood glue and small screws to attach shelves inside. Ensure they fit snugly and are level for stability.
Conclusion
Building a guitar bookshelf adds style and function to any room. It saves space and shows off your guitar collection. You only need basic tools and some patience. Follow the steps carefully to create a sturdy shelf. Enjoy your new piece that holds books and guitars together.
Try different designs to fit your taste and space. This project brings creativity and usefulness in one. Start building today and see the difference it makes!