
Looking for a simple way to add charm and function to your home? Making a rustic coat rack could be exactly what you need.
Imagine having a unique piece that not only keeps your space organized but also brings warmth and character to your walls. This project is easier than you think, and you don’t need fancy tools or skills to get started. Keep reading, and you’ll discover step-by-step how to create a beautiful, sturdy coat rack that fits perfectly with your style.
By the end, you’ll have a piece that’s both practical and full of personality—ready to impress your guests and make your daily routine smoother.

Credit: www.youtube.com
Choosing Materials
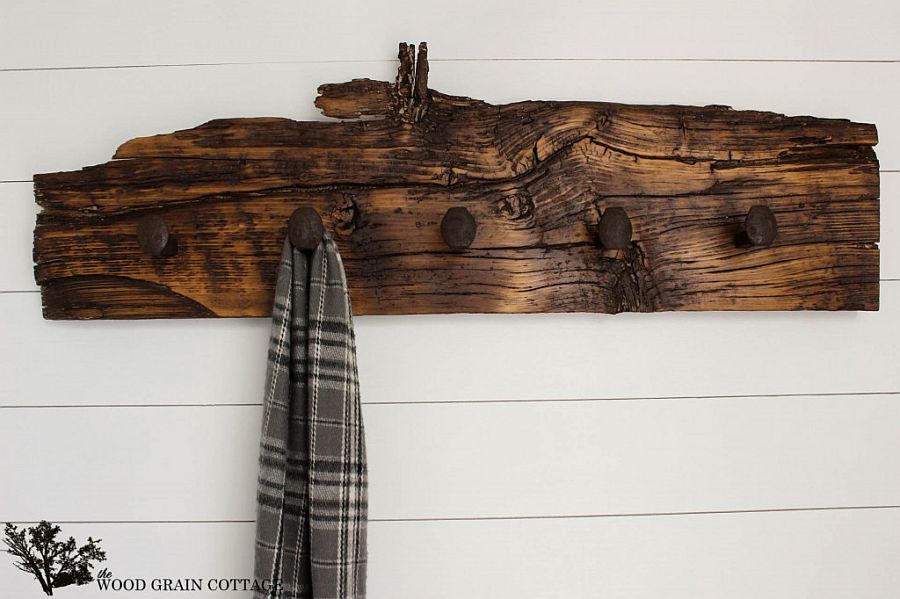
Choosing the right materials is the first step to making a rustic coat rack. The materials set the tone for your project. They affect how the coat rack looks and how long it lasts. Pick materials that are strong and fit the rustic style you want.
Simple, natural materials work best. You want something that feels warm and handmade. Think about wood that shows its natural grain and hardware with a vintage look. These choices give your coat rack charm and character.
Selecting Wood Types
Wood is the main part of your coat rack. Choose wood that is solid and easy to work with. Pine is a popular choice. It is soft, light, and has a nice grain. Oak is harder but very durable. It has a strong, rustic look.
Reclaimed wood is perfect for rustic projects. It has weathered edges and unique marks. These natural flaws add personality. Avoid wood that is too smooth or shiny. You want wood with texture and character.
Picking Hooks And Hardware
Hooks hold the coats and complete the style. Metal hooks with a worn finish fit the rustic theme. Look for hooks in black, bronze, or copper tones. They match well with natural wood.
Choose sturdy hooks that can hold heavy coats. Screw-in hooks are easier to install and strong. Use matching screws and brackets to keep the look consistent. Hardware that looks old or handmade adds charm.

Credit: www.thehandcraftedhaven.com
Tools You’ll Need
Building a rustic coat rack requires some essential tools. These tools help you cut, shape, and assemble wood pieces. Choosing the right tools makes the project easier and safer. You can work with basic hand tools or use power tools for faster results.
Basic Hand Tools
Hand tools are simple and easy to use. Start with a hammer to drive nails into wood. Use a tape measure to get exact wood lengths. A saw helps cut wood into pieces. Sandpaper smooths rough edges and surfaces. A screwdriver tightens screws and holds parts together. A pencil marks measurements on wood. These tools are good for beginners and small projects.
Power Tools For Efficiency
Power tools speed up your work and improve precision. A power drill quickly makes holes and drives screws. A circular saw cuts wood faster and straighter. An electric sander smooths wood surfaces with less effort. A jigsaw lets you cut curves or shapes. Power tools save time and reduce manual work. They suit larger projects or frequent woodworking.
Preparing The Wood
Preparing the wood is the first step to making a rustic coat rack. The wood must be ready to use. This means cutting it to the right size, smoothing the surface, and adding a worn look. These steps help the wood look natural and fit the rustic style.
Good preparation makes the building process easier. It also makes the final coat rack strong and beautiful.
Cutting To Size
Start by measuring the wood pieces. Mark the exact lengths needed for your coat rack. Use a saw to cut the wood carefully. Make straight cuts for clean edges. Cutting the wood to the right size keeps the rack balanced and neat.
Sanding For Smoothness
Use sandpaper to smooth all surfaces of the wood. Sand the edges to remove splinters. Smooth wood feels nice to touch and is safe to use. Sanding also helps paint or stain stick better. Spend time here for a polished look.
Adding Distress For Rustic Look
Create a worn, rustic look by gently distressing the wood. Use tools like hammers or chains to add small dents and scratches. Sand some areas more than others to show natural wear. This gives the rack character and charm. The rustic style comes alive with these details.
Credit: www.esseg.eu
Assembling The Rack
Assembling the rustic coat rack is the step where your project starts to take shape. This part needs careful attention to ensure the rack is sturdy and functional. You will focus on placing the hooks and attaching the hardware firmly.
Positioning Hooks
Decide how many hooks you want on your rack. Space them evenly along the wooden board. Mark each spot with a pencil. Make sure the hooks are at a comfortable height for easy use. Proper spacing prevents overcrowding and keeps the rack neat.
Attaching Hardware Securely
Use screws that fit your hooks well. Drill small pilot holes at the marked spots. This prevents the wood from splitting. Screw the hooks in tightly but gently. Check that each hook is stable and does not wobble. Secure hardware ensures your rack holds weight safely.
Finishing Touches
Finishing touches give your rustic coat rack its final look. These steps protect the wood and bring out its natural beauty. Take your time to make sure every detail is perfect. This will make your coat rack last longer and look great in any room.
Applying Stain Or Paint
Choose a stain or paint that fits your style. Stain shows the wood grain and gives a natural look. Paint adds color and covers imperfections. Use a brush or cloth to apply evenly. Let each coat dry before adding another. This helps avoid drips and uneven spots.
Sealing For Durability
Seal your coat rack with a clear finish. This protects it from water, dirt, and scratches. Use polyurethane or a similar wood sealer. Apply in thin, even layers. Allow drying time between coats. Sealing keeps the wood strong and looking new for years.
Mounting Your Coat Rack
Mounting your rustic coat rack is an important step that gives it function and style. Proper placement keeps it sturdy and easy to use. Follow simple guidelines to make sure your coat rack stays secure and looks great on your wall.
Choosing The Right Wall
Pick a wall near your door or entrance for convenience. Make sure the wall is strong enough to hold the weight of coats and bags. Drywall may need extra support like anchors or screws into studs. Avoid walls with pipes or wires behind them.
Installation Tips
Use a level to keep your coat rack straight. Mark the spots for screws before drilling. Choose screws that fit your wall type. Drill pilot holes first to avoid splitting the wood. Tighten screws until the rack feels firm. Check stability by gently pulling on the hooks.
Creative Variations
Creative variations can make your rustic coat rack unique and useful. Small changes can add style and function. These ideas help you customize your rack to fit your space and needs.
Adding Shelves Or Baskets
Shelves or baskets add space for small items like keys or hats. Attach a wooden shelf above the hooks for extra storage. Use baskets below the hooks to hold gloves or scarves. These additions keep things tidy and easy to find. They also make your coat rack more practical and attractive.
Using Reclaimed Materials
Reclaimed wood gives your coat rack a charming, worn look. Old barn wood, pallets, or fence boards work well. These materials add character and are eco-friendly. Each piece has unique marks and colors. Using reclaimed wood saves money and helps the environment. Your rustic coat rack will have a story to tell.
Frequently Asked Questions
What Materials Are Needed To Make A Rustic Coat Rack?
To make a rustic coat rack, you need wood planks, hooks, screws, sandpaper, paint or stain, and a drill. Choose reclaimed wood for an authentic rustic look. Quality hooks ensure durability and style.
How Do I Prepare Wood For A Rustic Coat Rack?
Start by sanding the wood to remove rough edges and splinters. Clean it thoroughly to remove dust. Apply a stain or paint to enhance the rustic feel. Let it dry completely before assembly.
Can I Customize The Size Of My Coat Rack?
Yes, you can customize the size based on your space and needs. Measure the wall area before cutting the wood. Adjust hook placement for optimal hanging capacity and style.
What Tools Are Essential For Building A Rustic Coat Rack?
You need a drill, screwdriver, measuring tape, level, and sandpaper. These tools help in precise cutting, assembling, and finishing the coat rack with ease and accuracy.
Conclusion
Creating a rustic coat rack adds charm to any space. You only need a few simple tools and materials. The steps are easy to follow and fun to do. This project saves money and lets you personalize your home. Hang your coats, hats, or bags in style.
Try making one today and enjoy the cozy feel. Small projects like this bring big satisfaction. Ready to add a rustic touch? Start building your coat rack now!

