Are you tired of bulky, boring bookshelves that take up too much space? Imagine having a sleek, stylish spine bookshelf that not only saves room but also highlights your favorite books in a unique way.
Making your own spine bookshelf is easier than you think, and it’s a project that will give your space a fresh, modern look. In this guide, you’ll discover simple steps and handy tips to build a bookshelf that fits perfectly in your home.
Ready to transform your reading nook? Let’s dive in and create something amazing together.
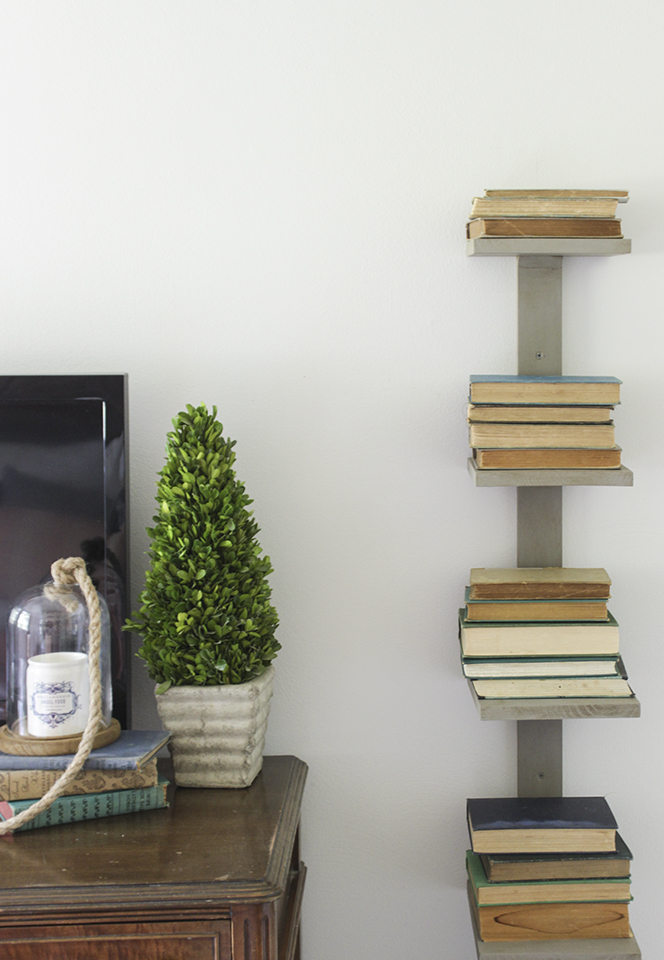
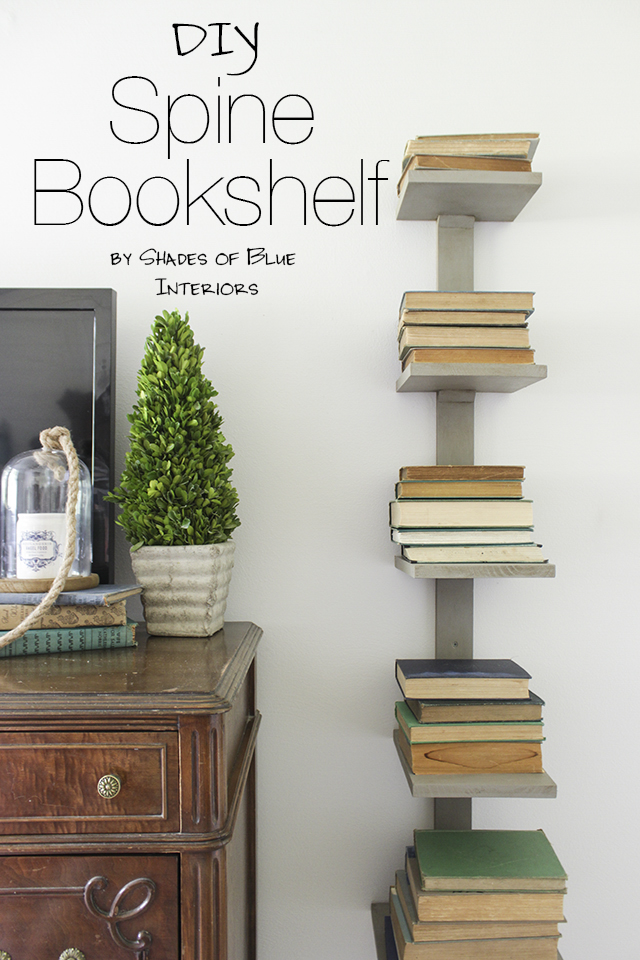
Credit: www.shadesofblueinteriors.com
Materials And Tools Needed
Building a spine bookshelf needs the right materials and tools. Good choices make your project easier. This section lists what you need to start.
Choosing The Right Wood
Pick wood that is strong and smooth. Pine, oak, or maple works well. Pine is soft and easy to cut. Oak and maple are harder but last longer. Check the wood for cracks or knots. These can weaken the shelf.
Essential Tools List
You need a saw to cut the wood. A drill helps make holes for screws. Use a screwdriver to tighten screws. A tape measure ensures your cuts are correct. Sandpaper smooths rough edges. A pencil helps mark measurements clearly. Clamps hold pieces steady while you work.
Optional Finishing Supplies
Paint or wood stain can improve the look. Use a brush or cloth for applying. A clear sealant protects the wood from damage. It also gives a shiny finish. Gloves and a mask keep you safe while working with finishes.
Credit: www.shadesofblueinteriors.com
Planning Your Bookshelf
Planning your spine bookshelf is the first step to a successful project. Good planning saves time and materials. It helps you create a bookshelf that fits your space and style. Start by thinking about the size and shape you want. Then, decide on the details of the spine design. Finally, make a clear blueprint to follow. This will guide your work and keep you on track.
Measuring And Dimensions
Measure the space where you will place the bookshelf. Note the height, width, and depth available. Think about how many books you want to store. Measure a few books to find the average thickness. Add extra space for air and easy access. Write down all these numbers clearly. This will help you cut the wood to the right size.
Designing The Spine Shape
The spine is the main feature of this bookshelf. Choose a shape that fits your room and taste. It can be simple like a straight line or curved like a wave. Draw different shapes on paper to see what looks best. Keep the spine strong enough to hold the shelves. Consider the wood thickness and support points. A good spine design makes the bookshelf both pretty and sturdy.
Sketching The Blueprint
Draw a clear blueprint before cutting any wood. Use a ruler and pencil for accuracy. Show the spine and shelf placement on the sketch. Mark the measurements you took earlier. Label each part to avoid confusion later. This blueprint acts like a map for your build. Follow it step by step for a smooth project.
Cutting And Shaping Wood
Cutting and shaping wood is a key step in building a spine bookshelf. This process shapes the wood to fit your design perfectly. Careful cutting ensures strong and smooth shelves. Shaping makes the wood pieces easy to assemble and look neat. Follow simple steps to cut and shape wood safely and accurately.
Marking Cut Lines
Start by measuring each wood piece carefully. Use a pencil to draw clear lines where you will cut. Double-check all measurements before marking. Use a ruler or straight edge for straight lines. Clear marks help you cut wood precisely. This reduces mistakes and saves wood.
Safe Cutting Techniques
Wear safety goggles and gloves before cutting. Use a sharp saw to make smooth cuts. Keep your hands away from the blade. Cut slowly and steadily along the marked lines. Use clamps to hold wood firmly in place. Stop and adjust if the saw slips. Safety keeps your work area accident-free.
Sanding And Smoothing Edges
After cutting, edges may feel rough or sharp. Use sandpaper to smooth all cut edges carefully. Start with coarse grit sandpaper for rough spots. Finish with fine grit for a smooth touch. Sand in the direction of the wood grain. Smooth edges prevent splinters and make assembly easier.
Credit: www.hgtv.com
Assembling The Bookshelf
Assembling the spine bookshelf is the most important step. It turns your wood pieces into a strong, useful shelf. Careful assembly makes sure the bookshelf holds your books safely. Follow the steps below to build a sturdy and neat bookshelf.
Joining Pieces Together
Start by aligning the spine and shelves carefully. Each piece should fit snugly without gaps. Use clamps to hold the pieces in place. Check that all angles are square before moving forward. This ensures the bookshelf will look good and stay stable.
Using Wood Glue And Screws
Apply a thin layer of wood glue on the joining edges. This adds extra strength to the connection. After gluing, drill pilot holes for the screws. Screws keep the pieces tightly joined. Drive the screws in slowly to avoid splitting the wood.
Ensuring Stability
Check the bookshelf for any wobbling or loose parts. Tighten screws if needed to secure all joints. Place the bookshelf on a flat surface to test balance. Add small pads under the legs if the floor is uneven. A stable bookshelf will hold books safely for years.
Finishing Touches
Finishing touches bring your spine bookshelf to life. They protect the wood and enhance its look. Small details make a big difference. These final steps create a beautiful and durable piece.
Painting Or Staining
Choose paint or stain to match your room style. Paint offers bright, solid colors. Stain shows wood grain and adds warmth. Use a brush or cloth for even coverage. Let each layer dry fully before applying the next. Two to three coats usually work best.
Adding Protective Coats
Protect your finish with a clear coat. Polyurethane or varnish adds shine and guards against scratches. Apply thin layers with a brush. Allow drying time between coats. This step helps your bookshelf last longer.
Decorative Enhancements
Decorate with small details for a personal touch. Add stencils, decals, or hand-painted designs. Consider attaching metal brackets or decorative knobs. These accents make your bookshelf unique and stylish.
Tips For Styling And Placement
Styling and placing a spine bookshelf can make a big difference in your room’s look. Thoughtful design helps your bookshelf stand out and fit well in your space. This section shares simple tips to arrange, decorate, and care for your new shelf.
Follow these easy ideas to make your spine bookshelf both useful and beautiful.
Arranging Books Creatively
Place books by color to create a bright, neat look. Mix tall and short books for variety. Stack some books horizontally to break the pattern. Use bookends to keep books upright and add style. Leave some empty space for a clean, open feel.
Complementing Room Decor
Match the bookshelf’s color with your room’s theme. Add small plants or art pieces on the shelves. Use lighting to highlight your books and decorations. Keep the area around the shelf tidy for a fresh look. Choose a spot that is easy to reach and see.
Maintenance And Care
Dust the shelves weekly to keep them clean. Wipe spills immediately to avoid damage. Check for loose screws or parts regularly. Avoid placing the bookshelf where it gets direct sunlight. Use a soft cloth for cleaning to protect the finish.
Frequently Asked Questions
What Materials Are Needed To Make A Spine Bookshelf?
You need wood planks, screws, wood glue, sandpaper, and paint or stain. Also, basic tools like a drill, saw, and measuring tape are essential for precise cuts and assembly.
How Do You Assemble A Spine Bookshelf Step-by-step?
First, cut wood pieces to size. Next, sand edges smooth. Then, attach shelves to the spine using screws and glue. Finally, paint or stain for a finished look.
Can I Customize The Size Of My Spine Bookshelf?
Yes, you can adjust shelf width, height, and depth to fit your space. Custom sizes allow for unique designs tailored to your storage needs.
How Long Does It Take To Build A Spine Bookshelf?
Building usually takes 3 to 5 hours, depending on skill level. Preparation and drying time for paint or stain add extra hours.
Conclusion
Creating a spine bookshelf is simple and fun. You only need basic tools and materials. Follow the steps carefully and take your time. This project adds style and function to any room. It also keeps your books organized and easy to find.
Try making one yourself and enjoy the result. A handmade bookshelf feels special and personal. Start today and see how great your space looks!