Are you looking to add a cozy, stylish touch to your bunk bed? Making a canopy for your bunk bed can transform it into a private little hideaway, perfect for reading, relaxing, or even a good night’s sleep.
You don’t need to be an expert or spend a fortune to create this magical space. In this guide, you’ll discover simple steps and smart tips to build a beautiful canopy that fits your style and budget. Keep reading, and soon your bunk bed will be the most inviting spot in the room!
Choosing The Right Materials
Choosing the right materials is key to making a sturdy and attractive canopy for a bunk bed. The materials must be safe, easy to handle, and fit your room’s style. Picking good fabric, solid support, and the right tools helps you build a canopy that lasts.
This section guides you through selecting fabrics, support structures, and tools. You will learn what works best and why. This makes your canopy project smoother and more fun.
Selecting Fabric Types
Choose fabric that is light and breathable. Cotton and linen are soft and let air pass. These fabrics create a cozy space without feeling hot. Avoid thick or heavy fabrics. They can make the canopy too dark or hard to hang.
Pick colors that match the room or bring cheer. Simple patterns add charm without clutter. Washable fabrics are best for easy cleaning. Safety matters—avoid fabrics that shed or irritate skin.
Picking Support Structures
Support frames hold your canopy in place. Wooden dowels are easy to cut and paint. Metal rods offer strong support but may need extra tools. Tension rods fit between walls and do not need drilling.
Make sure the support fits the bunk bed size. It should hold the fabric tightly without sagging. Check the weight limit of any hardware. Safe and steady support keeps the canopy secure.
Gathering Tools And Accessories
Prepare basic tools before starting. Scissors, measuring tape, and a sewing kit help with fabric. A drill or screwdriver may be needed for mounting supports. Hooks, clips, or Velcro secure the canopy fabric.
Extra accessories like fairy lights or tassels add style. Choose items that are safe and easy to attach. Having all tools ready saves time and stress during assembly.
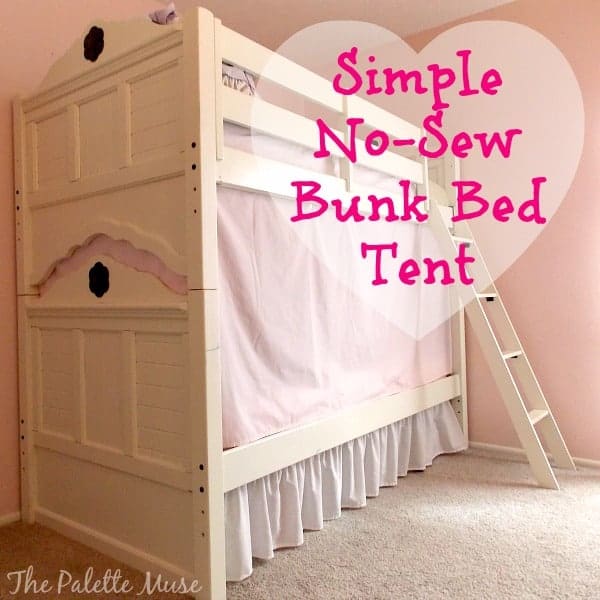
Credit: thepalettemuse.com
Measuring Your Bunk Bed
Measuring your bunk bed is the first step to making a perfect canopy. Accurate measurements help the canopy fit well. This step ensures the fabric will cover the bed properly and stay secure. Taking time to measure carefully saves effort later. It also helps you buy the right amount of material.
Determining Canopy Dimensions
Start by measuring the length and width of the bunk bed. Use a tape measure and note down the numbers. Add a few extra inches for the fabric to hang nicely. Think about how far you want the canopy to drape on each side. This creates a cozy and inviting space inside the bed.
Considering Bed Height And Width
Measure from the top of the mattress to the ceiling or bunk frame. This tells you how tall the canopy should be. Check the width across the top bunk’s frame. The canopy should be wide enough to cover the sides but not too loose. These measurements help make the canopy look neat and fit well.
Preparing The Fabric
Preparing the fabric is a key step in making a canopy for a bunk bed. This stage ensures the fabric fits well and looks neat. It also helps to create a cozy and stylish space for sleeping or playing. Careful preparation makes the final canopy both durable and attractive.
Cutting To Size
Measure the bunk bed carefully before cutting the fabric. Add a few extra inches for hems and seams. Use sharp scissors or a rotary cutter for clean edges. Cut slowly and steadily to avoid mistakes. Mark the fabric with chalk or a fabric pen for accuracy. Proper cutting prevents fabric from hanging unevenly or looking messy.
Adding Finishing Touches
Finish the fabric edges to stop fraying. Sew simple hems or use fabric glue for a quick fix. Consider adding ribbon or trim along the edges for style. Attach loops or ties to the corners for easy hanging. These small details improve both function and appearance. Well-finished fabric lasts longer and looks professional.
Building The Frame
Building the frame is the first step to making a canopy for your bunk bed. It gives the structure strength and shape. A strong frame keeps the fabric in place and safe. Use simple materials like wood or metal to build the frame.
Follow clear steps to assemble and secure the frame. This will make the canopy steady and long-lasting.
Assembling Support Poles
Start with four support poles, one for each corner of the bunk bed. Cut them to the height you want the canopy to be. Use smooth, sturdy wood or metal poles. Attach small brackets at the bottom of each pole. These will help hold the poles steady on the bed frame.
Next, fix the poles to the bed corners. Make sure they stand straight and firm. Measure twice to keep all poles the same height. This keeps the canopy even and balanced. Use screws or strong zip ties to hold the poles tightly.
Securing The Frame To Bed
Connect the top of the poles with horizontal bars. These bars form the canopy’s roof frame. Use screws or bolts to join the bars to the poles. Check the corners to make sure they are square and tight.
Then, secure the bottom of the poles to the bed frame. Use clamps or brackets for a strong hold. Avoid loose fittings that can wobble. Test the frame by gently shaking it. Fix any weak spots with more screws or ties.
Attaching The Canopy
Attaching the canopy to your bunk bed is a key step. It shapes the look and feel of the space. Proper attachment keeps the fabric secure and tidy. This process is simple with the right approach. Here are two easy ways to attach the canopy.
Draping The Fabric
Start by choosing soft, light fabric. Drape it evenly over the bed frame. Let it hang down on all sides. Make sure it covers the top and sides well. Adjust the fabric to avoid wrinkles and folds. Smooth fabric creates a neat, cozy look. You can tuck the edges under the mattress slightly. This helps keep the fabric in place without damage.
Fixing With Clips Or Ties
Use clips or ties to secure the fabric. Attach clips to the bed frame corners for a firm hold. Tie fabric ends around the bedposts to keep them tight. This prevents the canopy from slipping or falling. Choose clips that are gentle on fabric. Soft ties or ribbons work well and look nice. Fixing the fabric this way makes it easy to remove and wash. It also allows quick adjustments for better fit.
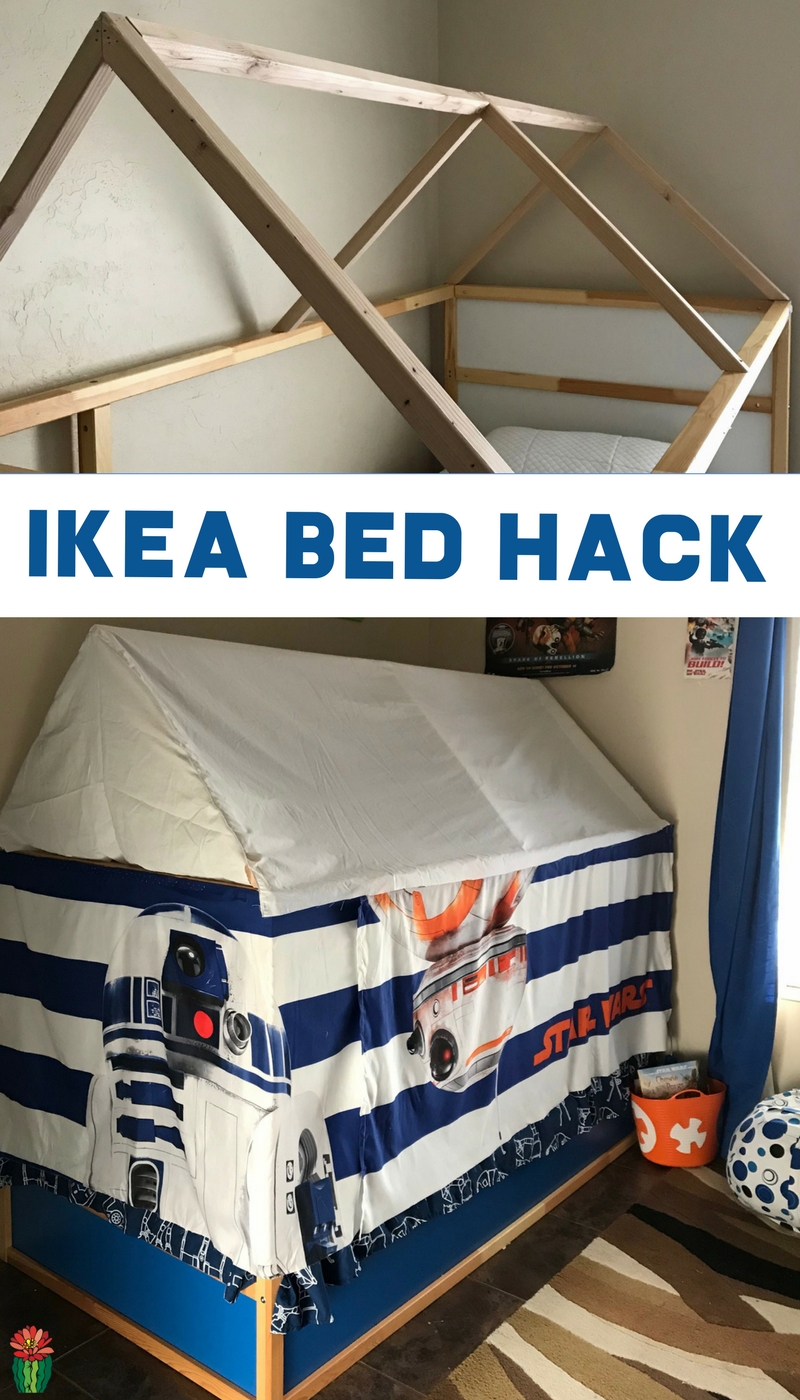
Credit: desertchica.com
Enhancing With Decor
Enhancing the canopy of a bunk bed with decor makes the space cozy and inviting. Simple touches can change the whole look and feel. Small details bring charm and comfort.
Decor helps create a special area for reading, resting, or playing. It turns the bunk bed into a personal hideaway. Choose items that add warmth and personality.
Adding Lights And Accessories
Soft lights add a warm glow under the canopy. String lights or fairy lights work well. Clip-on lamps are great for reading in bed. Choose lights with a gentle brightness to keep the space calm.
Accessories like small shelves or hanging organizers keep things neat. You can hang favorite toys or small plants. These items make the space fun and practical.
Incorporating Cushions And Pillows
Cushions and pillows add softness and color. Use different sizes and shapes for variety. Pick covers with fun patterns or your favorite colors. These make the bed more comfortable and inviting.
Place cushions along the back and sides. This creates a cozy nook for sitting or lying down. Pillows also add support for reading or relaxing.
Safety Tips And Maintenance
Creating a canopy for a bunk bed adds charm and comfort. Safety and maintenance are key for lasting use. Follow simple steps to keep the canopy secure and clean. This helps prevent accidents and keeps the fabric fresh.
Ensuring Secure Installation
Use strong hooks or brackets to hold the canopy. Check the weight limit of your materials. Tighten all screws and fasteners firmly. Avoid loose fabrics that can fall or tangle. Test the canopy by gently pulling on it. Make sure nothing blocks the bed’s exit paths. Keep the canopy away from lights or heaters. This reduces fire risks and overheating.
Cleaning And Care Advice
Choose a fabric that is easy to wash. Remove dust regularly with a soft brush or vacuum. Wash the canopy fabric based on the label’s instructions. Air dry to keep colors bright and fabric soft. Avoid harsh chemicals that can damage the fabric. Store the canopy in a dry place when not in use. Regular cleaning keeps the canopy looking new and safe.

Credit: www.amazon.com
Frequently Asked Questions
What Materials Do I Need To Make A Bunk Bed Canopy?
You need lightweight fabric, curtain rods or tension rods, and mounting hardware. Optional items include clips and decorative ties. Choose breathable fabric for comfort and easy cleaning.
How Do I Attach A Canopy To A Bunk Bed?
Secure rods to the top bunk’s frame using brackets or clamps. Drape fabric over rods and fix it with clips or ties for stability and style.
Can I Make A Canopy Without Drilling Holes?
Yes, use tension rods or removable adhesive hooks. These methods avoid damage and are easy to install and remove when needed.
What Fabric Is Best For A Bunk Bed Canopy?
Lightweight cotton or polyester blends work well. These fabrics are breathable, durable, and easy to wash, providing comfort and style for the canopy.
Conclusion
Making a canopy for a bunk bed adds style and comfort. It can create a cozy, private space for kids. Use simple materials and follow easy steps to build it. Adjust the size to fit the bed perfectly. A DIY canopy also saves money compared to buying one.
Enjoy personalizing it with colors and patterns you like. This project brings fun and creativity to the room. Try it yourself and see how it changes the space. A small effort makes a big difference in the bedroom.