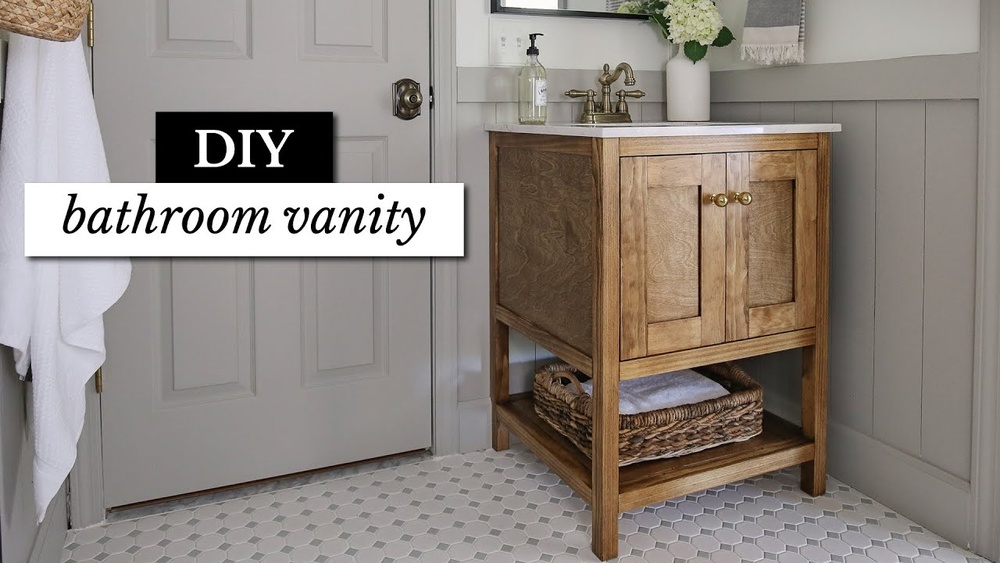
Are you ready to transform your bathroom with a stylish, custom vanity cabinet? Building your own bathroom vanity cabinet might sound tricky, but with the right steps, you can create a piece that fits perfectly and looks amazing.
Imagine having a cabinet that matches your space exactly, saves you money, and gives you a sense of pride every time you use it. In this guide, you’ll discover simple, clear instructions to help you build a sturdy, beautiful vanity cabinet—even if you’ve never done a project like this before.
Keep reading, and you’ll be one step closer to upgrading your bathroom with a vanity that’s truly your own.
Planning Your Vanity Cabinet
Planning your bathroom vanity cabinet is the first step in building a perfect piece. This phase shapes the cabinet’s function and look. Careful planning saves time and money later. Think about space, style, and materials before starting.
Good planning helps create a vanity that fits your bathroom well. It must hold your items and match the room’s style. Begin with clear ideas about size, materials, and design choices.
Choosing The Right Size
Measure your bathroom space carefully. The vanity should fit without blocking doors or walkways. Small bathrooms need compact vanities to keep space open. Larger bathrooms can handle wider cabinets with extra storage.
Consider the sink size and number of users. Double sinks need wider cabinets. Think about how much counter space you need for daily tasks. Planning size well helps avoid a crowded or empty look.
Selecting Materials
Materials affect the vanity’s durability and look. Solid wood offers strength and a classic feel. Plywood is strong and resists moisture well. MDF is budget-friendly but less water-resistant.
Choose materials that handle bathroom humidity. Use waterproof finishes to protect the wood. Good materials keep your vanity looking new for years.
Design And Style Options
Pick a design that matches your bathroom style. Modern vanities use clean lines and simple shapes. Traditional styles have more details and warm wood tones. Consider colors that blend with your walls and tiles.
Think about storage needs too. Drawers and shelves keep items organized. Open shelves add easy access but show clutter. Design your vanity to fit your daily routine and taste.

Credit: pineandpoplar.com
Gathering Tools And Supplies
Gathering the right tools and supplies sets the foundation for building a bathroom vanity cabinet. It saves time and prevents frustration during the project. Having everything ready helps you work smoothly and safely.
Take a moment to check each item on the list. Double-checking ensures you won’t miss anything important. This preparation makes the building process easier and more enjoyable.
Essential Tools List
- Measuring tape – for accurate dimensions
- Circular saw or handsaw – to cut wood pieces
- Power drill with drill bits – for screws and holes
- Screwdriver set – to fasten screws securely
- Clamps – to hold parts in place while assembling
- Level – to keep surfaces even
- Hammer – for nails and adjustments
- Sandpaper or electric sander – to smooth edges
- Pencil – to mark measurements
- Safety gear (gloves, goggles) – to protect yourself
Materials Checklist
- Plywood or solid wood panels – main cabinet structure
- Wood screws and nails – to join pieces
- Wood glue – for extra strength in joints
- Cabinet doors and drawer fronts – for storage access
- Hinges and handles – to open and close doors
- Paint or wood stain – to finish the cabinet
- Primer – to prepare wood for painting
- Sealant – to protect wood from moisture
- Drawer slides – for smooth drawer movement
- Back panel board – to close the cabinet back
Preparing The Workspace
Preparing the workspace is the first step to building a bathroom vanity cabinet. A clean and organized area helps you work better and faster. It also keeps the project safe and stress-free. Take time to set up your space before starting.
Clearing The Area
Remove all items from the bathroom or work zone. Move towels, rugs, and toiletries to another room. Clear countertops and shelves near the workspace. This prevents damage and gives you room to move. Clean the floor to avoid slipping or tripping. A neat area helps you focus on building the cabinet.
Safety Precautions
Wear safety glasses to protect your eyes from dust and debris. Use gloves to keep your hands safe from splinters and sharp tools. Ensure good lighting to see clearly while working. Keep a first aid kit nearby for minor cuts or injuries. Avoid loose clothing that can get caught in tools. Always unplug power tools when not in use.
Cutting The Wood Pieces
Cutting the wood pieces is the first big step in building your bathroom vanity cabinet. Accurate cuts ensure all parts fit well together. This step needs focus and care to avoid mistakes. Prepare your workspace and tools before starting.
Each piece must match the size and shape in your plan. Take your time measuring and marking. Safety is important when using saws. Follow simple rules to protect yourself and get clean cuts.
Measuring And Marking
Start by measuring the wood carefully with a tape measure. Double-check each measurement to avoid errors. Use a pencil to mark the cutting lines clearly. Draw straight lines using a ruler or square tool. Mark both sides of the wood for better guidance. Precise marks help you cut the right size every time.
Using A Saw Safely
Choose the right saw for your wood type and thickness. Always wear safety goggles and gloves before cutting. Keep your hands away from the blade path. Secure the wood firmly with clamps or a vise. Cut slowly and follow the marked lines closely. Let the saw do the work without forcing it. After cutting, smooth the edges with sandpaper for a clean finish.
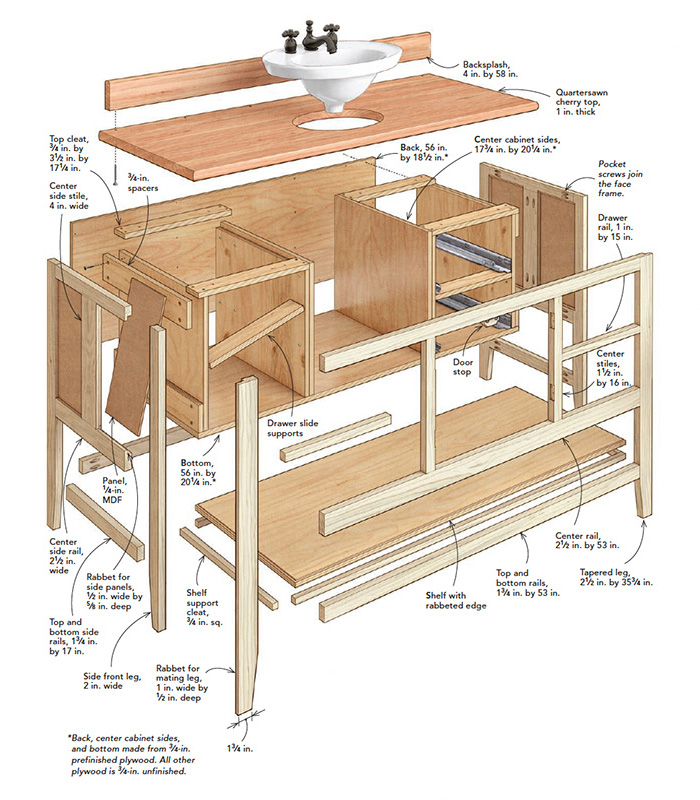
Assembling The Frame
Assembling the frame is the first major step in building your bathroom vanity cabinet. This stage sets the base for the entire cabinet. A strong frame ensures your vanity will last for years. Take your time and follow each step carefully. The frame consists of several panels joined together to form a box. Proper assembly keeps the cabinet square and stable.
Joining The Panels
Start by arranging the side panels, bottom, and back panel. Align the edges so they fit tightly. Use clamps to hold the panels in place. Check that corners form perfect right angles. This helps the cabinet look neat and fit well in your bathroom. Dry fit the pieces before gluing or screwing them.
Securing With Screws And Glue
Apply wood glue to the edges that join. This adds strength and prevents wobbling. Use a drill to screw the panels together. Place screws evenly along each joint. Do not over-tighten screws. This can split the wood. Wipe off any excess glue before it dries. Let the frame dry completely before moving on.
:strip_icc()/open-simple-blue-vanity-32366fec-cedb074f8ff9499fa7e993416f2d9eb8.jpg)
Credit: www.bhg.com
Adding Shelves And Dividers
Adding shelves and dividers inside your bathroom vanity cabinet creates extra space. You can organize toiletries, towels, and cleaning supplies neatly. Shelves help keep items visible and easy to reach. Dividers separate different items to avoid clutter. Both improve the cabinet’s function and appearance.
Measuring Shelf Placement
Start by measuring the inside height of the cabinet. Decide how many shelves you want to add. Measure equal distances or customize shelf heights for specific items. Mark the shelf positions clearly on both sides of the cabinet. Use a level to ensure marks are straight. Accurate measurements keep shelves balanced and stable.
Installing Support Brackets
Choose support brackets that fit your shelf thickness. Attach brackets at the marked points inside the cabinet. Use screws to secure brackets firmly. Check the brackets for level before tightening screws. Install brackets on both sides to support the shelf evenly. Proper support prevents shelves from sagging or falling.
Building And Attaching Doors
Building and attaching doors is a key step in creating your bathroom vanity cabinet. Doors give your cabinet a finished look. They also protect the inside from dust and water. Making strong, well-fit doors ensures your vanity lasts longer and looks great.
Proper door construction and hinge installation make the difference. Both parts must fit perfectly for smooth opening and closing. Let’s explore how to construct door panels and install hinges easily.
Constructing Door Panels
Start with choosing the right wood or plywood for the doors. Cut the panels to the size needed for your cabinet. Sand the edges smooth to avoid splinters. You can add a frame around the panel for extra strength. Use wood glue and clamps to hold parts together while drying. Check the door’s thickness matches the cabinet’s opening. Paint or stain the panels before attaching the doors for a neat finish.
Hinge Installation
Pick hinges that fit your door style and weight. Mark hinge positions on the door edge and the cabinet frame. Use a drill to make pilot holes for screws. Attach the hinges to the door first. Then, hold the door in place and screw the hinges to the cabinet. Check the door swings open and closes without rubbing. Adjust screws if the door is not aligned properly. Good hinge installation means smooth and quiet doors.
Credit: www.finehomebuilding.com
Sanding And Finishing
Sanding and finishing are key steps in building a bathroom vanity cabinet. These steps protect the wood and make the cabinet look great. Smooth surfaces help paint or stain stick better. A good finish keeps the cabinet safe from water and damage.
Smoothing Surfaces
Start with coarse sandpaper to remove rough spots and marks. Sand along the wood grain for a smooth feel. Use finer sandpaper to make the surface soft and even. Wipe off dust with a damp cloth before moving on. This step helps the paint or stain apply evenly and last longer.
Applying Paint Or Stain
Choose paint or stain that suits your bathroom style. Use a brush or cloth to apply thin, even coats. Let each coat dry completely before adding the next. Lightly sand between coats for a smooth finish. Finish with a clear sealant to protect against water and wear.
Installing The Vanity Cabinet
Installing the vanity cabinet is a key step in your bathroom project. It sets the stage for the sink and countertop. This part needs care and precision for a strong, level fit. Poor installation can cause problems later.
Start by preparing the space. Clear the area and check the wall for any damage. Ensure all plumbing is ready for the vanity. Take your time to make sure everything fits perfectly.
Positioning And Leveling
Place the vanity cabinet against the wall. Check the position carefully to match your design plan. Use a level tool to check both side to side and front to back. Adjust the cabinet until it is perfectly level. Use shims if the floor is uneven. This step helps avoid water pooling or uneven surfaces later.
Securing To The Wall
Find the wall studs behind the vanity with a stud finder. Mark these spots clearly. Drill pilot holes through the cabinet back into the studs. Use long screws to secure the cabinet firmly. Tighten the screws but do not overtighten to avoid damage. Double check the cabinet remains level after securing it. A stable cabinet supports your sink and countertop safely.
Adding Hardware And Fixtures
Adding hardware and fixtures completes your bathroom vanity cabinet. These parts make it functional and stylish. Proper installation ensures smooth use and a polished look. Focus on handles, knobs, sink, and faucet for best results.
Installing Handles And Knobs
Choose handles and knobs that match your bathroom style. Measure and mark holes carefully on cabinet doors and drawers. Use a drill to create clean holes. Attach handles or knobs with screws from the inside. Tighten screws firmly but avoid over-tightening to prevent damage. Check that all hardware opens and closes smoothly.
Fitting The Sink And Faucet
Place the sink into the vanity top opening. Ensure it fits snugly without gaps. Apply a bead of silicone sealant around the sink edge for a water-tight seal. Position the faucet over the pre-drilled holes. Secure the faucet with nuts and washers from underneath. Connect water supply lines to the faucet. Turn on water and check for leaks. Tighten connections if needed for a secure fit.
Frequently Asked Questions
What Materials Are Best For Building A Bathroom Vanity Cabinet?
Wood like plywood or MDF is ideal for bathroom vanities. They resist moisture and provide durability. Use water-resistant finishes to protect surfaces and extend cabinet life.
How Do I Measure For A Bathroom Vanity Cabinet?
Measure the available space width, depth, and height carefully. Account for plumbing and ensure enough clearance for doors and drawers to open fully.
Can I Build A Bathroom Vanity Cabinet Without Professional Tools?
Yes, basic tools like a saw, drill, and screwdriver suffice. Advanced tools help but are not mandatory for a simple vanity build.
What Finishes Protect A Bathroom Vanity Cabinet From Moisture?
Use waterproof paint, varnish, or sealant. These finishes prevent water damage and mold, keeping your vanity cabinet durable and looking new.
Conclusion
Building a bathroom vanity cabinet is a rewarding project anyone can try. Follow each step carefully and take your time. Choose materials that suit your style and budget. Measure twice to avoid mistakes and save materials. Use the right tools for better results and safety.
A well-built cabinet adds storage and improves bathroom look. Enjoy the satisfaction of creating something useful with your own hands. Keep practicing to improve your skills for future projects. Your bathroom will feel fresh and organized with this new cabinet.