Are you tired of clutter piling up by your door? Imagine having a neat, stylish spot where you can sit down, kick off your shoes, and hang your coat—all in one place.
Building a mudroom bench and coat rack can transform your entryway into a welcoming, organized space. In this guide, you’ll discover simple steps to create your own custom bench and rack that fit your style and needs. Ready to turn chaos into calm?
Keep reading, and let’s make your home more functional and inviting.

Credit: site-craft.net
Planning Your Mudroom Bench
Planning your mudroom bench is a key step in creating a useful and inviting space. Thoughtful planning ensures the bench fits well and serves your needs. Consider size, materials, and function carefully. This helps build a bench and coat rack that lasts and looks good.
Choosing The Right Size
Measure the available space before starting. The bench should fit comfortably without blocking walkways. Leave enough room to sit and remove shoes. A bench about 18 inches high is usually best for sitting. Length depends on how many people will use it.
Selecting Materials
Pick materials that suit your style and budget. Wood is classic and sturdy. Choose hardwood for durability or softwood for a lighter look. Consider moisture-resistant finishes if your mudroom gets wet often. Metal hooks and supports add strength and style.
Designing For Functionality
Think about how you will use the bench daily. Add storage under the seat for shoes or bags. Hooks above the bench keep coats and hats organized. Make sure hooks are easy to reach for everyone in the family. A bench with a backrest adds comfort when sitting.
Gathering Tools And Supplies
Before building a mudroom bench and coat rack, gather the right tools and supplies. This step helps avoid delays and mistakes. Having everything ready makes the project smoother and faster.
Essential Tools List
Start with a measuring tape to get accurate dimensions. Use a saw to cut wood pieces to size. A drill will help make holes and drive screws quickly. Screwdrivers are needed for tightening screws by hand. Sandpaper smooths rough edges for a clean finish. A level ensures your bench and rack stand straight. Clamps hold pieces steady during assembly. A pencil marks measurements and cutting lines clearly.
Recommended Materials
Choose sturdy wood like pine or oak for the bench frame. Use plywood for the seat and backing panels. Pick screws that fit the wood thickness. Wood glue adds strength to joints. Paint or stain gives color and protection. Hooks or pegs serve as coat hangers. Consider cushions for added comfort on the bench.
Safety Gear To Use
Wear safety glasses to protect your eyes from dust and debris. Use work gloves to avoid splinters and cuts. A dust mask keeps you safe from inhaling sawdust. Hearing protection helps reduce noise from power tools. Dress in close-fitting clothes to prevent snagging. Keep a first aid kit nearby for minor injuries.
Building The Bench Frame
Building the bench frame is the first step in creating a sturdy mudroom bench and coat rack. This frame forms the base and supports the seat and coat rack above. A strong frame ensures the bench will hold weight and last for years. Follow clear steps to cut, assemble, and reinforce the frame for best results.
Cutting The Wood Pieces
Start by measuring your space for the bench size. Mark the wood pieces carefully using a pencil and square. Cut the wood to size with a saw. You will need pieces for the sides, front, back, and supports. Keep cuts straight and smooth for easy assembly. Sand the edges to avoid splinters.
Assembling The Frame
Lay out the cut pieces on a flat surface. Join the sides to the front and back pieces using wood screws or nails. Use clamps to hold pieces steady while you work. Check that the frame is square by measuring the diagonals. Tighten all connections to make the frame rigid. Avoid gaps to keep the bench strong.
Adding Support And Stability
Add extra support pieces inside the frame. Place horizontal braces between the sides for strength. Attach vertical supports if the bench is wide. Secure all braces with screws. This will prevent wobbling and increase weight capacity. Double-check all joints for tightness before moving on.
Creating The Bench Seat
Creating the bench seat is a key step in building a mudroom bench and coat rack. The seat provides a comfortable spot to sit while putting on shoes or organizing items. It also adds to the overall look of your mudroom. Focus on making the seat sturdy, smooth, and attractive. This section covers how to choose the seat style, attach it securely, and finish it with sanding.
Choosing Seat Style
Select a seat style that fits your mudroom space and your needs. A simple flat seat works well for small spaces. For more comfort, try a bench with a slight curve or a padded top. Consider the wood type. Hardwoods like oak or maple are durable. Softwoods like pine are easier to work with but less strong. Match the seat style to the coat rack design for a unified look.
Attaching The Seat
Attach the seat firmly to the bench frame to ensure safety. Use wood screws or bolts for strong support. Pre-drill holes to prevent wood from splitting. Check that the seat is level before tightening all fasteners. Adding wood glue can increase strength. Make sure the seat does not wobble or shift after attachment. A secure seat adds stability and comfort.
Sanding And Smoothing
Sanding the bench seat removes rough edges and splinters. Start with coarse sandpaper to smooth large bumps. Then use finer grit for a soft finish. Sand all surfaces evenly, including corners. Check for any sharp spots and sand them down. A smooth seat feels good to sit on and looks polished. Clean the dust off before applying paint or stain.
Constructing The Coat Rack
Constructing the coat rack is a key step in building your mudroom bench. It makes the space functional and organized. A well-built rack holds coats, hats, and bags neatly. This section guides you through designing, installing, and securing the coat rack. Follow these steps for a strong and stylish rack.
Designing The Rack Layout
Start by measuring the space above the bench. Decide how many hooks and rods you want. Space hooks evenly for easy access. Plan the height based on the tallest coat or bag. Sketch your design on paper or use a digital tool. A clear layout helps avoid mistakes later.
Installing Hooks And Rods
Choose strong hooks that fit your style and needs. Use a drill to make holes for screws. Attach hooks firmly to the wood or wall. For rods, measure and cut to size. Secure rods with brackets or holders. Check each hook and rod for stability before moving on.
Securing The Rack To The Bench
Align the coat rack with the bench top or back. Use screws or brackets to fasten the rack tightly. Make sure the rack is level and steady. Tight connections prevent wobbling and damage. Test by hanging items to confirm the strength of the rack.

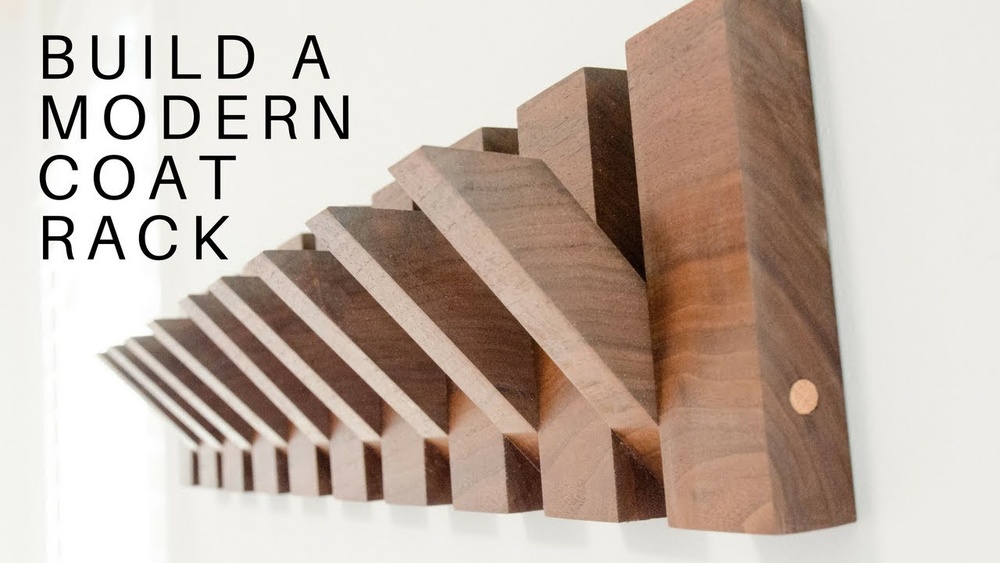
Credit: www.youtube.com
Finishing Touches
Finishing touches make your mudroom bench and coat rack look complete and inviting. They protect the wood and add comfort. These small steps also keep your furniture looking new for a long time.
Painting Or Staining
Choose paint or stain to match your home’s style. Paint gives a bright, clean look. Stain shows the wood’s natural beauty. Apply with a brush for smooth coverage. Let each coat dry fully before the next one. Use a sealant to protect from water and dirt.
Adding Cushions Or Storage Baskets
Place cushions on the bench for comfort. Pick colors and patterns that fit your room. Add baskets under the bench to hold shoes or hats. Baskets keep the area neat and easy to clean. They also add a cozy and organized feel to the space.
Maintaining Your Mudroom Bench
Clean the bench and rack regularly with a soft cloth. Check for loose screws and tighten them. Avoid harsh cleaners that can damage the finish. Fix scratches with matching paint or stain. Proper care keeps your mudroom furniture strong and fresh.

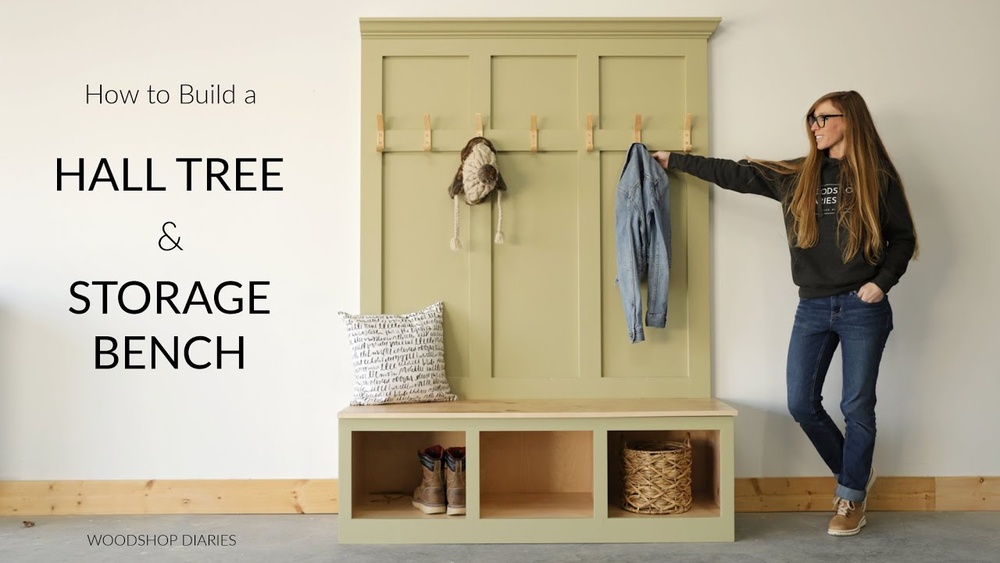
Credit: www.instructables.com
Frequently Asked Questions
What Materials Do I Need To Build A Mudroom Bench?
You need wood boards, screws, wood glue, sandpaper, paint or stain, hooks, and brackets. These materials ensure a sturdy and durable bench with a functional coat rack.
How Do I Attach The Coat Rack To The Bench?
Secure the coat rack to the bench using screws and brackets. Make sure it is level and firmly attached for safe hanging of coats and bags.
What Tools Are Essential For Building This Mudroom Bench?
Key tools include a saw, drill, screwdriver, measuring tape, level, and sander. These tools help you cut, assemble, and finish the bench efficiently.
How Much Time Does It Take To Build A Mudroom Bench?
Building a mudroom bench usually takes 3 to 5 hours. Time varies based on skill level and design complexity. Planning and preparation can save time.
Conclusion
Building a mudroom bench and coat rack adds both style and function. You create a space to sit and store coats easily. The project uses simple tools and materials anyone can handle. It also helps keep your entryway neat and organized.
Small steps lead to a useful and attractive piece. Enjoy the satisfaction of making something practical with your own hands. Now, your mudroom feels more welcoming and tidy. Give this DIY project a try and see the difference it makes.