Are you looking for a unique way to organize your coats while adding a touch of elegance to your space? A piano coat rack might be exactly what you need.
Imagine turning a classic piano element into a stylish and functional piece for your home. In this guide, you’ll discover simple steps to create your own piano coat rack that stands out and keeps your entryway neat. Ready to transform your space with a creative project?
Let’s get started!

Credit: artistichook.com
Materials Needed
Gathering the right materials is the first step to build a piano coat rack. Quality materials ensure the rack is strong and looks great. Prepare everything before starting to avoid interruptions.
Choosing The Right Wood
Select wood that is sturdy and easy to work with. Pine, oak, or maple are good choices. Pine is soft and cuts easily. Oak and maple are harder but last longer. Pick wood that matches your room’s style and color.
Essential Tools
Use basic tools to shape and assemble the rack. A saw helps cut the wood to size. Sandpaper smooths rough edges. A drill makes holes for screws and hooks. A screwdriver is needed to fix parts together. A measuring tape keeps your cuts accurate.
Additional Supplies
Some extra items make the project easier and neater. Wood glue adds strength to joints. Screws hold parts firmly. Hooks or pegs are for hanging coats. Paint or stain finishes the rack and protects the wood. Brushes or rags help apply the finish evenly.
Designing Your Coat Rack
Designing your piano coat rack is the first step toward a unique and useful piece. This phase shapes how your rack will look and function. Thoughtful design ensures it fits your space and style perfectly.
Focus on the details. This makes the building process smooth and the final product satisfying. Start by choosing a style that matches your room’s mood and your personal taste.
Picking The Style
Choose a style that suits your home decor. Classic, modern, rustic—each style sets a different tone. A piano coat rack can be elegant or simple. Decide if you want a natural wood finish or painted colors.
Think about how many coats and items you need to hang. This helps pick a style that meets your needs. Balance beauty with usefulness for the best result.
Measuring And Planning
Measure the space where the coat rack will hang or stand. Note width, height, and depth. Accurate measurements avoid surprises during installation.
Plan the number and placement of hooks. Make sure there is enough space between hooks for coats. Leave extra room if you want to hang bags or hats.
Use these plans to choose materials and tools before starting your project. A good plan saves time and effort.
Sketching Your Layout
Draw a simple sketch of your coat rack design. Include all parts and their sizes. Visualizing your rack helps catch mistakes early.
Label each part, such as hooks, shelves, and supports. This makes building easier and faster. Sketching also helps communicate your ideas if you get help.
Review your sketch to confirm balance and style. Adjust details until you feel confident about the design.
Cutting And Preparing Wood
Cutting and preparing wood is a key step in making a piano coat rack. This part shapes the wood into the right pieces. Good preparation helps the coat rack look neat and strong. Careful cutting and smoothing make the final product safe and easy to use. Follow these simple steps to get your wood ready.
Marking Cut Lines
Start by measuring your wood carefully. Use a pencil to draw clear, straight lines where you will cut. Double-check your measurements to avoid mistakes. Mark all pieces before cutting to save time and prevent errors. Clear lines guide your saw and keep cuts precise.
Safe Cutting Techniques
Wear safety glasses and gloves before cutting wood. Use a stable surface and a sharp saw for clean cuts. Cut slowly and follow your marked lines exactly. Keep fingers away from the saw blade at all times. Take breaks to stay focused and avoid accidents.
Sanding For Smoothness
After cutting, sand each piece to remove rough edges. Use medium-grit sandpaper first, then fine-grit for a smooth finish. Sand along the grain to avoid scratches. Smooth wood feels better to touch and looks more polished. Proper sanding also prepares the surface for painting or staining.

Credit: www.anikasdiylife.com
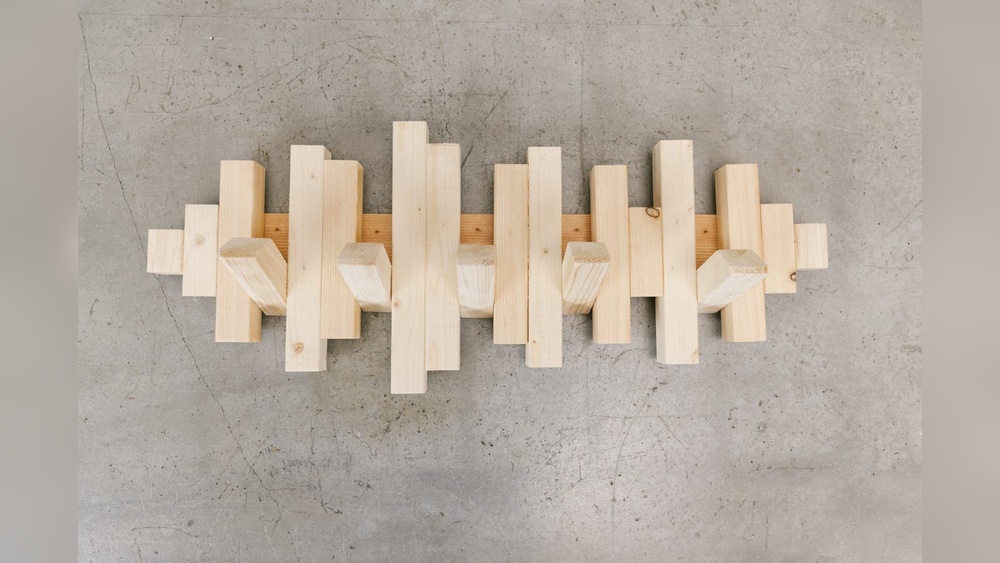
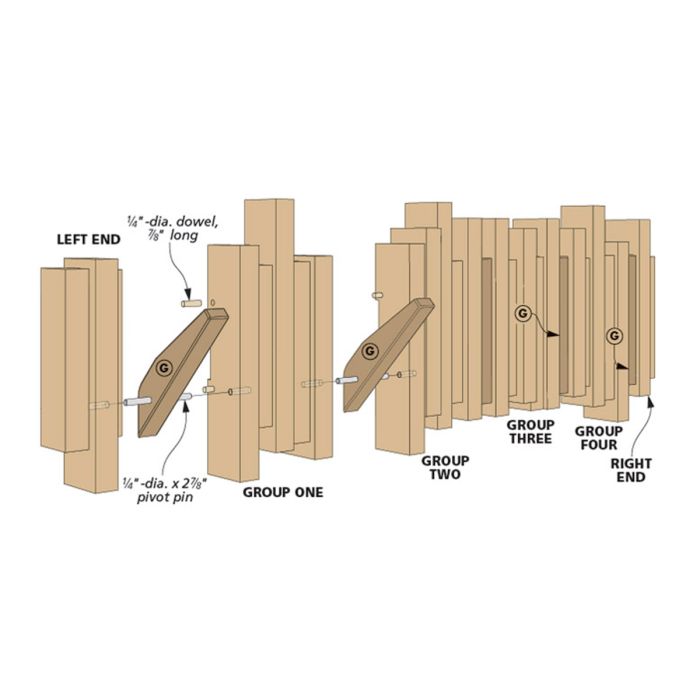
Assembling The Rack
Assembling the piano coat rack brings all parts together. This step shapes the final look and function. Follow clear steps to build a strong, stylish rack. Work slowly. Check each connection to avoid mistakes.
Joining Pieces Together
Start by aligning the wooden pieces. Use clamps to hold them steady. Drill pilot holes before screwing the pieces. This prevents wood from splitting. Attach the main frame firmly. Make sure corners are square. Tighten screws but do not overdo it.
Securing Hooks
Mark the spots for hooks evenly. Drill small holes for screws. Choose strong hooks that fit your design. Screw hooks tightly into the wood. Test each hook by pulling gently. Adjust if any feel loose or wobbly.
Adding Support Brackets
Support brackets add strength to the rack. Position brackets under shelves or near joints. Use screws to fix brackets in place. Check that brackets do not block hooks. Test the rack’s stability before final use.
Finishing Touches
Finishing touches bring your piano coat rack to life. They protect the wood and add style. These final steps make your rack both strong and beautiful. Focus on painting, sealing, and decorating.
Painting And Staining
Choose paint or stain that fits your room style. Paint offers bright colors and smooth coverage. Stain shows the wood grain and gives a natural look. Use thin coats and let each dry fully. Light sanding between coats helps smooth the surface.
Sealing For Durability
Seal your coat rack to protect it from wear. Use clear varnish or polyurethane for a strong finish. Apply with a brush in long, even strokes. Let the first coat dry before adding a second. Sealing stops water damage and scratches.
Decorative Elements
Add hooks, knobs, or small shelves for extra use. Choose hardware that matches your paint or stain. You can add personal touches like stencils or decals. Keep decorations simple to highlight the wood beauty. These details make your rack unique and useful.
Mounting And Placement
Mounting and placing your piano coat rack properly is important. It keeps the rack secure and easy to use. A well-mounted rack holds coats and bags safely. It also looks good on your wall. This section helps you pick the right spot and mount your rack correctly.
Choosing Wall Location
Pick a wall near your door or hallway. This makes it easy to hang coats when you enter. Avoid walls with light switches or outlets. Make sure the wall is strong and flat. Check for pipes or wires inside the wall before drilling. Choose a height that fits all users comfortably.
Proper Mounting Techniques
Use a stud finder to locate wall studs. Mounting on studs gives the best support. Mark the spots where you will drill holes. Use a level to keep the rack straight. Drill pilot holes before inserting screws. Use heavy-duty screws or wall anchors for extra hold. Tighten screws firmly but do not overdo it.
Tips For Stability
Check the rack after mounting by gently pulling it. Add extra anchors if the rack feels loose. Avoid hanging very heavy items on one hook. Spread the weight evenly across the rack. Regularly check screws and tighten if needed. This keeps your coat rack safe and stable over time.
Maintenance Tips
Maintaining your piano coat rack helps keep it looking fresh and sturdy. Regular care prevents damage and ensures it lasts for years. Simple steps make a big difference in its appearance and function.
Cleaning Your Coat Rack
Dust the coat rack with a soft cloth weekly. Use a damp cloth for sticky spots. Avoid harsh chemicals; they can damage the finish. Dry the surface immediately after cleaning to prevent water marks. Clean the hooks and corners carefully to remove dirt build-up.
Repairing Minor Damages
Fix small scratches with wood polish or a matching crayon. Tighten loose screws to keep the rack stable. Replace damaged hooks quickly to avoid further wear. Sand lightly if the surface feels rough. Use wood glue for small cracks to prevent splitting.
Extending Lifespan
Keep the rack away from direct sunlight to avoid fading. Avoid hanging very heavy items that can bend the hooks. Check the rack monthly for signs of wear. Apply a fresh coat of varnish every year to protect the wood. Store the rack in a dry place to stop moisture damage.
Credit: www.woodpeck.com
Frequently Asked Questions
What Materials Are Needed To Make A Piano Coat Rack?
You need piano wood, coat hooks, screws, sandpaper, wood glue, and varnish. These materials ensure durability and a polished look.
How Long Does It Take To Build A Piano Coat Rack?
Building a piano coat rack takes about 3 to 5 hours. This includes cutting, assembling, sanding, and finishing steps.
Can I Customize The Piano Coat Rack Design?
Yes, you can customize the design by choosing wood type, hook style, and finish color. Personal touches enhance its aesthetic and function.
What Tools Are Required For Making A Piano Coat Rack?
Essential tools include a saw, drill, screwdriver, measuring tape, and clamps. These tools help ensure precise cuts and strong assembly.
Conclusion
Creating a piano coat rack is a fun and useful project. You only need basic tools and some patience. The steps are simple and easy to follow. This rack adds charm and saves space in your home. Personalizing it makes the project even more special.
Enjoy the process and the final product. Try making one yourself and see the difference. It’s a great way to reuse old piano parts too. Give your home a unique touch with this creative idea.