Are you tired of bookshelves that don’t fit your growing collection? Imagine having a bookshelf where every shelf adjusts to your needs—whether you have tall art books or small paperbacks.
Building a bookshelf with adjustable shelves lets you customize your storage exactly how you want it. In this guide, you’ll discover simple steps to create a sturdy, flexible bookshelf that matches your style and space. Keep reading, and you’ll soon have a perfect place for all your books and treasures.

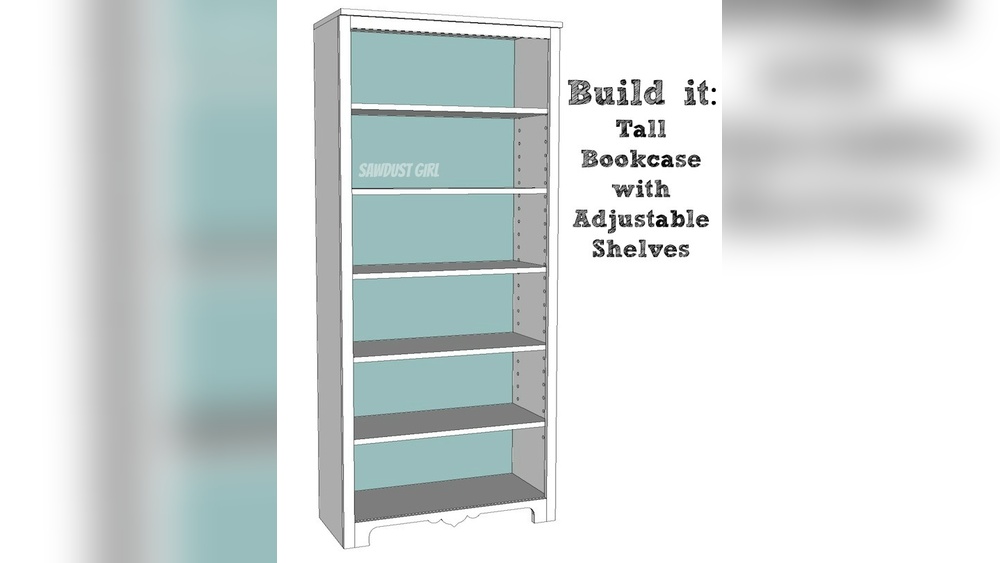
Credit: www.remodelaholic.com
Materials And Tools Needed
Starting a bookshelf project begins with gathering the right materials and tools. Choosing proper supplies makes the building process smooth. It also ensures a strong, lasting shelf.
This section covers what wood to pick, the essential tools, and extra supplies. Each part matters for building adjustable shelves that fit your space.
Choosing The Right Wood
Select wood that is sturdy and easy to work with. Pine and plywood are popular choices for bookshelves. Pine is affordable and simple to cut. Plywood offers strength and a smooth surface for finishing. Avoid soft woods that may bend under book weight. Opt for wood with a smooth finish to reduce sanding time.
Essential Tools For The Project
Gather basic tools to make your work easier. A saw is needed to cut wood pieces to size. Use a drill for screws and shelf pins. A screwdriver or power driver helps secure parts firmly. A level ensures shelves stay straight. Sandpaper or a sander smooths rough edges. Measuring tape and pencil are key for accuracy.
Additional Supplies
Extra items improve the shelf’s functionality and look. Shelf pins allow you to adjust shelf height easily. Wood glue adds extra strength to joints. Screws and nails hold parts securely. Finish options like paint or varnish protect the wood. Safety gear such as gloves and goggles keeps you safe during work.
Planning Your Bookshelf
Planning is the first step in building a bookshelf with adjustable shelves. Careful planning saves time and materials. It helps you create a strong and useful shelf that fits your space perfectly.
Start by thinking about what you want to store and the size of your room. This will guide your decisions on the shelf dimensions and design. A clear plan makes the building process smoother and more enjoyable.
Determining Shelf Dimensions
Measure the space where you want to place the bookshelf. Decide how tall, wide, and deep the shelf should be. Consider the height of your tallest books or items. Leave extra space for growth or new items. Keep shelf depth at least 10 inches for most books.
Designing Adjustable Shelves
Adjustable shelves let you change shelf height easily. Use small holes on the side panels for shelf pins. Space these holes evenly, usually 1 inch apart. This design allows you to move shelves up or down. It makes the bookshelf flexible for different items.
Creating A Cutting List
Write down all the wood pieces you need. Include the size and quantity of each part. List shelves, side panels, top, bottom, and back panel. A cutting list helps you buy the right amount of wood. It also guides you during the cutting process.
Cutting And Preparing Wood
Cutting and preparing wood is a key step in building a bookshelf with adjustable shelves. This part shapes the wood pieces to the right size and form. Proper preparation ensures the bookshelf fits well and looks good.
Careful cutting and smoothing make the assembly easier. It also helps the shelves hold weight safely. Start with accurate measuring and marking before making any cuts.
Measuring And Marking
Measure each wood piece carefully using a tape measure. Mark the cut lines with a pencil or chalk. Double-check measurements to avoid mistakes. Clear, straight lines help guide your cuts precisely. Mark all pieces before cutting to stay organized.
Safe Cutting Techniques
Use a saw that matches your wood type and thickness. Always wear safety goggles and gloves to protect yourself. Keep your hands away from the blade path. Cut slowly and steadily for clean edges. Clamp the wood to hold it firmly in place. Follow all safety rules for power tools.
Sanding And Smoothing Edges
Sand each cut edge with sandpaper or a sanding block. Smooth edges prevent splinters and give a neat look. Use medium-grit sandpaper first, then fine-grit for a softer finish. Check for rough spots and sand until smooth. Clean dust off wood before assembling the bookshelf.
Assembling The Frame
Assembling the frame is the first big step in building your bookshelf. A strong frame gives your shelf support and shape. Take your time to make sure everything fits well. This part sets the base for adding adjustable shelves later. Clear measurements and steady construction matter here.
Building The Side Panels
Start with cutting the wood for the side panels. These panels hold the whole bookshelf up. Use smooth, straight boards for best results. Drill holes for shelf pins evenly along each panel. This allows shelves to move up or down easily. Sand edges to avoid splinters and create a neat look.
Attaching The Top And Bottom
Connect the top and bottom pieces to the side panels next. These parts lock the frame together. Use screws or nails to secure them tightly. Check that the pieces are flush and aligned. This step makes the frame rigid and ready for shelves. Work on a flat surface to keep everything level.
Ensuring Square And Stability
Check the frame for squareness before moving on. Use a carpenter’s square or measure diagonals. Both diagonals should be the same length. If not, adjust the frame carefully. A square frame keeps shelves even and stable. Add corner braces if needed to strengthen the structure.
Installing Adjustable Shelf Supports
Installing adjustable shelf supports is a key step in building a bookshelf with flexible storage. These supports hold the shelves firmly while allowing you to change their height. Proper installation ensures the shelves stay steady and can hold the weight of your books. Follow simple steps to place the supports accurately and securely.
Choosing Shelf Support Types
There are several types of shelf supports available. Common ones include metal pins, plastic clips, and brackets. Metal pins fit into small holes drilled on the side panels. Plastic clips also fit in holes and are easy to remove. Brackets offer strong support but need screws for installation. Choose supports based on shelf weight and ease of adjustment.
Marking And Drilling Holes
Mark holes evenly along the side panels for shelf supports. Use a ruler and pencil to measure consistent spacing. Typical spacing is 1 to 2 inches apart vertically. Drill small holes matching the size of your supports. Drill straight and not too deep to avoid panel damage. Accurate hole placement helps the shelves stay level and balanced.
Inserting Supports Correctly
Insert each support into the drilled holes firmly. Push metal pins or plastic clips until they sit flush with the panel. For brackets, align holes and screw them tightly in place. Test each support by pressing gently to check stability. Proper insertion prevents shelves from slipping or falling. Adjust supports as needed before placing the shelves.
Credit: www.theawesomeorange.com
Adding Shelves
Adding shelves is a key step in building a bookshelf with adjustable shelves. It allows you to customize the space for different books and items. Properly adding shelves ensures strength and flexibility. Follow these simple steps to add shelves that fit perfectly and hold weight well.
Cutting Shelves To Size
Measure the width and depth of the bookshelf frame. Mark the wood board with these dimensions. Use a saw to cut the shelves straight and smooth. Sand the edges to avoid splinters. Precise cuts help shelves fit snugly and look neat.
Positioning Shelves On Supports
Place shelf supports inside the bookshelf at the desired height. Make sure they are level and secure. Gently rest the cut shelves on the supports. Check that each shelf sits evenly without wobbling. Proper positioning keeps shelves stable and safe.
Adjusting Shelf Heights
Adjust the shelf heights by moving the supports up or down. This allows you to store tall or short items easily. Test the shelf height before loading heavy items. Make small changes to find the perfect fit. Adjustable shelves add great flexibility to your bookshelf.
Finishing Touches
Finishing touches bring your bookshelf to life. They protect the wood and improve its look. These steps make your project last longer and look more polished. Let’s explore some easy ways to finish your adjustable bookshelf.
Applying Paint Or Stain
Choose paint or stain based on your room’s style. Paint gives solid color and hides wood grain. Stain shows the wood’s natural beauty and texture. Use a brush or cloth for even coverage. Let each coat dry fully before adding another. Light sanding between coats smooths the surface for a better finish.
Protective Coating Options
Protective coatings guard against scratches and spills. Polyurethane is tough and water-resistant. It works well for shelves holding heavy or damp items. Wax or oil finishes give a soft, natural look but need more care. Apply thin layers and let dry completely. This step helps your bookshelf stay fresh longer.
Adding Back Panels Or Trim
Back panels add stability and a clean look. Choose thin plywood or hardboard cut to size. Attach with nails or screws for a secure fit. Trim pieces frame the edges and hide gaps. Use wood glue and small nails to fix trim in place. These final details make your bookshelf look complete and neat.

Credit: www.youtube.com
Maintenance Tips
Maintaining your bookshelf with adjustable shelves keeps it sturdy and looking good. Regular care extends its life and helps avoid common problems. Small efforts every few weeks make a big difference in how your shelves perform and appear.
Keeping Shelves Level
Check the shelves for levelness often. Uneven shelves can cause items to fall or the shelf to warp. Use a small level tool to spot any tilt. Adjust the shelf supports to balance each shelf. This simple step prevents damage and keeps your books safe.
Regular Cleaning
Dust builds up quickly on shelves, especially in corners. Wipe down each shelf with a soft cloth every few weeks. Avoid harsh cleaners that can damage the wood or finish. Use a gentle, damp cloth to remove dirt. Clean shelves look better and protect your books from dust.
Adjusting Shelves Over Time
Books and items change in size and weight. Adjust shelves to fit new needs. Move shelf supports to create space for taller or larger items. Check the fit regularly to avoid stress on the shelves. Proper adjustment keeps the structure strong and flexible.
Frequently Asked Questions
What Tools Do I Need To Build An Adjustable Bookshelf?
You need a saw, drill, screwdriver, measuring tape, level, and clamps. Also, buy shelf pins or brackets for adjustability. Quality wood, screws, and sandpaper are essential for a smooth finish.
How Do Adjustable Shelves Improve Bookshelf Functionality?
Adjustable shelves allow customization for different book sizes. They maximize storage space and keep your collection organized. You can easily change shelf height without rebuilding the entire unit.
What Type Of Wood Is Best For Adjustable Bookshelves?
Pine, oak, and plywood are popular choices. Pine is affordable and easy to work with. Oak is durable but pricier. Plywood offers stability and resists warping well.
How Can I Ensure My Bookshelf Is Sturdy And Safe?
Use strong wood and secure all joints tightly. Add backing for extra support and prevent wobbling. Properly install shelf pins to hold weight safely.
Conclusion
Building a bookshelf with adjustable shelves takes some time and care. You can customize shelf height to fit different items easily. Using basic tools and clear steps makes the task simple. This project adds useful storage and a personal touch to your space.
Try it yourself and enjoy a neat, organized room. Small efforts bring big rewards in home projects. Keep practicing to improve your woodworking skills.