Are you looking for a fun and creative way to save space and add charm to your child’s room? Building a house bunk bed might be exactly what you need.
Imagine giving your kids a cozy hideaway that sparks their imagination while making bedtime exciting. In this guide, you’ll discover simple steps to create a sturdy, stylish bunk bed that fits your home and budget. Ready to turn your ideas into reality?
Keep reading, and you’ll learn everything you need to build the perfect house bunk bed for your family.

Credit: www.youtube.com
Choosing The Right Design
Choosing the right design for a house bunk bed is important. It affects comfort, space use, and safety. A good design fits the room and meets your needs. This section helps you pick the best style and features for your bunk bed project.
Popular Styles
Several styles suit different tastes and spaces. The classic bunk bed stacks two beds vertically. Loft beds raise the top bed, leaving space below for a desk or play area. L-shaped bunk beds place beds at right angles, saving floor space. Some designs include built-in storage or desks. Pick a style that matches the room and your child’s needs.
Space Considerations
Measure the room before choosing a design. Check ceiling height to ensure enough headroom. Think about how much floor space you want to save. Some bunk beds fit better in small rooms. Consider the bed’s size and how it fits with other furniture. Leave space for easy movement and cleaning. Planning space well makes the room safe and comfortable.
Safety Features
Safety is key for any bunk bed design. Look for sturdy guardrails on the top bunk. The ladder should be easy to climb and firmly attached. Check that the bed frame is strong and stable. Choose non-toxic paint or finish for health safety. Avoid sharp edges or small parts that can hurt children. A safe design gives peace of mind to parents and kids.
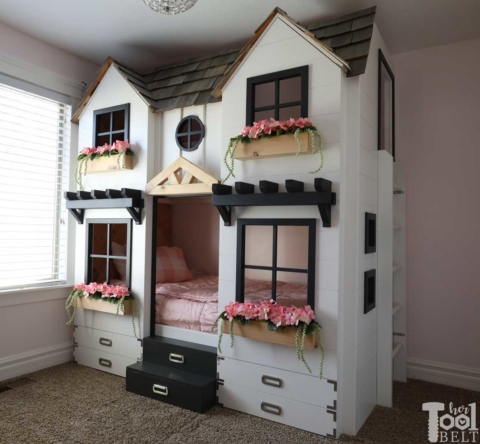
Credit: www.hertoolbelt.com
Gathering Materials And Tools
Building a house bunk bed starts with gathering the right materials and tools. This step is important for a strong and safe bed. Choosing good wood, hardware, and tools makes the work easier and the bed last longer.
Essential Wood Types
Choose wood that is strong and easy to work with. Pine is popular because it is affordable and light. Oak or maple are harder woods and last longer but cost more. Avoid soft woods that break easily. Make sure the wood is smooth and free of cracks or knots.
Hardware And Fasteners
Use screws and bolts for strong joints. Wood screws hold the pieces tightly together. Lag bolts give extra strength for the frame. Include washers to protect the wood from damage. Get metal brackets for added support at corners and joints.
Basic Tools Needed
Prepare basic tools before starting. A saw cuts wood to size. A drill makes holes and drives screws. Sandpaper smooths rough edges. A tape measure helps with precise cuts. A level ensures the bed is even. Clamps hold pieces while you work on them.
Preparing The Workspace
Preparing the workspace is the first step in building a house bunk bed. A clean and organized area helps you work faster and safer. It also keeps your tools and materials easy to find. Setting up the space properly makes the project more enjoyable and less stressful.
Clearing The Area
Remove any furniture or items that block your work area. A wide space helps you move freely and use large materials. Sweep the floor to avoid slipping or tripping. Clearing the area prevents accidents and saves time during the build.
Setting Up Workstations
Create different stations for cutting, drilling, and assembling parts. Arrange your tools close to each station for quick access. Use tables or sturdy surfaces to support your materials. Well-planned workstations improve efficiency and reduce mistakes.
Safety Precautions
Wear safety goggles and gloves to protect your eyes and hands. Keep a first aid kit nearby for emergencies. Check that all tools are in good condition before use. Work in a well-lit area to see clearly and avoid errors. Safety makes your project smoother and protects you from harm.
Cutting And Sanding Wood
Cutting and sanding wood are key steps in building a house bunk bed. These steps help shape the wood pieces and make them safe to use. Precise cutting ensures all parts fit well. Smooth sanding removes rough edges and splinters. Taking time here improves the bed’s strength and look.
Measuring And Marking
Start by measuring your wood carefully. Use a tape measure and a pencil for marking. Mark each cut line clearly to avoid mistakes. Double-check measurements before cutting. Accurate marks save wood and make assembly easier. Use a square tool to keep lines straight. Clear marks guide your saw for clean cuts.
Cutting Techniques
Choose the right saw for your wood type and thickness. A circular saw works well for long, straight cuts. Use a handsaw for small or detailed cuts. Cut slowly to keep lines straight. Support wood firmly while cutting. Avoid forcing the saw; let the blade do the work. Clean cuts reduce sanding time later.
Sanding For Smoothness
After cutting, sand all edges and surfaces. Start with coarse sandpaper to remove rough spots. Move to finer sandpaper for a smooth finish. Sand in the direction of the wood grain. Check for splinters or sharp corners. Smooth wood protects skin and improves paint or stain hold. Take your time to achieve a soft, even surface.
Assembling The Frame
Assembling the frame is the key step in building a house bunk bed. This part creates the strong base and structure that holds the beds safely. A solid frame ensures the bunk bed will last long and stay stable. Follow each step carefully to build a strong frame.
Building The Base
Start by cutting the wood pieces to the right size for the base. Use sturdy wood like pine or oak. Lay out the pieces on a flat surface. Connect the side rails with the end rails to form a rectangle. Check that all corners are square before securing them. The base must be level to support the mattress evenly.
Constructing The Bunk Structure
Next, build the vertical posts for the bunk bed. These posts hold the top bunk above the bottom one. Attach the posts to each corner of the base. Use long screws for strong grip. Add horizontal support beams between the posts. These beams hold the mattresses and add stability to the frame.
Securing Joints
Secure all joints tightly with screws or bolts. Reinforce corners with metal brackets for extra strength. Check each joint to avoid any wobbling. Tight joints keep the bunk bed safe during use. Tighten screws again after assembly to ensure no parts are loose.
Adding The House Elements
Adding house elements to your bunk bed turns it into a fun, cozy space. It creates the feel of a real little house. This makes bedtime more exciting for kids. The process involves building walls and a roof, adding decorative touches, and finishing with paint. Each step shapes the bunk bed into a unique play and sleep area.
Creating Walls And Roof
Start by cutting wooden panels to form walls around the bunk bed. Use lightweight plywood for easy handling. Attach the panels securely to the bed frame with screws. Leave enough space for windows or openings. For the roof, build a simple A-frame or flat top. Fix it firmly to the walls. Ensure all edges are smooth to avoid splinters.
Decorative Features
Add fun details like window shutters, flower boxes, or a small door. Use wood scraps or craft materials. Attach these decorations safely with nails or glue. Personalize the house with name signs or playful patterns. These features make the bed feel more like a home. Keep decorations child-friendly and sturdy.
Painting And Finishing
Choose bright, safe paint colors to brighten the house bunk bed. Use non-toxic, water-based paint for safety. Apply a primer before painting for better color hold. Paint walls, roof, and decorative parts evenly. Let each coat dry before adding the next. Seal the paint with a clear varnish to protect the finish. This step adds durability and a polished look.
Installing Safety Rails And Ladder
Installing safety rails and a ladder is key to making a bunk bed safe and easy to use. These parts protect from falls and help climb up and down. Proper installation keeps the bed strong and secure. Focus on choosing the right rails, placing the ladder well, and making sure everything is stable.
Choosing Rail Styles
Pick rail styles that fit your bed design and space. Solid wood rails give strong protection. Slatted rails allow air flow and look lighter. Rails should be tall enough to stop rolling off. Smooth edges prevent scrapes and bumps. Check rails meet safety rules for bunk beds.
Ladder Placement
Place the ladder where it is easy to reach. Side ladders save space. Front ladders offer straight climbing. Keep the ladder away from walls or furniture. Make sure it does not block room walking paths. Choose ladder steps wide enough for safe climbing.
Ensuring Stability
Attach rails and ladder tightly to the bed frame. Use strong screws and brackets. Test the ladder by pulling and stepping on it. Check rails for any wobble or movement. Reinforce weak points with extra support. A stable setup prevents accidents and lasts longer.
Credit: www.ana-white.com
Final Touches And Bedding
Final touches and bedding complete the look and comfort of a house bunk bed. This step makes the bed cozy and inviting. A well-chosen mattress and bedding can improve sleep quality. Decorating adds personality and makes the space fun. Proper care keeps the bed safe and long-lasting.
Mattress Selection
Choose a mattress that fits the bunk bed frame exactly. Use firm mattresses for safety and support. Avoid mattresses thicker than 6 to 8 inches. Pick materials that are breathable and hypoallergenic. This helps keep the bed fresh and comfortable. Always check the mattress weight to match the bed’s limits.
Decorating Tips
Use bright colors to make the bed cheerful. Add themed bedding for a playful touch. Soft pillows and blankets increase comfort. String lights create a warm, cozy feel. Use removable wall decals near the bed for easy updates. Keep decorations simple to avoid clutter. Ensure nothing blocks the ladder or safety rails.
Maintenance Advice
Clean bedding regularly to keep it fresh. Inspect the bed frame for loose screws monthly. Tighten any bolts to keep the bed sturdy. Check the mattress for signs of wear or sagging. Rotate the mattress every few months for even use. Wipe the frame with a damp cloth to remove dust. Keep the area around the bed tidy and safe.
Frequently Asked Questions
What Materials Are Needed To Build A House Bunk Bed?
You need sturdy wood, screws, nails, wood glue, sandpaper, paint, and safety rails. Choose quality wood for durability and safety.
How Long Does It Take To Build A House Bunk Bed?
Building a house bunk bed typically takes 8 to 12 hours. This depends on your skill level and available tools.
What Safety Features Should A House Bunk Bed Have?
Include guardrails on all sides of the top bunk. Ensure a strong ladder and secure joints for child safety.
Can I Customize The Design Of A House Bunk Bed?
Yes, you can customize size, shape, and colors. Personalize it with shelves, drawers, or themed decorations to suit your needs.
Conclusion
Building a house bunk bed can save space and add fun. Follow clear steps and use safe materials for best results. Take your time to measure and cut carefully. Ask for help if the project feels hard. Enjoy the process and watch your bunk bed come to life.
A well-made bunk bed lasts for years and brings joy to any room. Start your project today and create a cozy, practical space for kids or guests. Simple tools and patience make a big difference.