Are you tired of clutter and need a simple, budget-friendly way to organize your books? Making a bookshelf out of cardboard boxes is easier than you think.
With just a few materials and some creativity, you can build a sturdy, unique shelf that fits your space perfectly. Imagine turning everyday boxes into a stylish storage solution that shows off your personality. Keep reading, and you’ll discover step-by-step tips to create your own bookshelf that saves money, reduces waste, and adds charm to your room.
Ready to transform your space? Let’s get started!

Credit: www.instructables.com
Materials Needed
Building a bookshelf from cardboard boxes is simple and fun. You need a few materials to start. Choosing the right supplies helps your bookshelf last longer and look better.
Below, find the types of cardboard boxes and extra supplies needed for this project.
Types Of Cardboard Boxes
Use strong, sturdy boxes for the bookshelf. Look for boxes with thick walls. Shipping boxes or appliance boxes work well. Avoid thin or damaged boxes. Uniform size boxes create a neat look. You can also use recycled boxes from stores or home deliveries. Make sure the boxes are clean and dry.
Additional Supplies
Gather tape to hold boxes securely. Strong packing tape or duct tape works best. Get scissors or a box cutter for cutting. Use glue to add strength between boxes. A ruler or measuring tape helps with precision. Paint or decorative paper can add style. Markers or labels help organize your shelves. A flat surface makes building easier.
Preparing The Boxes
Preparing the cardboard boxes is the first step to making a sturdy bookshelf. This step ensures the boxes are clean and ready for cutting. Proper preparation helps the bookshelf last longer and look neat.
Start by checking the boxes for dirt, dust, or sticky spots. A clean surface makes the glue and tape stick better. Also, flattening the boxes helps create smooth and even pieces.
Cleaning And Flattening
Remove any tape, labels, or stickers from the boxes. Wipe the surface with a dry cloth to remove dust. Avoid wet cleaning as it can weaken the cardboard. After cleaning, open the boxes fully and press them flat. Use your hands or a flat object to smooth the folds. Flattened boxes are easier to measure and cut.
Cutting To Size
Measure the size you want for each bookshelf part. Use a ruler and pencil to mark straight lines on the flattened boxes. Cut along the lines with a sharp utility knife or scissors. Cut carefully to keep edges neat and even. Cutting the right size pieces helps the bookshelf fit together well.
Designing Your Bookshelf
Designing your bookshelf is the first step to a successful project. This phase helps you imagine the final look. It also guides how you use your cardboard boxes. Simple plans lead to better results. Clear ideas save time and materials.
Think about the space where the bookshelf will go. Measure walls and available corners. Visualize the style you want. A neat design makes your bookshelf both useful and attractive.
Choosing The Layout
Decide the shape of your bookshelf. Will it stand tall or stretch wide? Consider the number of shelves you need. Square or rectangular boxes work best. Arrange boxes so they fit well together. Stability is key for holding books safely.
Planning Dimensions
Measure each box carefully before building. Check height, width, and depth. Plan for space between shelves for books. Leave room for bigger books if needed. Add a little extra space to avoid tight fits. Accurate dimensions make stacking easier and safer.
Credit: improvisedlife.com
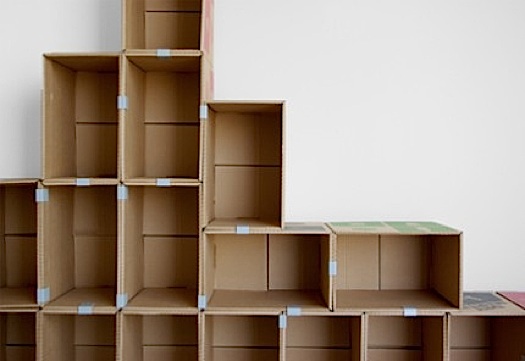
Assembling The Structure
Building your bookshelf starts with putting the boxes together. This step shapes the whole structure. Careful assembly gives your shelf strength and balance. Take your time to align each box correctly. A solid base is key to prevent wobbling.
Arrange the boxes in the order you want. Keep the size and shape in mind. Proper stacking helps hold the weight of books later. Use tape or glue to keep boxes fixed. Secure connections stop the shelf from falling apart.
Stacking And Securing Boxes
Place the largest boxes at the bottom for a strong base. Stack smaller boxes on top for height. Check that each box sits flat and even. Use strong tape on all touching edges. Wrap tape around corners for extra hold. Press tape firmly to avoid gaps. Repeat for each level until you reach the desired height.
Reinforcing For Stability
Strengthen the shelf by adding support inside boxes. Insert cardboard panels or folded pieces to fill empty spaces. This keeps boxes from bending under weight. Attach extra tape on joints and corners. Use glue for long-lasting bonds. Test the shelf’s stability by gently pushing it. Add more reinforcement if it moves or creaks.
Finishing Touches
Finishing touches give your cardboard bookshelf a polished look. These steps help your shelf last longer and look great. Small details make a big difference. Focus on painting, decorating, and adding shelves or dividers. This improves both function and style.
Painting And Decorating
Painting adds color and protects the cardboard. Use acrylic or spray paint for best results. Apply a primer first to avoid soaking. Let each coat dry fully before adding the next. Choose colors that match your room’s style.
Decorate with patterns or simple designs. Use stencils or painter’s tape for clean lines. Stick on decals or wallpaper for extra flair. Avoid heavy decorations that can weigh down the shelf.
Adding Shelves And Dividers
Shelves and dividers increase storage space and organization. Cut extra cardboard pieces to fit inside the main frame. Secure them with strong glue or tape. Make sure they are level and sturdy.
Use dividers to separate books by size or topic. This keeps your shelf tidy and easy to use. Reinforce corners with extra cardboard strips for durability. Check stability before placing heavy items on your shelf.
Maintenance Tips
Maintaining a bookshelf made from cardboard boxes is simple but important. Proper care helps your shelf last longer and hold books safely. Small habits protect the structure and keep it looking good. Follow these easy tips to keep your cardboard bookshelf strong and neat.
Keeping It Dry
Cardboard weakens quickly when wet. Avoid placing your shelf in humid or damp areas. Use a cloth to wipe off any spills immediately. Consider using plastic liners inside the boxes to block moisture. Keeping your shelf dry stops it from bending or breaking.
Handling Weight Limits
Cardboard is not as strong as wood. Do not overload the shelves with heavy books. Distribute weight evenly across all boxes. Place heavier books on the bottom shelves to prevent tipping. Respecting weight limits prevents damage and keeps the shelf steady.

Credit: homelyeconomics.com
Frequently Asked Questions
How Durable Is A Bookshelf Made From Cardboard Boxes?
A cardboard bookshelf can be durable if reinforced properly. Use strong boxes and add supports. Avoid heavy items to prevent collapse. Proper sealing and layering increase strength and lifespan.
What Materials Are Needed Besides Cardboard Boxes?
You’ll need glue or tape, scissors or a box cutter, and paint or decorative paper. Optional items include rulers and markers for precise measurements and design.
Can Cardboard Bookshelves Hold Heavy Books?
Cardboard shelves are best for lightweight or medium-weight books. Heavy books may cause bending or damage. Reinforce shelves with extra layers or wooden planks for added support.
How To Prevent Cardboard Shelves From Warping?
Keep shelves dry and away from moisture. Use waterproof sealants or covers. Store books evenly to avoid pressure points. Proper ventilation helps maintain shape and durability.
Conclusion
Making a bookshelf from cardboard boxes is simple and fun. You only need a few materials and some patience. This project saves money and helps the environment by recycling. You can customize the size and shape to fit your space.
Plus, it’s a great way to be creative. Try adding paint or decorations to make it unique. Start today and enjoy your new, handmade bookshelf. It’s a smart, easy way to organize your books and items. Give it a try—you might be surprised how well it works.