Are you looking for a fun and creative project that you can make with just popsicle sticks? Imagine building your very own miniature bunk bed, perfect for dolls or as a cool decoration.
It’s easier than you think, and you don’t need any special tools or skills to get started. In this guide, you’ll discover simple steps to turn ordinary popsicle sticks into a sturdy and stylish bunk bed. Ready to impress your friends and enjoy a rewarding craft?
Keep reading, and let’s make something amazing together!

Credit: www.youtube.com
Materials Needed
Creating a bunk bed out of popsicle sticks is a fun and creative project. You need the right materials to build it strong and look nice. Gather all items before starting to make the process easier. Here are the main materials you will need.
Popsicle Sticks
Popsicle sticks are the main building blocks. Choose sticks that are smooth and without cracks. Craft sticks come in different sizes. Select standard-sized sticks for easier assembly. You will need many sticks to build the frame and the bed slats.
Glue And Adhesives
Strong glue keeps your bunk bed together. Use wood glue or a strong craft adhesive. Avoid weak glue that can cause the bed to fall apart. Hot glue guns work well but be careful with heat. Allow glue to dry fully for the best hold.
Cutting Tools
Cutting sticks to size is important. Use small scissors or a craft knife. A small saw can help for thicker sticks. Always cut safely and carefully. Sandpaper can smooth rough edges after cutting.
Paint And Finishing Supplies
Painting adds color and protects the wood. Use acrylic paint for bright, lasting colors. You can also use wood varnish for a natural look. Brushes and small sponges help with painting. Let paint dry completely before using the bed.
Preparing The Sticks
Preparing the sticks is the first step in making a sturdy bunk bed out of popsicle sticks. It sets the foundation for a strong and neat project. Proper preparation helps the sticks fit well and look good. Take time to get the sticks ready before starting to build.
Sorting And Cleaning
Sort the popsicle sticks by size and shape. Remove any broken or warped sticks. Clean the sticks with a damp cloth to remove dust and dirt. Dry them completely before use. Clean sticks glue better and last longer.
Cutting To Size
Measure the parts of the bunk bed you need to build. Mark the sticks with a pencil where you want to cut. Use sharp scissors or a small saw for clean cuts. Cut slowly and carefully to avoid splintering. Uniform stick sizes make the bed stronger and neater.
Sanding Edges
Sand the cut edges of the sticks with fine sandpaper. This removes rough spots and splinters. Smooth edges help the glue hold better. Sanding also makes the sticks safer to handle. Take your time and sand evenly for the best results.
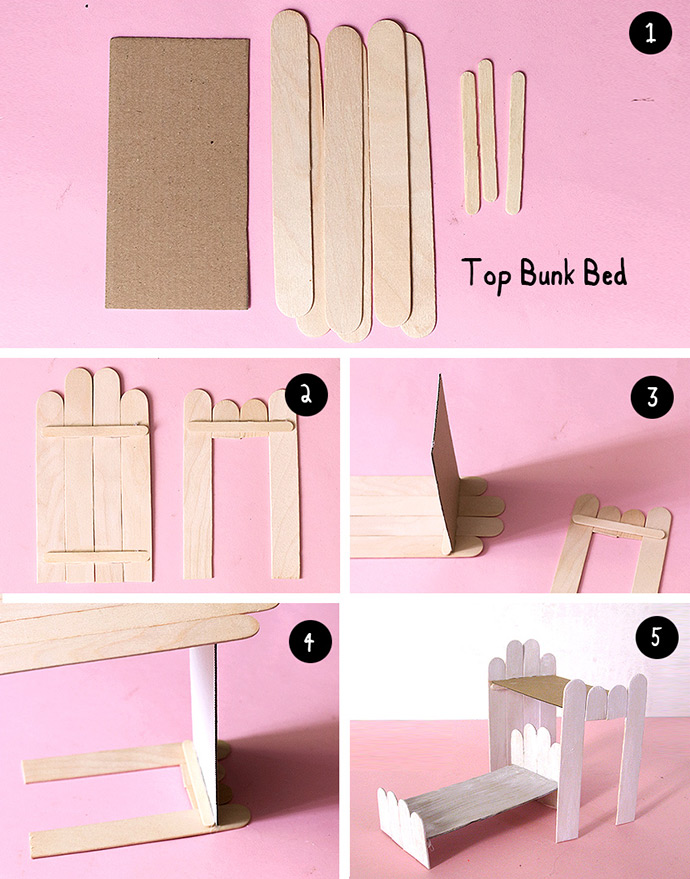
Building The Frame
Building the frame is the first step in making your popsicle stick bunk bed. This part sets the shape and strength of the bed. Careful work here means a sturdy and safe bed for your mini project. Start with simple, straight lines and connect the pieces firmly.
Use glue that dries clear and holds well. Take your time to measure and place each stick. A good frame will hold all other parts together without wobbling.
Constructing The Bed Base
Lay out sticks side by side to form the bed base. Make two rectangles for the top and bottom beds. Each rectangle should match the desired size of your bunk bed mattress. Glue the sticks tightly along the edges to keep them flat and strong. Add extra sticks across the middle for more support.
Creating The Headboards And Footboards
Headboards and footboards give the bed its classic look. Build these by stacking sticks vertically and gluing them side by side. Use shorter sticks to create a frame around the edges. This frame adds strength and keeps the sticks aligned. Decorate with small cutouts or patterns for style.
Assembling The Support Beams
Support beams hold the bunk bed together and keep it stable. Cut sticks to the right length for the sides and middle supports. Glue beams under the bed bases and between the headboards and footboards. Make sure all beams are straight and firmly attached. This ensures the bed will not collapse or wobble.

Credit: www.carboservis.cz
Adding The Ladder
Adding the ladder is an important step in building your popsicle stick bunk bed. The ladder lets you climb to the top bunk safely. It also gives the bed a more realistic look. This part is fun and simple to make.
Designing The Ladder
Start by deciding how tall your ladder should be. It should reach from the floor to the top bunk’s edge. Use four popsicle sticks for the sides. These will be the ladder’s rails.
Next, cut smaller sticks for the steps. Each step should be about two inches long. Space the steps evenly between the rails. Usually, three or four steps work well. Make sure the steps are wide enough to stand on.
Attaching The Ladder To The Frame
Place the ladder next to the bunk bed frame. Use glue to attach the rails to the bed’s side. Hold the ladder in place until the glue dries. Check that the ladder is straight and stable.
Add extra glue to secure the steps to the rails. Let everything dry completely before moving the bed. This keeps the ladder strong and safe to use.
Finishing Touches
Finishing touches bring your popsicle stick bunk bed to life. They add color, protect the wood, and give a polished look. These final steps make your project look complete and last longer.
Painting And Decorating
Choose bright or soft colors to paint your bunk bed. Use acrylic paint for smooth and even coverage. Paint thin layers to avoid drips and lumps. Let each layer dry before applying the next. Add fun details like stripes or polka dots. Stick small stickers or draw patterns with markers. Personalize your bunk bed to match your style.
Sealing For Durability
Apply a clear sealant to protect the paint and wood. Use a water-based sealant for easy cleaning and safety. Brush the sealant evenly over all surfaces. Let it dry completely before handling the bed. The sealant stops moisture and dirt from damaging the popsicle sticks. It keeps your bunk bed strong and looking fresh for a long time.
Credit: www.handmadecharlotte.com
Safety Tips
Building a bunk bed out of popsicle sticks is fun and creative. Safety matters a lot in this project. It keeps you safe and makes the bed strong. Follow these tips to make your model safe and sturdy.
Ensuring Stability
Use strong glue to hold the sticks together well. Let the glue dry fully before moving the bed. Check each joint to avoid weak spots. Add extra sticks at corners for more strength. Test the bed gently to see if it stays steady. Fix any loose parts before finishing.
Handling Tools Safely
Use scissors or craft knives with care. Cut away from your body and fingers. Keep sharp tools out of reach of young children. Work on a clean, flat surface to avoid slips. Put tools down safely after use. Wear protective gloves if needed to avoid cuts.
Frequently Asked Questions
How Many Popsicle Sticks Are Needed For A Bunk Bed?
You need about 200 to 300 popsicle sticks for a sturdy bunk bed. The exact number depends on your design and size.
What Glue Works Best For Popsicle Stick Bunk Beds?
Wood glue or strong craft glue works best. It dries clear and holds the sticks firmly in place.
How Long Does It Take To Build A Popsicle Stick Bunk Bed?
Building usually takes 3 to 5 hours. Time varies based on complexity and drying time for the glue.
Can Kids Safely Build A Popsicle Stick Bunk Bed?
Yes, with adult supervision. Kids can learn crafting skills while staying safe with scissors and glue.
Conclusion
Building a bunk bed from popsicle sticks is fun and rewarding. It teaches patience and creativity step by step. You can make it strong by following the simple instructions carefully. This project uses easy materials anyone can find. Kids and adults enjoy making it together.
Try adding your own style to make it unique. It’s a great way to spend free time and learn new skills. Keep practicing, and your designs will improve quickly. Enjoy your handmade popsicle stick bunk bed!