Are you looking for a unique way to organize your coats and add a rustic touch to your space? Making a deer antler coat rack could be the perfect project for you.
Not only does it bring a natural, outdoorsy charm to your home, but it also gives you a functional piece that stands out. Imagine walking into your entryway and seeing a beautiful, handcrafted rack made from real antlers—something that catches the eye and sparks conversation.
In this guide, you’ll discover simple steps to create your own stunning deer antler coat rack, even if you’ve never worked with antlers before. Ready to turn your vision into reality? Let’s get started!
Credit: www.etsy.com
Choosing The Right Antlers
Choosing the right antlers is key to making a sturdy and attractive coat rack. The size, shape, and quality of antlers affect both function and style. Understanding the different types and knowing where to find good ones helps create a unique piece. Careful inspection ensures the antlers will last and hold weight well.
Types Of Deer Antlers
Antlers vary by deer species and age. Common types include white-tailed, mule, and elk antlers. White-tailed antlers have many points and curves. Mule deer antlers are wider with a forked shape. Elk antlers are large and heavy with long tines. Choose antlers that match your room’s style and size needs.
Where To Source Antlers
Antlers can come from nature or stores. Shed antlers fall off deer naturally each year. These can be found in woods or bought online. Some stores sell cleaned and treated antlers. Hunting lodges or farms sometimes offer antlers for sale. Always check local laws before collecting antlers in the wild.
Inspecting Quality And Size
Good antlers are solid and free of cracks. Check for damage or rot before buying. Size matters for balance and coat capacity. Large antlers hold more coats but need strong mounting. Small antlers fit smaller spaces and lighter use. Pick antlers that suit your room and coat rack needs.

Credit: garinfobahn.com
Gathering Materials And Tools
Gathering the right materials and tools is the first step in making a deer antler coat rack. Having everything ready will make the project smooth and enjoyable. This step ensures you have all you need before starting the assembly.
Essential Supplies
Start with real or faux deer antlers. Choose ones that are clean and sturdy. A wooden board or plaque forms the base. Select wood that fits your style and size needs. Screws or strong glue will hold parts together. Sandpaper helps smooth rough edges. Finish with a clear sealant to protect the rack.
Tools Needed For Assembly
You need a drill for making holes in the wood. A screwdriver will fasten the screws tightly. A saw helps cut the wood to the right size. A measuring tape ensures proper placement of antlers. Clamps hold pieces steady while gluing. A pencil helps mark where to drill or cut.
Safety Gear Recommendations
Wear safety glasses to protect your eyes from dust and debris. Use gloves to avoid splinters and sharp edges. A dust mask keeps you safe from inhaling wood particles. Work in a well-ventilated area to reduce fumes from glue or sealant. Keep a first aid kit nearby for small cuts or scrapes.
Preparing The Antlers
Preparing the antlers is a key step in making a deer antler coat rack. Clean and shape the antlers carefully. This makes sure the rack looks good and lasts long. Taking time here helps you create a strong and beautiful piece.
Cleaning And Sanitizing
Start by washing the antlers with warm water and soap. Use a brush to remove dirt and debris. Rinse well to get rid of all soap. Then, soak the antlers in a mild bleach solution. This kills bacteria and removes odors. Dry the antlers completely before moving on.
Trimming And Shaping
Use a saw or a strong tool to trim sharp or uneven parts. Cut the antlers to the size you want for the coat rack. Shape the ends smooth so they don’t scratch clothes. Work slowly and carefully for the best results.
Sanding For Smooth Finish
Sand the antlers with fine-grit sandpaper. This removes rough spots and splinters. Sand all surfaces you will touch or hang items on. Wipe off dust with a dry cloth. Smooth antlers protect your clothes and look polished.

Credit: www.youtube.com
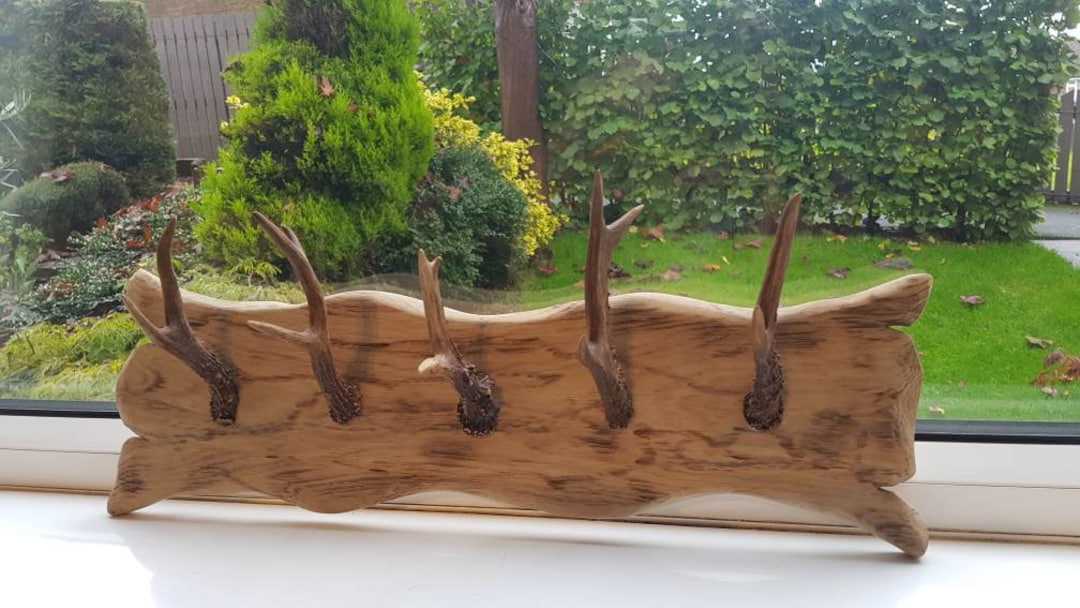
Designing The Rack Layout
Designing the layout of your deer antler coat rack is the first step to creating a functional and attractive piece. A well-planned design ensures the rack holds coats securely and looks balanced on the wall. Think about how the antlers will fit together and how the rack will use space efficiently.
Arranging Antlers For Balance
Start by sorting your antlers by size and shape. Place larger antlers in the center or at the bottom for support. Smaller antlers can go on the sides or top. This keeps the rack stable and prevents it from tipping.
Try to space the antlers evenly. Avoid crowding one side more than the other. Balanced placement makes the rack look neat and pleasing.
Choosing Mounting Style
Decide how you want to attach the antlers to the base. You can mount them directly onto a wooden board or use metal brackets for extra strength. Wall anchors or screws should match the rack’s weight.
Think about the wall type where you’ll hang the rack. Heavy racks need stronger mounts. Choose a mounting style that fits your tools and skills.
Sketching Your Design
Draw a simple sketch of your rack before building. Include the size, shape, and positions of each antler. This helps avoid mistakes during assembly.
Use pencil and paper or a digital tool. Mark where screws or hooks will go. A clear plan saves time and effort.
Assembling The Coat Rack
Assembling the deer antler coat rack is a fun and simple process. This step brings all parts together to create a functional and rustic piece. Careful assembly ensures your coat rack looks great and holds coats securely. Follow clear steps for a smooth build.
Attaching Antlers To Base
Start by placing the antlers on the wooden base. Position them evenly for balance and style. Mark the spots where the antlers touch the base. Drill small holes in these marks to prepare for screws. Attach the antlers using strong screws or bolts. Make sure each antler fits tightly to the base.
Securing With Hardware
Use washers and nuts with screws to hold the antlers firmly. Tighten all screws with a screwdriver or wrench. Check that no parts move or wiggle. Hardware must be strong to support the weight of coats. Choose rust-resistant screws to keep the rack durable.
Ensuring Stability
Place the coat rack on a flat surface to test balance. Adjust the antlers or base if it wobbles. Add rubber pads under the base for better grip. Stability prevents the rack from tipping over. A stable rack keeps coats safe and makes it easier to use.
Finishing Touches
Finishing touches bring your deer antler coat rack to life. These small steps protect your work and add style. They make the rack durable and beautiful. Let’s explore how to finish your rack like a pro.
Applying Protective Coatings
Start by cleaning the antlers and wood. Use a soft cloth to remove dust. Next, apply a clear protective coat. Choose polyurethane or varnish for strong protection. Use a brush to apply thin, even layers. Let each layer dry before adding the next. This keeps the antlers shiny and safe from damage.
Adding Decorative Elements
Decorate to match your room style. Wrap leather strips around the antlers for a rustic look. Attach small metal hooks for extra hanging space. Use natural twine or rope for a cabin feel. Keep decorations simple to highlight the antlers’ natural beauty.
Mounting Tips
Choose a sturdy wall for mounting. Use strong anchors or screws to hold the weight. Measure carefully to keep the rack level. Mark holes on the wall before drilling. Attach the rack securely to avoid falls. Check stability by gently pulling the rack after installation.
Maintaining Your Antler Rack
Maintaining your deer antler coat rack keeps it strong and beautiful. Regular care helps the rack last for years. Simple steps protect the natural look and prevent damage. Follow easy tips to keep your antler rack in top shape.
Cleaning Tips
Dust your antler rack often with a soft cloth. Use a dry or slightly damp cloth. Avoid harsh chemicals that can damage the antler. For stubborn dirt, mix mild soap with water. Wipe gently and dry immediately. Keep the rack away from direct sunlight to prevent fading.
Repairing Minor Damages
Small cracks or chips appear over time. Fill cracks with wood filler that matches the antler color. Use fine sandpaper to smooth rough edges. Tighten loose screws or hooks carefully. For loose antlers, apply strong wood glue. Let repairs dry fully before use.
Preserving Rustic Look
Maintain the natural texture by avoiding heavy polishing. Use natural oils like mineral oil to nourish the antler. Apply oil sparingly with a soft cloth. Let the oil soak in for a few minutes. Wipe off any extra oil to avoid stickiness. Keep the rack in a dry place to prevent mold.
Frequently Asked Questions
What Materials Are Needed To Make A Deer Antler Coat Rack?
You need deer antlers, a wooden board, screws, wall anchors, sandpaper, and a drill. These materials ensure durability and a rustic look.
How Do You Securely Attach Antlers To The Board?
Drill pilot holes into the board and antlers. Use strong screws to fasten them tightly for stability and safety.
Can I Use Shed Antlers For The Coat Rack?
Yes, shed antlers are ideal. They are naturally shed by deer and provide an authentic, eco-friendly touch to your rack.
How Do I Finish The Wooden Base For Durability?
Sand the wood smoothly and apply a sealant or wood stain. This protects against moisture and enhances the natural grain.
Conclusion
Creating a deer antler coat rack adds charm to any room. It uses natural materials and simple tools. You can hang coats, hats, or bags easily. The project suits beginners and experienced DIYers alike. It saves money compared to store-bought racks.
Plus, it gives your space a rustic feel. Try this craft to enjoy a unique home item. Your friends will notice and ask about it. Start your project today and enjoy the process. A handmade rack brings warmth and style to your home.