Are you looking for a simple, affordable way to organize your books and add a personal touch to your space? Making a bookshelf using cardboard might be the perfect solution for you.
It’s easy to do, requires just a few materials, and lets you create something unique that fits your style. Imagine having a sturdy, lightweight shelf that you built yourself—saving money and impressing your friends. Keep reading, and you’ll discover step-by-step how to turn plain cardboard into a functional and stylish bookshelf you’ll love.

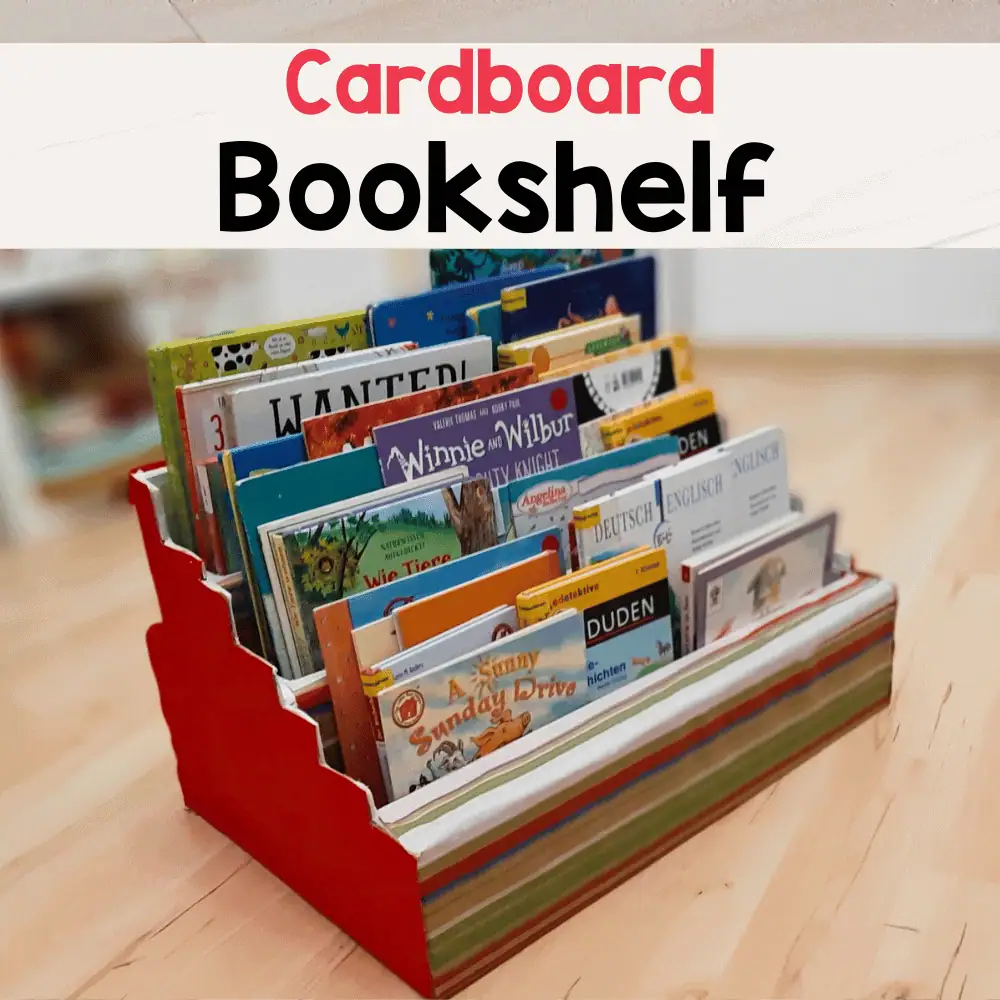
Credit: www.youtube.com
Materials Needed
Building a bookshelf from cardboard is easy and fun. You only need a few materials. Choosing the right supplies helps make a strong bookshelf. This section lists what you need before you start.
Choosing The Right Cardboard
Pick thick, sturdy cardboard for your bookshelf. Double or triple-wall cardboard works best. Avoid thin or soft cardboard. It won’t hold the weight of books. Check for any dents or holes. Use clean pieces without tears. Bigger sheets help make bigger shelves. Recycle old boxes or buy new ones. The stronger the cardboard, the safer your books.
Additional Supplies
You need a sharp box cutter or utility knife for cutting. Use a metal ruler to guide straight cuts. Hot glue or strong craft glue holds pieces together well. Packing tape adds extra strength to corners. A pencil helps mark where to cut. Sandpaper smooths rough edges for safety. Optionally, paint or contact paper can decorate your shelf. Prepare all materials before starting to work.

Credit: sonshinemumma.blogspot.com
Planning Your Bookshelf
Planning your bookshelf is the first step in creating a sturdy and useful piece. It helps to avoid mistakes and saves time. Careful planning makes the building process easier and the end result better.
This section covers two key parts: measuring space and designing the shelf structure. Both are important for a perfect fit and strong design.
Measuring Space And Dimensions
Start by choosing the spot for your bookshelf. Use a tape measure to find the width, height, and depth of the space. Write down these numbers carefully.
Consider the room’s shape and obstacles like doors or windows. Think about how many books or items you want to store. This will guide your size choices.
Remember, cardboard has limits in weight and size. Plan dimensions that balance space and strength for your shelf.
Designing The Shelf Structure
Decide on the number of shelves and their spacing. Keep shelf height enough for different book sizes. Avoid making shelves too far apart or too close.
Think about the shape and support. Simple rectangular shelves work best with cardboard. Add vertical dividers to increase stability.
Plan how to connect pieces. Use tabs, slots, or glue. A good design uses parts that fit tightly for strength.
Sketch your design on paper. This helps visualize and spot problems early. Adjust measurements before cutting cardboard.
Cutting The Cardboard
Cutting the cardboard is the first step in building your bookshelf. Accurate cuts make assembly easier and result in a sturdy shelf. Take your time to measure and cut carefully. This section explains how to mark and cut your cardboard pieces correctly.
Marking The Pieces
Start by measuring the size of each bookshelf part on the cardboard. Use a ruler or measuring tape for accuracy. Mark the lines clearly with a pencil. Double-check each measurement before marking to avoid mistakes. Mark all pieces needed, including shelves and side panels. Clear marks help cut straight lines and fit pieces perfectly.
Tips For Precise Cutting
Use a sharp utility knife or box cutter for clean cuts. Cut on a flat, stable surface to keep the cardboard steady. Follow the marked lines slowly and carefully. Use a metal ruler as a guide to keep cuts straight. Change blades if cutting feels tough or uneven. Cut one layer at a time if cardboard is thick. Take breaks to avoid rushing and making mistakes.
Credit: www.littleladoo.com
Assembling The Shelf
Assembling the shelf is an important step in making a cardboard bookshelf. This part brings all pieces together. Careful assembly ensures the shelf holds books well. Use the right methods to join parts and make the structure strong. Focus on secure joints and reinforcement for durability.
Joining Pieces Securely
Start by aligning the cardboard pieces carefully. Use strong glue made for cardboard. Apply glue evenly on the edges to join. Hold the pieces firmly until the glue dries. For extra hold, use clear tape along the joints. This prevents movement and keeps parts in place.
Make sure corners fit tightly. Loose edges will weaken the shelf. Use clamps or heavy books to press joints. Wait long enough for glue to set fully. Strong connections stop the shelf from wobbling.
Reinforcing The Structure
Add extra cardboard strips inside the shelf. Place them along the back and bottom. These strips act as braces to support weight. Use glue and tape to fix them firmly. Reinforcement stops the shelf from bending or breaking.
Double layers of cardboard on shelves improve strength. Also, attach small triangular pieces at corners. These triangles help keep angles steady. Check every joint and add support where needed. Reinforcement makes the shelf last longer and hold more books safely.
Finishing Touches
Finishing touches make your cardboard bookshelf look neat and strong. They help protect the edges and give your shelf a polished look. Spend time on these steps for a better final result.
Sanding And Smoothing Edges
Use fine sandpaper to smooth all the edges of your bookshelf. This step removes rough parts that can catch or tear. Sand lightly until the surface feels soft and even. Pay special attention to corners and cut lines. Smooth edges also help paint stick better.
Painting And Decorating
Choose paint that works well on cardboard, like acrylic or spray paint. Apply thin, even coats to avoid soaking the cardboard. Let each coat dry fully before adding the next. Decorate with patterns, stencils, or stickers to add personality. A clear sealant can protect your paint and make the shelf last longer.
Maintaining Your Bookshelf
Maintaining your cardboard bookshelf helps it last longer and stay sturdy. Cardboard is light and easy to shape. But it can also be delicate. Simple care keeps your shelf safe and useful. Check it often for problems. Fix small issues fast to avoid bigger damage.
Weight Limitations
Cardboard shelves hold less weight than wood or metal. Avoid heavy books or objects. Spread items evenly on the shelf. Too much weight in one spot causes bending. Keep the shelf light and balanced. Use it for paperbacks, small decor, or craft supplies.
Repairing Damages
Small tears or dents happen with cardboard. Fix these quickly to keep strength. Use strong tape or glue for cracks. Replace damaged sections if needed. Keep a repair kit nearby for quick fixes. Clean dust and dirt gently to avoid wear.
Frequently Asked Questions
How Durable Is A Cardboard Bookshelf?
A cardboard bookshelf is surprisingly sturdy if made with thick, layered cardboard. Proper assembly and reinforcement enhance its strength. It suits light to medium-weight books. Avoid overloading to maintain durability and prevent bending or collapsing over time.
What Tools Are Needed To Make A Cardboard Bookshelf?
You will need a utility knife, ruler, pencil, hot glue gun, and cutting mat. These tools help measure, cut, and assemble cardboard pieces precisely. Using the right tools ensures clean edges and a stable, professional-looking bookshelf.
Can I Customize The Size Of The Cardboard Bookshelf?
Yes, you can customize the size easily by adjusting the cardboard dimensions. Measure your space and books before cutting. Custom sizing allows the bookshelf to fit perfectly in any room or corner.
Is Making A Cardboard Bookshelf Environmentally Friendly?
Yes, using recycled cardboard reduces waste and environmental impact. This DIY project promotes recycling and reusing materials. It’s a sustainable alternative to buying new wooden furniture.
Conclusion
Building a cardboard bookshelf is simple and fun. You only need a few materials and some patience. This project saves money and helps the environment by reusing cardboard. You can customize the size and design to fit your space. It also gives a sense of pride to make something yourself.
Try this easy craft to organize your books and decorate your room. Give it a go and enjoy your new, homemade bookshelf!