Imagine turning your child’s bunk bed into a fun, exciting playground right at home. You can make your own bunk bed slide that brings joy, saves space, and adds a unique touch to their room.
If you’ve ever wondered how to do this safely and easily, you’re in the right place. This guide will show you step-by-step how to create a slide that your kids will love—and you’ll feel proud building it yourself. Ready to transform your bunk bed into the coolest spot in the house?
Let’s get started!
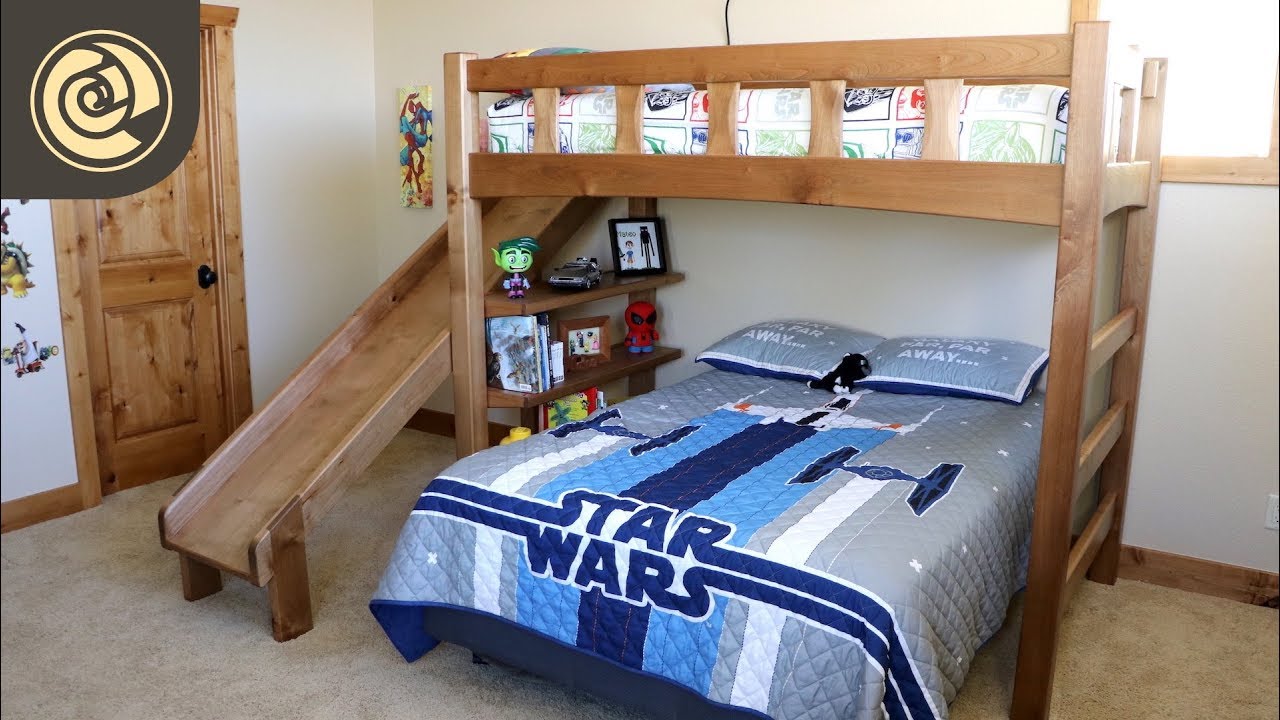
Credit: www.youtube.com
Choosing The Right Materials
Choosing the right materials is key to building a safe and sturdy bunk bed slide. The materials must support weight and last long. Safety is the top priority for children’s furniture. The right wood, hardware, and tools help create a smooth, fun slide. This section covers the best choices for each material type.
Selecting Safe Wood Types
Choose wood that is strong and smooth. Pine, maple, or birch are good options. They resist cracking and splintering. Avoid softwoods that break easily. Sand the wood well to prevent splinters. Use non-toxic paint or finish to keep it safe for kids.
Picking Durable Hardware
Hardware must hold the slide firmly in place. Use heavy-duty screws and bolts. Steel brackets add extra support. Avoid nails because they can loosen over time. Check that all metal parts are rust-resistant. This keeps the slide safe and stable for years.
Gathering Necessary Tools
Tools make the job easier and safer. You need a drill, screwdriver, measuring tape, and saw. Sandpaper or an electric sander smooths rough edges. A level ensures the slide is straight. Have clamps to hold pieces while you work. Prepare all tools before starting your project.

Credit: www.youtube.com
Planning Your Slide Design
Planning your slide design is the first step to a safe and fun bunk bed slide. It helps you know what materials to buy and how to build the slide properly. A good plan saves time and avoids mistakes. Take your time to think about the size and shape of the slide. This makes the building process easier and the slide more enjoyable.
Start by measuring your bunk bed carefully. Then decide the best length and angle for the slide. Finally, sketch the layout to see how everything fits together. This way, you can adjust your plan before building.
Measuring Your Bunk Bed
Use a tape measure to get exact dimensions of the bunk bed. Measure the height from the top bunk to the floor. Check the width of the bed frame. Note any obstacles like guardrails or ladder positions. Write down all measurements clearly. These numbers guide the size of your slide.
Deciding Slide Length And Angle
The slide should be long enough to be fun but safe. A slide length between 6 to 8 feet works well for most beds. The angle should not be too steep to avoid fast speeds. A 30 to 35-degree angle feels smooth and safe. Use your bed height and slide length to find the right angle.
Sketching The Layout
Draw a simple plan on paper or use a computer program. Include the bunk bed and the slide position. Mark the slide’s length, width, and angle. Show where the slide will attach to the bed. This helps you see the final look. Change the sketch if something looks off.
Preparing The Wood Pieces
Preparing the wood pieces is the first step to build a safe and fun bunk bed slide. This step ensures the slide fits well and is smooth for sliding. Using the right wood and cutting it correctly is very important. You will work on shaping the slide surface, smoothing the edges, and adding safety features. Each part must be done carefully to avoid accidents and make the slide last longer.
Cutting The Slide Surface
Start by choosing a sturdy wood board. Plywood or smooth pine works well. Measure the length and width based on your bunk bed size. Mark the wood clearly with a pencil. Use a saw to cut the slide surface straight and even. Keep the cuts slow and steady for accuracy. A smooth, flat surface helps kids slide down easily and safely.
Sanding For Smoothness
Sanding removes rough spots and splinters from the wood. Use medium-grit sandpaper first to smooth the surface. Then, use fine-grit sandpaper for a soft finish. Sand all edges and corners thoroughly. The smoother the wood, the safer and more comfortable the slide will be. Take your time to avoid any sharp or rough areas.
Adding Safety Edges
Safety edges prevent children from falling off the slide sides. Cut thin strips of wood or use pre-made guard rails. Attach these strips firmly along both slide edges. Make sure they are smooth and rounded. Check that the edges are high enough to keep kids safe. Secure the rails with screws for strong support.
Credit: www.reddit.com
Building The Slide Frame
Building the slide frame is the key step to make a safe bunk bed slide. It supports the slide and keeps it steady. The frame must be strong and stable to hold weight and use. Follow simple steps to create a reliable frame for your slide.
Assembling Support Structures
Start by cutting wood pieces for the slide supports. Use strong, smooth boards for safety. Arrange two long side pieces parallel to each other. Connect them with shorter cross pieces to form a rectangular frame. Secure all joints with screws for extra strength.
Check that the frame fits the bunk bed height and slide length. Sand the edges to avoid splinters. This structure will hold the slide surface firmly in place.
Attaching The Slide Surface
Choose a smooth, sturdy board for the slide surface. Place it on top of the support frame. Align the edges evenly for a neat look. Attach the surface with screws or nails along the sides. Make sure the surface is tight and does not wobble.
Test the slide for smoothness. Sand any rough spots carefully. A smooth slide surface ensures a fun and safe ride.
Reinforcing With Brackets
Use metal brackets to strengthen the frame corners. Attach brackets inside each corner using screws. This adds extra stability and prevents wobbling. Check all connections to ensure they are tight and secure.
Brackets help the slide frame last longer under regular use. They provide peace of mind when the slide holds weight.
Installing The Slide On The Bunk Bed
Installing the slide on the bunk bed is a key step in making it fun and safe. This process needs careful attention to ensure the slide stays strong and steady. Proper installation helps kids enjoy the slide without any risk of injury. Follow clear steps to position the slide correctly, secure it with bolts and screws, and check its stability.
Positioning The Slide Securely
Place the slide next to the bunk bed’s edge where it fits well. The slide should start near the top bunk for a smooth ride. Make sure the bottom of the slide rests flat on the floor. Double-check the angle; it should not be too steep or flat. Mark the points where the slide will attach to the bed frame. This ensures the slide stays in place during use.
Using Bolts And Screws
Choose strong bolts and screws for attaching the slide. Use a drill to make pilot holes in the bed frame and slide. This prevents wood from splitting. Insert bolts through the holes and tighten with nuts. Add screws for extra support on smaller parts. Tighten all fasteners firmly but avoid over-tightening, which can damage the wood.
Ensuring Stability And Safety
Test the slide by gently pushing it side to side. Check if it moves or feels loose. Add extra screws or brackets if needed for more strength. Inspect the slide surface for smoothness to avoid splinters. Place a soft mat at the slide’s end for safe landings. Regularly check all fasteners to keep the slide secure over time.
Finishing Touches
Finishing touches make your bunk bed slide safe and attractive. They protect the wood and add personality. Take time for these steps. They improve the slide’s look and durability.
Applying Paint Or Varnish
Choose paint or varnish that suits your style. Paint offers color and fun. Varnish shows the wood’s natural beauty. Both protect the slide from wear and moisture. Use smooth, even strokes. Let each coat dry fully before adding the next. This ensures a strong, lasting finish.
Adding Decorative Elements
Decorate the slide to match the room’s theme. Stickers, decals, or stencils work well. Use safe, non-toxic materials for children. Add soft padding at the edges for safety. Personal touches make the slide unique and fun. Keep decorations simple to avoid distractions during play.
Testing The Slide
Test the slide carefully before use. Check for stability and smoothness. Make sure there are no sharp edges or loose parts. Try sliding gently to confirm safety. Fix any problems immediately. A well-tested slide gives peace of mind and hours of fun.
Safety Tips For Kids
Building a bunk bed slide is fun, but safety must come first. Kids need a safe space to play and enjoy the slide without getting hurt. Following simple safety tips helps keep the slide a happy place for everyone. Read on for key safety advice for your children.
Supervision Guidelines
Always watch kids while they use the slide. Stay close enough to help if needed. Teach children to wait their turn and slide down one at a time. Avoid running or pushing near the slide area. Supervision lowers accidents and keeps playtime safe.
Maintaining Slide Condition
Check the slide often for damage or loose parts. Tighten screws and bolts regularly. Clean the slide to remove dirt or slippery spots. Fix cracks or rough edges quickly. A well-kept slide prevents injuries and lasts longer.
Encouraging Safe Play
Explain the right way to use the slide. Encourage sitting down and sliding feet first. Remind kids not to climb up the slide surface. Use soft mats or rugs at the slide’s end for a gentle landing. Teaching safe habits builds good playtime routines.
Frequently Asked Questions
What Materials Do I Need For A Bunk Bed Slide?
You need plywood, wood screws, sandpaper, paint, and brackets. A saw and drill are essential tools. Choose smooth wood for safety and durability.
How Do I Attach The Slide To The Bunk Bed?
Secure the slide with sturdy brackets at both ends. Ensure the slide is firmly anchored to the bed frame. Double-check stability before use.
Is It Safe To Build A Bunk Bed Slide At Home?
Yes, if you follow safety guidelines and use quality materials. Smooth edges and secure attachments reduce injury risks. Always supervise children while using the slide.
Can I Customize The Bunk Bed Slide Design?
Absolutely! You can paint it, add decals, or change the slide shape. Customize length and width to fit your bed and space. Personal touches make it fun and unique.
Conclusion
Building your own bunk bed slide adds fun and creativity to any room. The steps are simple and clear to follow. You can choose materials that suit your style and budget. Safety is key—always check your work carefully. Enjoy watching kids laugh and play on your new slide.
This project brings joy and a sense of pride. Give it a try and make playtime even better. A homemade slide turns a bed into an adventure spot. Small efforts can create big smiles every day.