Are you tired of cluttered spaces and expensive furniture that just doesn’t fit your needs? Imagine having a bookshelf that adapts to your collection, saves space, and costs less than a night out.
You don’t need to be a woodworking expert or spend a fortune to create a small, adjustable bookshelf that works perfectly for your room. In this guide, you’ll discover simple steps to build your own stylish and affordable bookshelf, tailored just for you.
Ready to transform your space and organize your books with ease? Let’s get started!

Credit: www.youtube.com
Materials And Tools Needed
Building a small, adjustable bookshelf on a budget starts with the right materials and tools. Choosing affordable supplies helps keep costs low. Having essential tools makes the project easier and safer. Optional accessories can improve the bookshelf’s look and function.
Choosing Affordable Wood
Look for wood that is cheap but strong. Pine and plywood are good choices. Pine is easy to cut and light. Plywood offers a smooth surface and lasts long. Avoid expensive hardwoods to save money. Local hardware stores often have discounts or scrap wood sections.
Essential Tools List
Gather tools that help cut, measure, and assemble the bookshelf. A handsaw or jigsaw cuts wood pieces accurately. A drill is needed for making holes and screwing parts. Use a tape measure to get exact lengths. Sandpaper smooths rough edges. Screwdrivers help tighten screws. A level ensures shelves sit straight.
Optional Accessories
Extras improve the look and function but are not required. Shelf pins allow easy shelf height changes. Wood glue strengthens joints. Paint or stain adds color and protects wood. Corner brackets offer extra support for heavy books. Felt pads under the bookshelf prevent floor scratches.
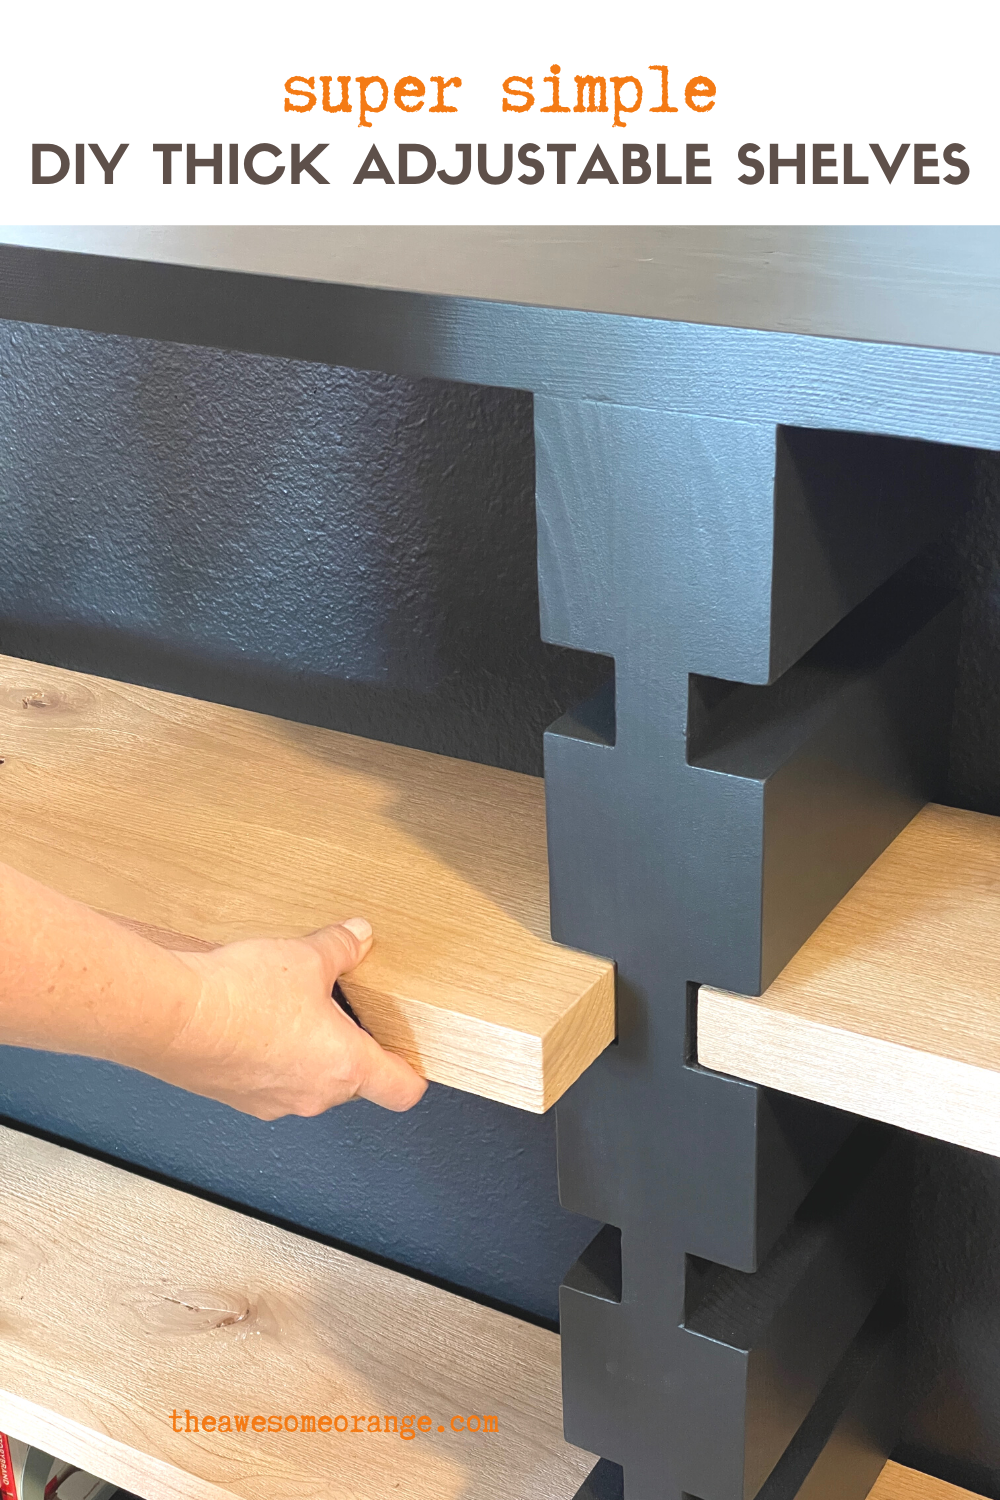
Credit: www.theawesomeorange.com
Planning Your Bookshelf
Planning your small adjustable bookshelf is the first step to a successful build. This stage helps you set clear goals and avoid mistakes. It saves time and money. You get a bookshelf that fits your needs and space perfectly.
Determining Size And Capacity
Start by measuring the space for your bookshelf. Note the height, width, and depth available. Think about how many books or items you want to store. Consider the weight your shelves must hold. This helps choose strong materials and proper shelf thickness.
Sketching The Design
Draw a simple sketch of your bookshelf. Show the overall shape and size. Mark where shelves will go. Use basic shapes and lines. A sketch guides you during cutting and assembling. It also helps check if your ideas fit in the space.
Deciding On Adjustable Features
Choose how to make shelves adjustable. Common ways include holes with pegs or sliding tracks. Think about how often you will move shelves. Make sure adjusting is easy and stable. Adjustable shelves let you store tall or short items comfortably.
Cutting And Preparing Wood
Cutting and preparing wood is the first step in building your adjustable bookshelf. Getting this right ensures strong shelves and a neat look. Precise work saves time and avoids mistakes later. This section shows how to measure, cut, and smooth the wood safely.
Measuring And Marking
Measure each piece carefully with a tape measure. Mark the wood clearly using a pencil. Double-check each mark before cutting. Use a square tool to draw straight lines. Accurate marks help keep your bookshelf even and stable.
Safe Cutting Techniques
Use a saw that matches your wood type and size. Hold the wood firmly on a stable surface. Keep your hands away from the blade. Cut slowly following your marked lines. Wearing safety goggles protects your eyes from dust and chips.
Sanding For Smooth Finish
Sand each cut edge to remove splinters. Start with coarse sandpaper to smooth rough spots. Finish with fine sandpaper for a clean surface. Smooth wood helps paint stick better and prevents injury. Wipe dust off with a dry cloth before assembly.
Assembling The Frame
Assembling the frame is the key step in making your small, cheap adjustable bookshelf sturdy and reliable. This part shapes the main structure and holds everything together. Careful assembly ensures your shelf will last and adjust easily.
Building The Side Panels
Start by cutting two side panels from plywood or MDF. Make sure they are the same size. Mark evenly spaced holes along the inside edges. These holes will hold the shelf pegs for adjustability. Drill the holes carefully for a perfect fit.
Attaching The Base And Top
Next, cut the base and top pieces to match the width of the side panels. Attach the base first, using wood screws or nails. Then fix the top piece in the same way. Check that both are square and flush with the side panels to keep the frame balanced.
Ensuring Stability
Use corner braces or L-brackets inside the corners for extra strength. Tighten all screws securely to avoid wobbling. Place the frame on a flat surface to test balance. Add small rubber feet or pads under the base to stop slipping and protect floors.
Installing Adjustable Shelves
Installing adjustable shelves is key to making your bookshelf flexible and useful. It lets you change shelf height to fit different books and items. This section guides you through choosing shelf supports, drilling holes for adjustment, and fitting shelves securely.
Choosing Shelf Support Systems
Select shelf supports that fit your bookshelf size and weight needs. Common options include metal pins, plastic clips, or peg strips. Metal pins are strong and easy to move. Plastic clips work well for light loads. Peg strips allow many adjustment points along the side panels. Choose supports that match your materials and budget.
Drilling Adjustable Holes
Mark holes evenly along the side panels. Use a ruler and pencil to keep spacing consistent. Typical spacing is 1 to 2 inches apart. Drill holes slightly larger than your shelf pins or pegs. Drill straight and clean to avoid damage. Sand edges to remove splinters. This step creates the flexibility to move shelves as needed.
Fitting And Testing Shelves
Insert shelf supports into drilled holes at desired heights. Place shelves carefully on the supports. Check that shelves sit level and stable. Adjust pin positions if shelves tilt or wobble. Test by adding weight gradually. Make sure shelves hold books firmly without sagging. Proper fitting ensures safe, adjustable storage.
Finishing Touches
Finishing touches give your bookshelf a clean, polished look. They protect the wood and make the shelf last longer. This step also lets you add style and personality to your project.
Applying Paint Or Stain
Choose paint or stain based on your room’s style. Paint hides wood grain and adds color. Stain shows the wood’s natural texture and color. Use a brush or cloth for even coverage. Let each coat dry fully before adding another.
Adding Protective Coating
Protective coating prevents scratches and water damage. Clear varnish or polyurethane works well. Apply thin layers with a clean brush. Let each layer dry completely. Lightly sand between coats for a smooth finish.
Decorative Options
Decorate shelves with washi tape or decals for a personal touch. Add small knobs or handles for a unique look. Use stencils for patterns or shapes on wood. These details make your shelf stand out and feel special.
Tips For Maintenance And Safety
Keeping your small adjustable bookshelf safe and in good shape is very important. Regular care helps it last longer and stay sturdy. Follow these simple tips to maintain your bookshelf and keep it safe for everyone.
Regular Checks And Repairs
Look at your bookshelf often for loose screws or broken parts. Tighten any screws that feel loose. Fix small cracks or chips quickly. This stops bigger damage later. Check the shelves to make sure they stay steady.
Weight Distribution Advice
Place heavy books on the lower shelves. This keeps the bookshelf balanced and less likely to tip. Don’t put too many items on one shelf. Spread weight evenly to avoid bending or breaking.
Childproofing Ideas
Secure the bookshelf to the wall using brackets. This stops it from tipping over. Use corner guards on sharp edges to protect little hands. Keep heavy or fragile items out of children’s reach.

Credit: www.youtube.com
Frequently Asked Questions
What Materials Are Best For A Cheap Adjustable Bookshelf?
Plywood and MDF are affordable, durable materials ideal for small adjustable bookshelves. They are easy to cut and assemble, making them perfect for budget-friendly projects.
How Can I Make My Bookshelf Adjustable?
Use shelf pins or brackets inside pre-drilled holes. This allows easy repositioning of shelves for different book sizes without permanent fixtures.
What Tools Do I Need To Build A Small Bookshelf?
Basic tools include a saw, drill, screwdriver, measuring tape, and sandpaper. These help cut, assemble, and finish your bookshelf efficiently.
How Do I Ensure The Bookshelf Is Stable And Safe?
Secure the bookshelf to the wall using brackets. Also, use sturdy materials and level shelves to prevent tipping or collapsing.
Conclusion
Building a small, cheap adjustable bookshelf is simple and useful. You can save money by making it yourself. Adjust the shelves to fit different books and items. This project fits well in any room or space. It helps keep your area neat and organized.
Try this easy DIY to add storage without much cost. Enjoy your new bookshelf that works just the way you want.