Imagine having a bookshelf that not only stores your favorite reads but also adds a clever twist to your space. A pivoting bookshelf does just that—it swings open to reveal hidden storage or a secret room.
If you’ve ever wanted to add a unique, practical feature to your home, this project is perfect for you. In this guide, you’ll learn exactly how to make your own pivoting bookshelf with simple steps and easy-to-find materials. Ready to transform your space and impress your friends?
Keep reading, and let’s get started!
Choosing The Right Materials
Choosing the right materials is key to building a strong pivoting bookshelf. The materials affect the shelf’s strength, look, and how long it lasts. Picking good wood, hardware, and finishing supplies makes the project easier and the result better.
Wood Types For Durability
Hardwoods are best for a sturdy bookshelf. Oak, maple, and walnut resist dents and scratches. Softwoods like pine cost less but wear faster. Plywood is stable and less likely to warp. Choose wood with a smooth surface to save sanding time.
Hardware Essentials
Strong hinges are vital for smooth pivoting. Heavy-duty pivot hinges support weight well. Screws must be long and thick enough to hold firmly. Use washers to spread pressure and avoid wood damage. Quality hardware keeps the bookshelf safe and steady.
Finishing Supplies
Finish protects wood and enhances beauty. Sandpaper smooths rough edges and prepares wood. Wood stain adds color and shows grain patterns. Sealants like varnish or polyurethane guard against moisture and wear. A good finish keeps the shelf looking new for years.

Credit: www.youtube.com
Designing Your Pivoting Bookshelf
Designing your pivoting bookshelf is an important step. It shapes how the final product will look and work. Good design fits your space and holds your books well. It also ensures smooth pivot action and safety. This section guides you through key design steps.
Start by measuring the space and your books. Next, sketch a clear layout. Finally, choose the right pivot mechanism for your shelf.
Measuring Space And Books
Measure the wall or corner where the bookshelf will stand. Note height, width, and depth available. Measure the size of your books too. Record the tallest and widest books. This helps decide shelf height and depth. Leave extra space for easy book removal.
Sketching The Layout
Draw your bookshelf on paper or use a simple app. Mark shelf positions and pivot points clearly. Decide how many shelves you want. Plan spacing between shelves based on book sizes. Show how the bookshelf will pivot. This visual plan helps avoid mistakes later.
Selecting Pivot Mechanism
Pick a pivot mechanism that fits your design and weight needs. Common options include floor and ceiling pivots or side pivots. Check load capacity to hold all shelves and books safely. Make sure the mechanism allows smooth, easy turning. Choose durable materials for long life.
Cutting And Preparing Wood
Cutting and preparing wood is a key step in making a pivoting bookshelf. The wood must be measured and cut carefully. It must be smooth and ready for assembly. Taking time in this step helps the bookshelf fit well and look great.
Accurate Measurements
Measure the wood pieces with a tape measure or ruler. Mark lines clearly where you will cut. Double-check each measurement before cutting. Accurate sizes keep the bookshelf stable and balanced. Use a pencil for easy adjustments.
Safe Cutting Techniques
Wear safety goggles and gloves before cutting wood. Use a saw suited for your wood type. Cut slowly along the marked lines. Keep your hands away from the blade. A steady hand makes cleaner cuts and prevents accidents.
Sanding And Smoothing
After cutting, sand the edges with sandpaper. Smooth all rough spots to avoid splinters. Use fine-grit sandpaper for a clean finish. Wipe off dust before assembling the bookshelf. Smooth wood improves both safety and appearance.
Assembling The Bookshelf Frame
Assembling the bookshelf frame is the first big step in making your pivoting bookshelf. This step sets the base for a strong and steady structure. Take your time and follow each part carefully. Your frame needs to be solid to hold the shelves and books safely.
Use the right tools and materials. Check your panels and shelves for any damage before starting. Clear your workspace for easy movement and focus. Let’s start building the frame step by step.
Joining Panels
Start by placing the side panels upright. Align the edges so they fit tightly. Use wood glue along the edges for a strong bond. Push the panels together firmly. Screw them in place using a drill and screws. Check that the panels form a right angle. This keeps the frame square and balanced.
Installing Shelves
Mark the shelf positions on the side panels. Use a level to keep shelves even. Insert shelf supports or brackets at the marked spots. Slide the shelves into place gently. Ensure each shelf fits snugly without gaps. Secure shelves with screws or nails. Double-check the level to avoid slanting shelves.
Securing Joints
Reinforce all joints for extra strength. Add corner braces inside the frame. Tighten all screws and bolts firmly. Use wood glue on each joint before fastening. Wipe off any excess glue quickly. Let the glue dry fully before moving the frame. A strong frame prevents wobbling and keeps your books safe.
Attaching The Pivot Mechanism
Attaching the pivot mechanism is a key step in building your pivoting bookshelf. This part lets the bookshelf turn smoothly and hold weight without wobbling. Take time to place the hardware correctly. Proper attachment ensures safety and ease of use. Follow the steps carefully for best results.
Mounting The Pivot Hardware
Start by marking the exact spots for the pivot points on both the bookshelf and the base. Use a pencil and a level to keep marks straight. Drill pilot holes to avoid splitting the wood. Attach the pivot hardware firmly with screws. Use a screwdriver or drill for a tight fit. Make sure the hardware aligns perfectly to allow smooth movement.
Ensuring Smooth Rotation
Check that the pivot parts move without resistance. Lubricate the pivot joints with light oil or silicone spray. Avoid over-lubricating to prevent drips. Rotate the bookshelf several times to spread the lubricant evenly. Adjust the hardware if you feel any stiffness. Smooth rotation keeps the bookshelf functional and easy to use.
Testing Stability
After mounting, test the bookshelf’s stability carefully. Open and close it slowly to watch for wobbling. Tighten any loose screws. Place books on the shelves and check balance. The bookshelf should stay steady in all positions. Stability ensures safety and long-lasting performance.

Credit: www.fritsjurgens.com
Finishing Touches
Finishing touches bring your pivoting bookshelf to life. They protect the wood and enhance its look. Small details make a big difference. Let’s explore key steps to complete your project.
Painting Or Staining
Choose paint or stain to suit your room’s style. Paint offers bright, solid colors. Stain shows the wood’s natural grain. Apply evenly with a brush or cloth. Let each coat dry fully before the next. Two or three coats often work best.
Adding Protective Coating
Protect your bookshelf from scratches and spills. Use clear varnish, polyurethane, or lacquer. These coatings add shine and durability. Apply thin layers with a soft brush. Allow drying time between coats. Sand lightly for a smooth finish.
Decorative Elements
Add personality with knobs, handles, or trim. Choose simple designs to match your style. Attach securely to avoid wobbling. Use decorative brackets for extra charm. These details make your bookshelf unique and inviting.
Maintaining Your Pivoting Bookshelf
Maintaining your pivoting bookshelf keeps it working smoothly and looking great. Regular care helps avoid damage and extends its life. Small steps can prevent bigger problems.
Regular Cleaning Tips
Dust the bookshelf often using a soft cloth. Avoid wet cloths that might damage the wood. Clean corners and edges where dust gathers. Use a vacuum with a brush attachment for hard-to-reach spots. Keep books and items tidy to reduce dust build-up.
Lubricating Pivot Points
Check the pivot points for any stiffness. Use a light oil or silicone spray to lubricate these areas. Apply a small amount and move the shelf to spread it evenly. Avoid over-lubricating to prevent dirt sticking. Lubricate every few months or if movement feels rough.
Troubleshooting Common Issues
Listen for squeaks or creaks when pivoting. Tighten loose screws or bolts gently. If the shelf wobbles, check the base and pivot for stability. Fix uneven surfaces under the shelf to keep balance. Replace worn parts early to avoid bigger damage.
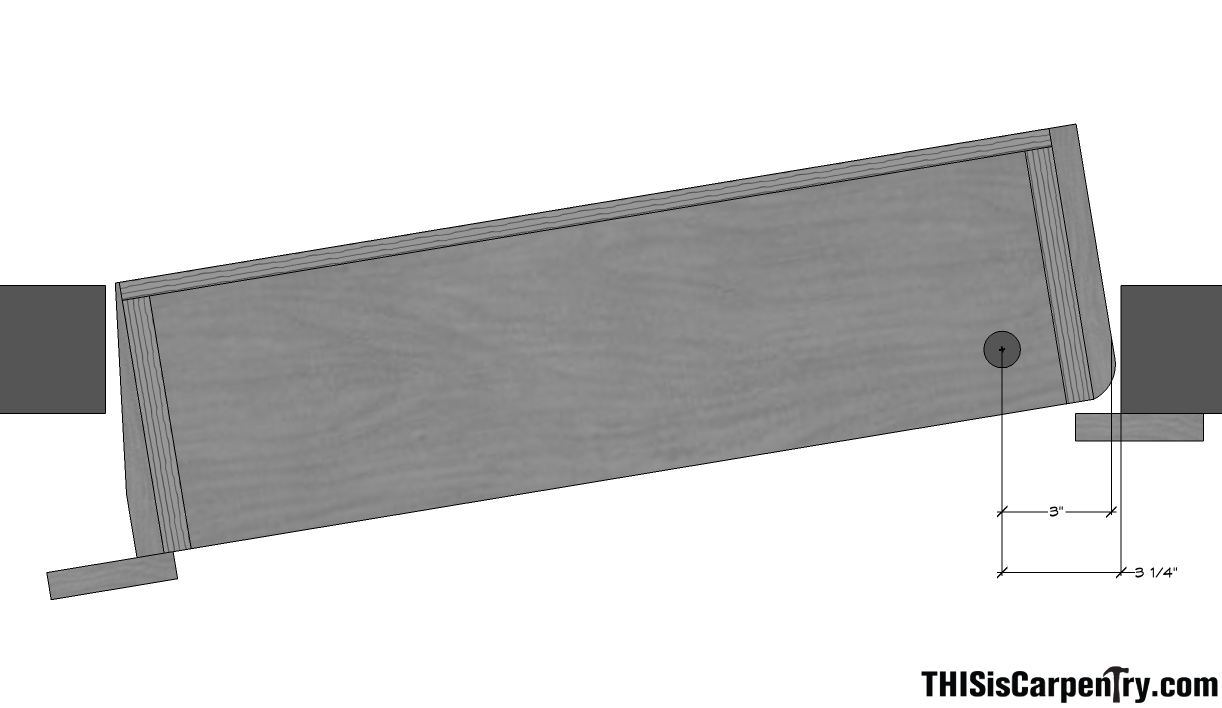
Credit: www.thisiscarpentry.com
Frequently Asked Questions
What Materials Are Needed To Make A Pivoting Bookshelf?
You need plywood or solid wood, hinges, a pivot mechanism, screws, wood glue, and paint or finish. These materials ensure durability and smooth pivot action for your bookshelf.
How Do You Install The Pivot Mechanism On The Bookshelf?
Attach the pivot hardware at the top and bottom of the bookshelf. Ensure they align vertically for smooth rotation and secure with screws for stability.
Can A Pivoting Bookshelf Support Heavy Books?
Yes, if constructed with strong wood and quality pivot hardware. Proper installation ensures it holds heavy books without wobbling or damage.
How Much Space Is Needed For A Pivoting Bookshelf To Rotate?
Allow at least 24 inches of clearance around the bookshelf. This space lets the shelf pivot fully without hitting walls or furniture.
Conclusion
Building a pivoting bookshelf adds style and function to any room. It saves space and keeps books organized. The steps are simple and clear to follow. You only need basic tools and materials. This project suits beginners and DIY lovers alike.
Try making one to enjoy a unique home feature. It brings charm and practicality together nicely. Start today and see the difference it makes.