Are you looking for a stylish and practical way to organize your books and display your favorite items? Building a bookshelf with open sides might be exactly what you need.
This design not only adds a modern touch to any room but also makes your space feel larger and more inviting. In this guide, you’ll discover simple steps to create your own open-sided bookshelf, even if you’re new to woodworking.
By the end, you’ll have a custom piece that fits perfectly in your home and shows off your personality. Ready to get started? Let’s dive in!
Materials And Tools
Building a bookshelf with open sides starts with the right materials and tools. Choosing good wood and having the correct tools will make the project easier. Safety gear keeps you protected during work. Below, find details about wood, tools, and safety essentials.
Wood Selection
Pick wood that is strong and smooth. Pine is affordable and easy to cut. Oak or maple offer more strength and last longer. Avoid wood with many knots or cracks. Measure your space to decide the size of wood boards. Smooth surfaces need less sanding and look better.
Required Tools
You will need a saw to cut the wood. A drill helps make holes for screws. Sandpaper or a sander smooths rough edges. A tape measure ensures accurate cuts. Clamps hold wood pieces steady while working. A screwdriver or power drill drives screws. Use a level to keep shelves straight.
Safety Gear
Wear safety glasses to protect your eyes from dust. Use ear protection if the tools are loud. Gloves protect your hands from splinters and sharp edges. A dust mask stops you from breathing sawdust. Wear closed-toe shoes to protect your feet. Keep your work area clean and well-lit.
Design Planning
Design planning is the first step in building a bookshelf with open sides. It helps you create a clear vision for your project. Careful planning saves time and materials. It also ensures the final product fits your space perfectly. Focus on three main points: measuring space, choosing dimensions, and sketching the layout.
Measuring Space
Start by measuring the wall or corner where the bookshelf will stand. Use a tape measure for accuracy. Note the height, width, and depth available. Consider space for walking and other furniture. Write down these numbers for reference during design.
Choosing Dimensions
Decide on the bookshelf size based on your measurements. Keep the depth shallow to maintain an open feel. A width between 24 to 36 inches works well. Choose a height that suits your room without overwhelming it. Make sure each shelf can hold your books comfortably.
Sketching The Layout
Draw a simple sketch of your bookshelf design. Include the open sides and shelf placements. Use graph paper or a digital tool for precision. Label dimensions and note the spacing between shelves. This step helps visualize the final product and guides construction.
Cutting The Wood
Cutting the wood is a key step in building a bookshelf with open sides. Precise cuts help the pieces fit well. This makes the bookshelf strong and neat. Taking time during this step saves effort later. Safety and accuracy are important while cutting wood.
Marking Cut Lines
Start by measuring each piece carefully. Use a pencil to draw clear lines on the wood. Mark both sides to avoid mistakes. Double-check your measurements before cutting. Straight lines guide the saw for clean cuts. Accurate markings make assembly easier later.
Using A Saw Safely
Choose the right saw for your wood type and thickness. Hold the saw firmly and keep your hands away from the blade. Cut slowly and follow the marked lines. Wear safety goggles to protect your eyes. Always cut on a stable surface to avoid slips. Take breaks if you feel tired.
Sanding Edges
After cutting, edges may be rough or sharp. Use sandpaper or a sanding block to smooth them. Sand along the wood grain for best results. Clean the dust off after sanding. Smooth edges prevent splinters and improve the look. This step helps the wood fit better during assembly.
.jpg)
Credit: www.mascheroni.it
Assembling The Frame
Building a bookshelf with open sides starts with assembling the frame. The frame holds everything together and gives the shelf its shape. Take your time to make it strong and straight. A solid frame makes your bookshelf last longer and look better.
Joining Side Panels
Begin by joining the two side panels. Place them upright and parallel to each other. Use clamps to hold them steady. Align the edges carefully to keep the frame square. Attach the panels with wood glue for extra strength. Let the glue dry before moving on.
Attaching Shelves
Next, position the shelves between the side panels. Measure the distance to keep shelves even. Mark the spots where shelves will go. Insert each shelf carefully, making sure it fits tight. Use a level to keep shelves flat and straight.
Securing With Screws
Secure the frame by driving screws through the side panels into the shelves. Pre-drill holes to avoid splitting the wood. Use screws long enough to hold parts firmly. Tighten screws but avoid overdriving them. Check the frame for stability after all screws are in place.
Finishing Touches
Finishing touches bring your open-sided bookshelf to life. They make it smooth, strong, and beautiful. These final steps protect the wood and improve its look. Take your time with each step to get the best results.
Filling Holes
Use wood filler to cover nail or screw holes. Apply it with a putty knife. Press the filler into the holes and smooth it out. Let it dry completely. After drying, sand the area gently until smooth. This step helps your bookshelf look neat and even.
Applying Paint Or Stain
Choose paint or stain that fits your style. Use a brush or cloth to apply it evenly. Paint hides the wood grain and gives color. Stain shows the natural wood texture. Apply thin coats and let each dry before adding more. This creates a rich, smooth finish.
Adding Protective Coating
Protect your bookshelf with a clear coat. Use polyurethane, varnish, or lacquer for strength. Apply with a clean brush in thin layers. Let each layer dry and sand lightly between coats. This stops scratches and water damage. Your bookshelf will last longer and stay beautiful.
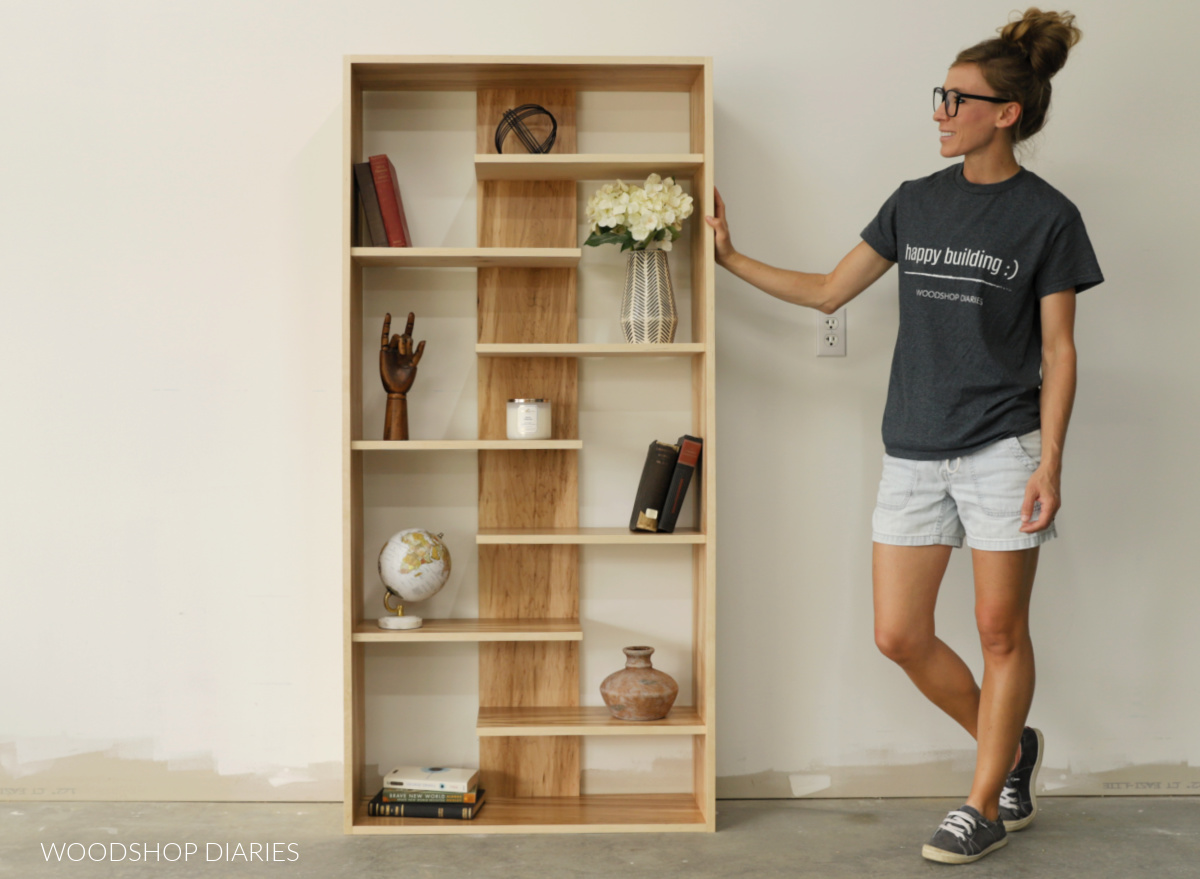
Credit: www.woodshopdiaries.com
Placement And Styling
Choosing the right spot for your open-sided bookshelf affects both its look and use. Placement also shapes how you style the shelf to fit your room’s mood. Thoughtful styling makes your bookshelf a focal point, not just storage.
Consider light, space, and flow in your room. These factors help you decide where to put the bookshelf. Styling should match your personal taste and the room’s theme.
Positioning The Bookshelf
Place the bookshelf near natural light to brighten the items on display. Avoid spots that block walkways or crowd furniture. A corner or against a plain wall often works well. Keep it stable and away from damp areas to protect your books.
Decorating Tips
Mix books with decorative objects for visual interest. Use plants, small sculptures, or photo frames to add color and texture. Arrange books both vertically and horizontally for variety. Leave some empty space to avoid cluttered looks.
Maintenance Advice
Dust the bookshelf weekly to keep it clean and fresh. Check for loose screws or joints regularly. Use a soft cloth and mild cleaner to avoid damage. Keep books dry and avoid overloading shelves to maintain strength.

Credit: www.vecteezy.com
Frequently Asked Questions
What Materials Are Needed To Build A Bookshelf With Open Sides?
You need plywood or solid wood, wood screws, wood glue, sandpaper, paint or stain, and brackets for stability. Choose quality wood for durability and a smooth finish. Basic tools like a saw, drill, and screwdriver are also essential.
How Do You Ensure Stability In An Open-sided Bookshelf?
Use sturdy wood and secure shelves with screws and wood glue. Add brackets or braces at corners for extra support. Proper anchoring to the wall can prevent tipping and improve overall stability.
What Are The Benefits Of Open-sided Bookshelf Design?
Open sides allow easy access and better visibility of books. This design improves air circulation and reduces dust buildup. It also adds a modern, airy aesthetic to any room, making the space feel larger and more open.
Can I Customize The Size Of The Bookshelf Easily?
Yes, open-sided bookshelves are highly customizable. You can adjust height, width, and depth to fit your space. Custom sizing helps maximize storage and match your room’s style and dimensions perfectly.
Conclusion
Building a bookshelf with open sides can be fun and simple. You only need a few tools and some patience. Follow the steps carefully, and you will have a stylish shelf in no time. Open sides make the shelf look light and modern.
It also helps to see your books easily. This project fits well in any room and adds a personal touch. Give it a try, and enjoy your new bookshelf every day.