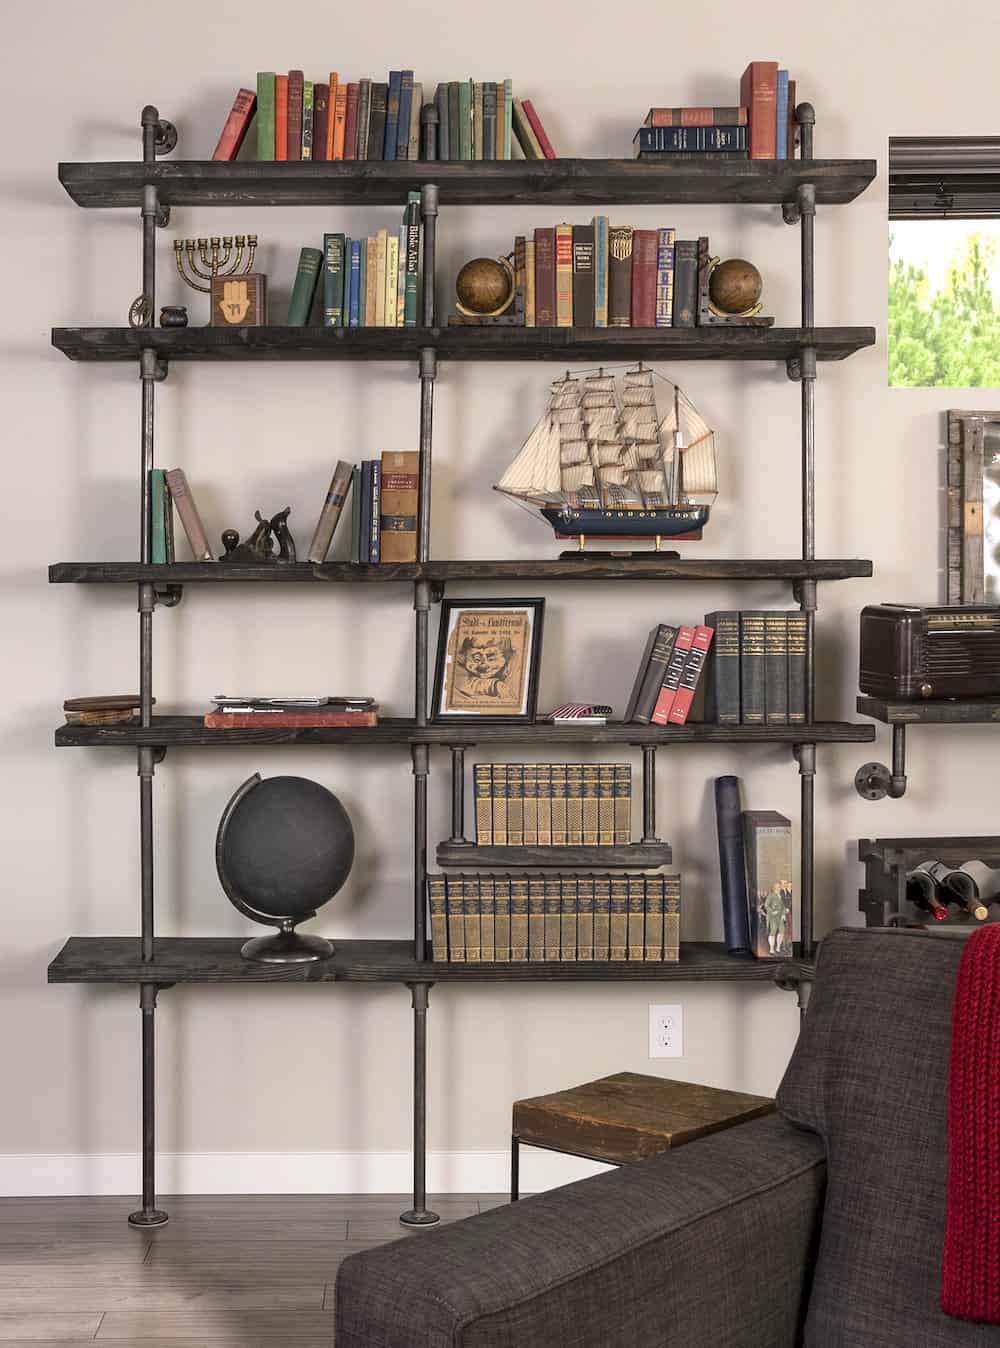
Are you looking for a unique and sturdy bookshelf that adds character to your space? Making a black pipe bookshelf is easier than you think, and it gives your room a stylish, industrial vibe.
Imagine having a piece that not only holds your favorite books but also becomes a conversation starter. In this guide, you’ll discover simple steps to build your own black pipe bookshelf, even if you’re not a DIY expert. Ready to create something functional and eye-catching?
Let’s dive in and make your bookshelf dreams come true.
Materials And Tools Needed
Building a black pipe bookshelf needs the right materials and tools. Choosing good parts makes the project easier and the shelf stronger. This section explains what to buy and use. Follow these tips to gather everything needed before starting.
Selecting Black Pipes
Pick black pipes that are strong and rust-resistant. Steel pipes work best for support. Check the diameter; 1/2 inch or 3/4 inch pipes fit well for most shelves. Buy threaded pipes and fittings for easy assembly. Count how many pipes and connectors you need. This depends on your shelf size and design.
Choosing Wood Boards
Choose wood boards that fit your style and space. Pine, oak, or plywood are good choices. Look for smooth, straight boards without cracks. Measure the length and width to match your pipe frame. Sand the wood well to avoid splinters. You can paint or stain boards to match your room decor.
Essential Tools
Gather tools that help you build the shelf safely and fast. A drill with bits is needed to make holes in the wood. A wrench or pipe wrench tightens the pipe fittings. A tape measure ensures correct dimensions. Sandpaper smooths the wood surface. A level keeps shelves straight. Have a pencil and safety goggles ready too.
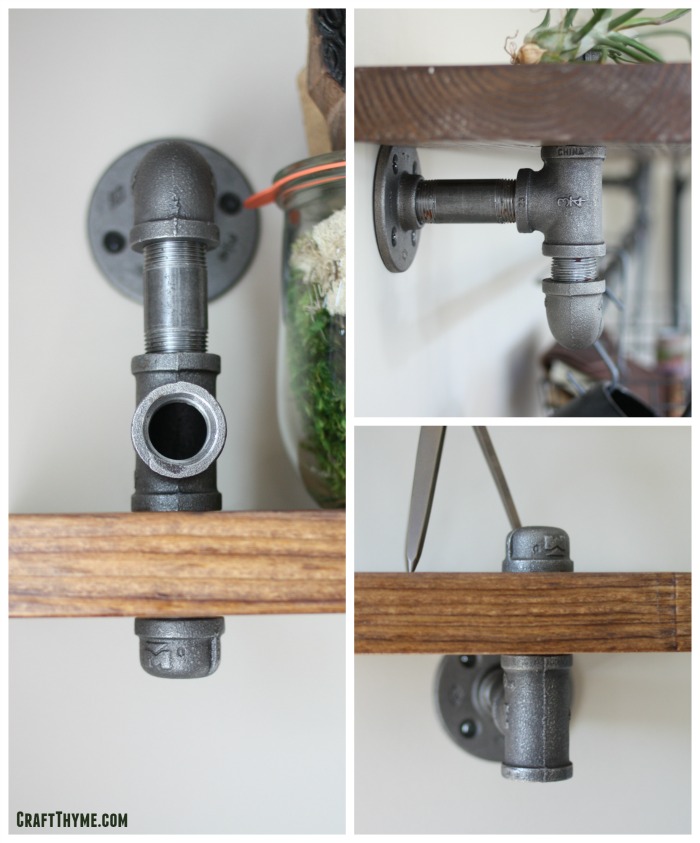
Credit: craftthyme.com
Planning Your Bookshelf
Planning your black pipe bookshelf is the first step to a successful build. Careful planning helps avoid mistakes and ensures the shelf fits perfectly. It saves time and materials. Take your time to plan well. Focus on the space, design, and materials needed.
Measuring Space And Dimensions
Measure the wall space where the bookshelf will go. Note the height, width, and depth available. Use a tape measure for accuracy. Write down the numbers. Check for obstacles like outlets or vents. Ensure the shelf will not block them. Measure twice to avoid errors.
Designing The Layout
Decide the number of shelves needed. Think about what you want to store. Books, decorations, or plants? Plan shelf spacing to fit those items. Sketch your design on paper or use a simple app. Keep the design balanced and stable. Consider pipe placement for strength.
Calculating Pipe Lengths
List all pipes needed for your design. Include vertical supports and horizontal shelves. Add extra length for fittings and connections. Use the measurements from your layout. Buy slightly more pipe than needed. Pipes can be cut but not extended easily. Check pipe sizes match your design needs.
Cutting And Preparing Wood
Cutting and preparing wood is a key step in building your black pipe bookshelf. This process sets the stage for a strong, clean, and attractive finished product. Taking time to measure, cut, and smooth your wood pieces ensures everything fits perfectly with the pipes.
Quality preparation helps avoid mistakes and saves time during assembly. Clear, precise steps make the project easier and more enjoyable. Let’s break down the cutting and preparing process into simple parts.
Measuring And Marking
Start by measuring the wood carefully. Use a tape measure to get exact lengths for each shelf piece. Mark the cutting lines clearly with a pencil. Double-check every measurement before cutting. Marking both sides of the wood helps guide your saw straight. Accurate marks make a big difference in fit and finish.
Cutting Techniques
Use a handsaw, circular saw, or miter saw for cutting. Keep the saw blade steady and follow your pencil marks. Cut slowly to avoid splintering the wood. Support the wood firmly while cutting to prevent movement. Clean, straight cuts provide a professional look and easier assembly. Wear safety glasses and work in a well-lit area for safety.
Sanding And Finishing
Sand each cut edge with medium-grit sandpaper to smooth rough spots. Finish by using fine-grit sandpaper to create an even surface. Sanding prevents splinters and helps paint or stain stick better. Wipe the wood clean after sanding to remove dust. Proper finishing protects the wood and improves shelf durability.

Credit: craftthyme.com
Assembling The Frame
Assembling the frame is the key step in making a black pipe bookshelf. This step creates the strong skeleton that holds the shelves. Careful assembly ensures your bookshelf stays sturdy and looks great.
Follow these simple steps to connect pipes and fittings, secure the base, and build the full structure. Take your time and check each connection for tightness.
Connecting Pipes And Fittings
Start by gathering all pipes and fittings. Screw each pipe tightly into its matching fitting. Use a pipe wrench for a firm grip. Avoid over-tightening to prevent damage. Align pipes straight to keep the frame balanced.
Securing The Base
Place the base pipes flat on the floor. Attach flanges or feet to the ends for stability. Make sure the base is level and does not wobble. Tighten all connections to avoid movement. A solid base supports the entire bookshelf.
Building The Structure
Work upwards by adding vertical pipes to the base. Connect horizontal pipes to create shelf supports. Check that all parts are square and even. Tighten every fitting firmly to keep the frame rigid. The frame is now ready for shelving boards.
Attaching Shelves To Frame
Attaching the shelves to the black pipe frame is an important step. It holds the entire bookshelf together. Proper attachment keeps the shelves strong and stable. Follow simple steps to make sure the shelves fit well and stay in place.
Positioning Wood Boards
Start by placing the wood boards on the pipe frame. Align each board evenly along the pipes. Check the height of each shelf to keep them level. Use a measuring tape for accuracy. Make sure the boards do not wobble or tilt.
Fastening Shelves
Secure the shelves using screws or brackets. Drill holes through the wood and into the pipe frame. Use screws that fit the holes tightly. Fasten the shelves firmly to prevent movement. Avoid over-tightening to keep the wood intact.
Ensuring Stability
Check each shelf for stability after fastening. Press down gently to test strength. Add extra screws if needed for support. Tighten all connections and remove any gaps. A stable bookshelf holds books safely without shaking.
Credit: diycandy.com
Finishing Touches
Finishing touches bring your black pipe bookshelf to life. They protect the wood and add style. Simple steps make the shelf last longer. These final details create a polished look. Focus on painting or staining, sealing, and decoration. Each step enhances the shelf’s beauty and strength.
Painting Or Staining Wood
Choose paint or stain to change the wood’s color. Paint gives a solid, smooth finish and hides imperfections. Stain shows the wood’s natural grain and adds warmth. Use a brush or cloth for even coverage. Let each coat dry fully before adding another. Pick colors that match your room’s style.
Sealing And Protecting
Seal the wood to guard against water and wear. Use clear varnish, polyurethane, or wax. Apply with a clean brush or soft cloth. Two or three thin coats work best. Let each coat dry before the next. Sealing keeps the wood strong and easy to clean.
Adding Decorative Elements
Decorate to make your shelf unique and eye-catching. Add metal brackets or pipe caps for an industrial look. Attach leather straps or rope for extra texture. Use small plants or books to style the shelves. Decorations make the space personal and inviting. Keep it simple to avoid clutter.
Maintenance Tips
Maintaining your black pipe bookshelf is key to keeping it strong and looking good. Regular care helps the shelf stay safe for your books and lasts longer. Small checks and cleaning prevent big problems over time. Here are some simple tips to keep your bookshelf in top shape.
Cleaning The Bookshelf
Dust the pipes and shelves often. Use a soft cloth to avoid scratches. For stubborn dirt, dampen the cloth slightly with water. Avoid harsh chemicals that can damage the metal or wood. Dry all parts well to stop rust or water marks.
Checking For Loose Fittings
Look at all pipe joints and screws regularly. Tighten any that feel loose using the right tools. Loose fittings can cause the shelf to wobble or fall. Make this a habit to keep the shelf stable and safe.
Extending Shelf Life
Keep the bookshelf away from direct sunlight and moisture. Use coasters or mats under heavy items to protect the wood. Reapply a protective finish to wood parts if the surface looks dry. These steps help your shelf stay strong and look fresh for years.
Frequently Asked Questions
What Materials Are Needed For A Black Pipe Bookshelf?
You need black iron pipes, wooden boards, pipe fittings, screws, and mounting brackets. These materials ensure a sturdy, industrial-style bookshelf.
How Do I Assemble A Black Pipe Bookshelf?
Measure and cut pipes, attach fittings, and secure wooden shelves. Then, fasten the structure to the wall for stability.
Can I Customize The Size Of The Bookshelf?
Yes, you can adjust pipe lengths and shelf sizes. This allows you to fit the bookshelf in any space.
Is A Black Pipe Bookshelf Durable?
Absolutely. Black iron pipes are strong and support heavy books. The wooden shelves add extra stability and style.
Conclusion
Building a black pipe bookshelf is a fun and useful project. You only need a few tools and materials. Follow each step carefully for a strong shelf. This bookshelf fits many styles and rooms. It holds books, plants, or decorations well.
You can change its size to fit your space. Making it yourself saves money and adds a personal touch. Try this project to enjoy a unique and sturdy bookshelf. Your room will look neat and stylish. Give it a try today!