Are you looking to give your bedroom furniture a fresh new look without spending a fortune? Refinishing your furniture can transform old, worn pieces into stunning highlights of your room.
Imagine the satisfaction of turning something tired into something beautiful, all with your own hands. You’ll discover simple, step-by-step tips that make refinishing easy and enjoyable—even if you’ve never done it before. Ready to bring your bedroom furniture back to life?
Let’s dive in!
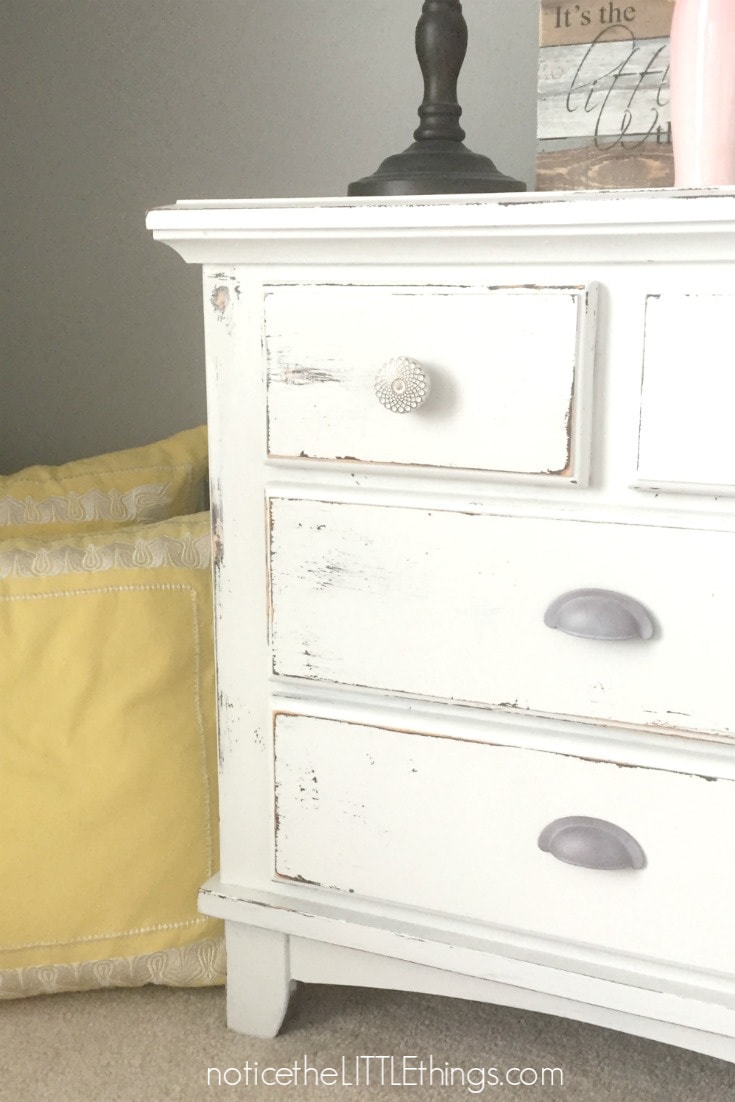
Credit: noticethelittlethings.com
Preparing Your Workspace
Preparing your workspace is the first step to refinish bedroom furniture. A clean and organized area helps you work faster. It also keeps your furniture safe from damage. Taking time to set up right saves effort later. Follow simple steps to get ready before you start.
Choosing The Right Location
Pick a spot with good air flow. Open windows or work outside if possible. Avoid small, closed rooms to reduce fumes from paint or stain. Choose a flat surface to keep furniture steady. Make sure there is enough light to see details clearly. A garage or a backyard works well.
Gathering Necessary Tools
Collect all tools before beginning. Sandpaper, paintbrushes, and cleaning cloths are basics. You may need a paint stripper or wood filler. Keep a bucket with water and rags nearby. Having everything at hand saves time and avoids interruptions. Check tools for damage to ensure safety.
Protecting Surrounding Areas
Cover floors and nearby furniture with drop cloths. Use old sheets or plastic covers to catch dust and spills. Tape edges of walls or baseboards to avoid stains. Protect light switches and outlets with painter’s tape. This prevents extra cleaning and damage. A well-protected area makes cleanup easier.
Assessing Furniture Condition
Assessing the condition of your bedroom furniture is the first step in refinishing. It helps you understand what work is needed. A careful check saves time and effort later. This stage sets the foundation for a smooth refinishing process.
Checking For Damage
Look closely at the furniture for cracks, chips, or loose joints. Note any scratches or dents on the surface. Check drawers and doors for smooth opening and closing. Small repairs now prevent bigger problems after refinishing.
Removing Hardware
Take off all knobs, handles, and hinges carefully. Use a screwdriver to avoid damage. Keep the hardware in a safe place for reuse or replacement. Removing hardware makes sanding and painting easier and cleaner.
Cleaning The Surface
Wipe the furniture with a damp cloth to remove dust and dirt. Use mild soap if the surface is very dirty. Dry the furniture completely before starting any sanding or painting. A clean surface ensures the new finish sticks well.
Stripping Old Finish
Stripping the old finish from bedroom furniture is the first step in refinishing. It removes layers of paint, varnish, or stain. This process reveals the bare wood underneath. It helps the new finish stick better. Careful stripping keeps the wood smooth and clean.
Selecting A Stripper
Choose a stripper based on the finish type and wood condition. Gel strippers work well on vertical surfaces. Liquid strippers cover flat surfaces quickly. Look for a product safe for indoor use. Always check the label for instructions and safety tips.
Applying Stripping Agent
Wear gloves and work in a well-ventilated area. Use a brush to apply the stripper evenly. Cover all areas with a thick layer. Let it sit for the time recommended on the label. Watch as the old finish softens and peels away.
Removing Residue
Use a plastic scraper to gently lift the softened finish. Avoid metal tools that can damage the wood. Wipe the surface with a damp cloth to remove residue. Sand lightly to smooth out rough spots. Ensure the wood is clean before refinishing.

Credit: farmfreshvintagefinds.com
Sanding The Furniture
Sanding is a key step in refinishing bedroom furniture. It smooths the surface and removes old paint or finish. Proper sanding helps new paint or stain stick better. This step makes furniture look fresh and clean. Take your time and sand evenly for the best results.
Choosing Sandpaper Grits
Start with coarse sandpaper to remove old finish fast. Use 80 or 100 grit for rough sanding. Then switch to medium grit like 150 to smooth the surface. Finish with fine grit, around 220, for a soft touch. Using the right grit prevents scratches and uneven spots.
Sanding Techniques
Sand with the grain of the wood. Move the sandpaper in long, even strokes. Avoid sanding in circles to stop marks. Use light pressure to keep the wood safe. For edges and corners, fold the paper to reach tight spots. Take breaks to check your progress often.
Dust Removal Tips
Remove dust after every sanding step. Use a soft brush or cloth to wipe the surface. A vacuum cleaner with a brush attachment helps too. Finish by wiping with a damp cloth to catch fine dust. Clean surfaces ensure better paint or stain adhesion and a smooth finish.
Repairing Imperfections
Repairing imperfections is a key step in refinishing bedroom furniture. It makes the piece look smooth and new. Small cracks, holes, and loose joints can spoil the final look. Fixing these problems ensures the new finish holds well and looks great. Take time with each repair for the best results.
Filling Cracks And Holes
Cracks and holes are common in old furniture. Use wood filler to fill these gaps. Apply it with a putty knife and press firmly. Let it dry completely before sanding. Choose a filler close to your furniture color for a natural look. This step hides flaws and creates a smooth surface.
Fixing Loose Joints
Loose joints make furniture weak and shaky. Check each joint carefully. Use wood glue to secure loose parts. Clamp the joint tightly while the glue dries. Avoid moving the piece until the glue sets. Strong joints keep the furniture steady and safe to use.
Smoothing Repairs
After filling and gluing, smooth the surface with sandpaper. Start with medium grit, then use fine grit for a soft finish. Sand gently to avoid damaging the wood. Smooth repairs blend well with the rest of the furniture. This step prepares the piece for staining or painting.

Credit: www.confessionsofaserialdiyer.com
Applying New Finish
Applying a new finish is the key step in refinishing bedroom furniture. It changes the look and feel of the wood. This step protects the furniture and gives it a fresh appearance. Choosing the right products and tools helps create a smooth, lasting finish. The process includes picking stains or paints, using brushes or sprayers, and adding protective coats.
Selecting Stains Or Paints
Choose stains to show the wood’s natural grain. Stains come in many colors and tones. Pick a shade that matches your room style. Paint covers the wood completely, hiding any flaws. Use paint for a bold or colorful look. Always test a small area first. This helps ensure you like the color.
Using Brushes And Sprayers
Brushes give control and work well for small pieces. Use a soft brush for smooth strokes. Avoid over-brushing to prevent streaks. Sprayers cover large surfaces quickly. They create an even finish without brush marks. Keep the sprayer moving to avoid drips. Clean tools after use to keep them ready for next time.
Applying Protective Coats
Protective coats keep the finish safe from damage. Use clear varnish, polyurethane, or wax. They add shine and resist scratches. Apply thin, even layers for best results. Let each coat dry fully before adding the next. Sand lightly between coats for a smooth surface. This step helps the furniture last longer and look great.
Reassembling And Final Touches
After sanding, painting, or staining, it’s time to put the furniture back together. This stage is crucial for restoring the look and function of your bedroom pieces. Careful reassembling and adding final touches make your furniture look fresh and last longer.
Reattaching Hardware
Start by cleaning all the hardware parts. Use a soft cloth and mild cleaner to remove dust and grime. Check screws, knobs, and handles for damage. Replace any broken or rusty pieces. Attach the hardware carefully to avoid scratching the new finish. Tighten screws just enough to hold securely. Avoid over-tightening to prevent damage.
Polishing Surfaces
Apply a gentle polish or wax to enhance the furniture’s shine. Use a soft cloth and work in small sections. Polishing brings out the color and smooths the surface. It also protects against dirt and moisture. Let the polish dry completely before touching the furniture. This step helps maintain a fresh look for months.
Ensuring Durability
Check all joints and connections for stability. Add wood glue or screws if needed. Avoid loose parts that may cause future damage. Consider applying a clear topcoat for extra protection. This layer guards against scratches and spills. Let everything dry and cure fully before regular use. Strong, durable furniture lasts many years.
Tips For Long-lasting Results
Refinishing bedroom furniture can give your room a fresh look. To keep your work beautiful for years, follow these simple tips. These tips help protect the finish and keep your furniture looking new.
Small actions can make a big difference. Caring for your refinished furniture the right way makes it last longer and shine brighter.
Maintaining Finished Furniture
Use a soft cloth to clean dust gently. Avoid harsh chemicals that can damage the finish. Wipe spills immediately to stop stains. Keep furniture away from direct sunlight to prevent fading. Use coasters and pads to protect surfaces from heat and scratches.
Avoiding Common Mistakes
Do not use rough sponges or scrubbing pads. Avoid placing wet items directly on the furniture. Do not drag heavy objects across the surface. Skip using wax or polish that can build up and dull the finish. Avoid exposing furniture to high humidity or very dry air.
Enhancing With Accessories
Add small rugs or mats under lamps and decorations. Use drawer liners to keep the inside clean and fresh. Choose soft pads under chair legs to prevent floor damage and furniture wear. Select accessories that match your refinished style for a complete look.
Frequently Asked Questions
How Do You Prepare Bedroom Furniture For Refinishing?
Start by cleaning the furniture thoroughly. Remove all hardware and sand the surface to remove old finish. Use a tack cloth to wipe away dust before applying any new stain or paint.
What Tools Are Needed To Refinish Bedroom Furniture?
Essential tools include sandpaper or a power sander, paintbrushes, wood stain or paint, and protective gloves. A scraper and wood filler are helpful for repairing imperfections.
How Long Does It Take To Refinish Bedroom Furniture?
Refinishing usually takes 2 to 4 days, depending on furniture size and drying time. Allow extra time for sanding, staining, and applying protective finishes.
Can I Refinish Bedroom Furniture Without Sanding?
Sanding is recommended for best results but not always necessary. Use a chemical stripper or deglosser if you want to avoid sanding.
Conclusion
Refinishing bedroom furniture can bring new life to old pieces. It saves money and adds a personal touch to your room. Start with cleaning and sanding for a smooth surface. Choose the right paint or stain to match your style.
Take your time and work carefully for best results. Enjoy the satisfaction of creating something unique and beautiful. Your refreshed furniture will brighten your bedroom and feel like new again. Simple steps can make a big difference in your space.
Give it a try and see the change yourself.