Have you ever wanted to quickly mark important parts in your Bookshelf app but weren’t sure how? Highlighting can transform the way you read and study, making it easier to find key information later.
In this guide, you’ll discover simple steps to highlight effectively in Bookshelf. By the end, you’ll save time and get more from every page you read. Keep reading, and unlock the full potential of your digital library!

Credit: www.homary.com
Getting Started With Bookshelf
Getting started with Bookshelf is simple and fast. This tool helps you read and highlight important parts of your books. You can save notes and find them easily later. Let’s explore how to set up your account and move around the platform.
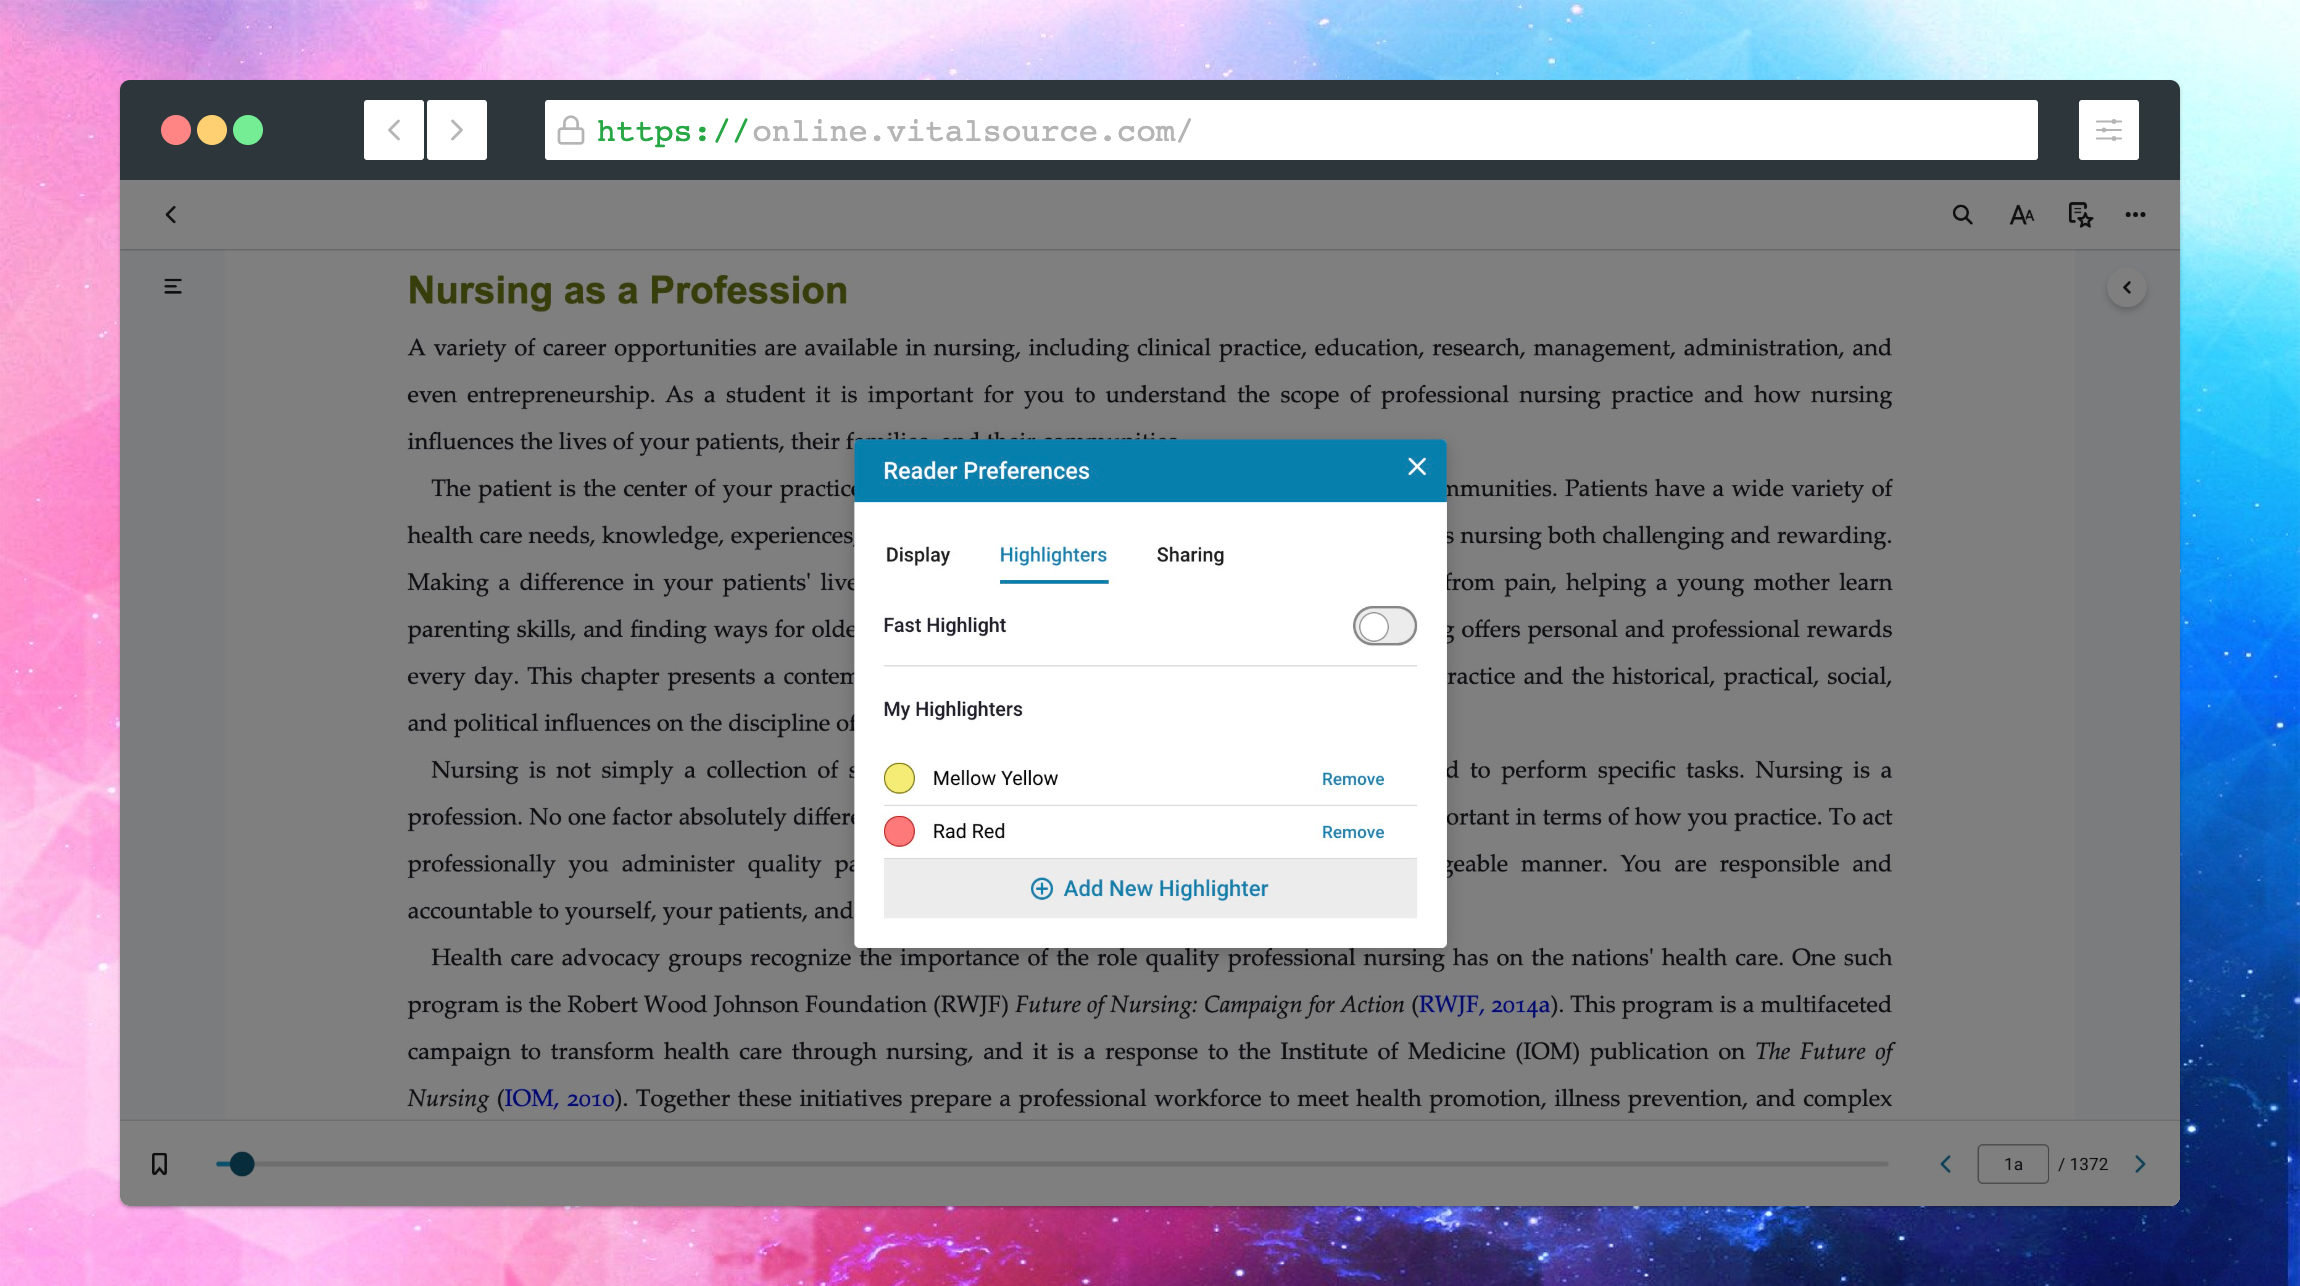
Setting Up Your Account
First, create your Bookshelf account. Use your email and make a strong password. You will get a confirmation email. Click the link to verify your account. After that, you can log in and start using Bookshelf.
Your profile lets you manage your books and highlights. You can add your name and picture to personalize your space. This step makes your experience better and more secure.
Navigating The Interface
Bookshelf’s interface is clean and easy to use. The main menu shows your library, highlights, and settings. Click on a book to open it and start reading.
The toolbar lets you highlight text with one click. You can choose colors to organize your notes. Use the search bar to find specific words or sections quickly.
All your highlights save automatically. You can review them anytime from the highlights tab. This helps you study or revisit key information fast.
Credit: support.evantage.ca
Locating Text For Highlighting
Finding the right text to highlight in your digital bookshelf is simple. It helps you save important information and revisit key points quickly. Knowing where to find the text makes highlighting faster and more effective.
Searching Within Books
Most digital bookshelf apps have a search feature. Type a word or phrase into the search bar. The app shows all pages with that text. This saves time. No need to flip through every page. You can jump directly to the part you want.
Use clear keywords. Specific words work best. The search results list helps you pick the exact spot. Tap on the result to open that page. Then, highlight the text easily.
Using Table Of Contents
The table of contents (TOC) is a map of the book. It lists chapters and sections. Click a chapter title to go there fast. This helps find big parts of the book. It works well if you remember the section name.
Once at the right chapter, scan for the text you want. The TOC makes navigation smooth. It keeps your reading organized. Highlighting becomes a quick task after you locate the section.
Highlighting Techniques
Highlighting in Bookshelf helps you mark important parts of your text. It makes studying and reviewing easier. Using good techniques improves your reading experience.
Effective highlighting saves time and keeps your notes clear. It lets you focus on key ideas without confusion.
Selecting Text Precisely
Start by tapping and holding the word you want to highlight. Drag the handles to include all the words you need. Be careful not to select extra text. Precise selection keeps your highlights neat and useful.
Take your time to get the exact phrase or sentence. This helps you find important points quickly later.
Choosing Highlight Colors
Bookshelf offers many colors for highlights. Use different colors for different topics or ideas. For example, yellow can mark facts, and blue can show questions.
Pick colors that stand out but do not distract your eyes. Consistent use of colors makes your notes easy to understand.
Adding And Managing Annotations
Adding and managing annotations in Bookshelf helps you keep track of important parts. It makes reading more interactive and useful. You can highlight text, write notes, and change or delete your marks anytime. This way, your reading stays organized and personalized.
Writing Notes
To write notes, select the text you want to remember. A small menu appears with the option to add a note. Click it and type your thoughts or reminders. These notes stay linked to the highlighted section. You can open them anytime to review or add details.
Editing And Deleting Highlights
Editing highlights is simple. Tap on a highlight to open its menu. You can change the color or add a note to it. To delete, select the highlight and choose the delete option. This removes the mark but keeps your reading clean and focused.
Organizing Your Highlights
Organizing your highlights helps you find important notes quickly. It makes your reading and studying more effective. Proper organization saves time and keeps your thoughts clear. You can focus on what matters most without distractions.
Using Tags And Categories
Tags and categories group your highlights by topic or theme. Tags are keywords that describe the content. Categories are broader groups that hold many tags. Use simple tags like “history,” “quotes,” or “ideas.” Categories might be “fiction” or “science.” This system helps you sort and search highlights fast. You can add multiple tags to one highlight. This way, you find the same note under different subjects.
Syncing Across Devices
Syncing keeps your highlights updated on all devices. You can read on your phone, tablet, or computer. Changes you make on one device show up everywhere else. This feature prevents losing notes or highlights. It also lets you work anytime, anywhere. Syncing ensures your organized highlights are always with you.

Credit: www.contemporist.com
Tips For Effective Annotation
Effective annotation helps you remember key points and understand books better. It makes reviewing easier and saves time. Follow simple tips to highlight smartly and add notes that make sense.
Good annotation means not just marking text but thinking about what matters most. It improves your reading and learning experience.
Highlighting Strategies
Choose only important sentences to highlight. Avoid marking too many words. Use different colors for different ideas or themes. Highlight facts, definitions, or quotes you want to revisit. Keep highlights brief and clear. This keeps your notes clean and useful.
Balancing Highlights And Notes
Use notes to explain why you highlighted something. Write short thoughts or questions in the margins. Notes help you connect ideas and remember your thoughts later. Don’t write too much; keep notes simple. Balance highlights with notes for better understanding.
Troubleshooting Common Issues
Troubleshooting common issues in Bookshelf helps you enjoy smooth reading. Highlighting is a useful feature, but it can face problems sometimes. This section guides you through fixing the most frequent issues. Follow these steps to solve sync and highlighting errors quickly.
Fixing Sync Errors
Sync errors stop your highlights from updating across devices. First, check your internet connection. A weak connection often causes sync problems. Next, sign out and sign back into your Bookshelf account. This refreshes your session and fixes many errors.
Make sure your app is updated to the latest version. Older versions may have bugs affecting sync. Clear the app cache in settings to remove temporary files. These files can slow down syncing or cause errors.
Try syncing manually by tapping the sync button. Wait a few minutes for the process to finish. If sync still fails, restart your device. This simple step can fix many app-related issues.
Resolving Highlighting Problems
Highlighting may not work due to app glitches or settings. Begin by closing and reopening the app. This refresh often clears minor bugs. If you cannot select text, check if the book supports highlighting. Some files restrict this feature.
Restart your device if the problem continues. This helps clear memory and resets app processes. Update your app to avoid known bugs that block highlighting. If highlights disappear, sync your device to restore them.
Try deleting and reinstalling the app as a last step. This removes corrupted files causing problems. Back up your highlights before reinstalling to avoid data loss.
Frequently Asked Questions
How Do I Highlight Text In Bookshelf App?
To highlight text in Bookshelf, tap and hold on the desired text. Drag the selection handles to adjust. Then, choose the highlight color from the pop-up menu. Your highlight will be saved automatically for easy reference later.
Can I Customize Highlight Colors In Bookshelf?
Yes, Bookshelf allows custom highlight colors. After selecting text, tap the highlight option. Then, select from various colors or add new ones. This helps organize notes and visually separate important content effectively.
Is Highlighting Possible On Both Mobile And Desktop?
Highlighting is available on both Bookshelf mobile and desktop versions. The interface may differ slightly, but the process remains similar. This ensures seamless study and review across devices.
How Do I Remove Or Edit Highlights In Bookshelf?
To remove or edit highlights, tap on the highlighted text. A menu will appear with options to delete or change the color. This helps keep your notes clean and updated.
Conclusion
Highlighting in Bookshelf helps you keep track of important parts. It makes studying and reviewing easier. You can quickly find key ideas without rereading everything. Use different colors to organize your notes better. This way, your reading becomes more active and focused.
Try to highlight only what matters most. Practice a little each day to get comfortable. You will soon find it a helpful habit. Happy reading and learning!
