Looking to give your console table a fresh, functional upgrade? Adding a shelf is a simple way to boost storage and style without buying new furniture.
Imagine having extra space right where you need it—perfect for books, decor, or everyday essentials. In this guide, you’ll discover easy steps to add a shelf yourself, even if you’re not a DIY expert. Ready to transform your console table and make your space more organized?
Let’s get started!
Choose The Right Console Table
Choosing the right console table is the first step in adding a shelf. It sets the foundation for your project and affects the final look.
Pick a table that fits your space and style. The right table makes adding a shelf easier and looks better.
Measure Dimensions
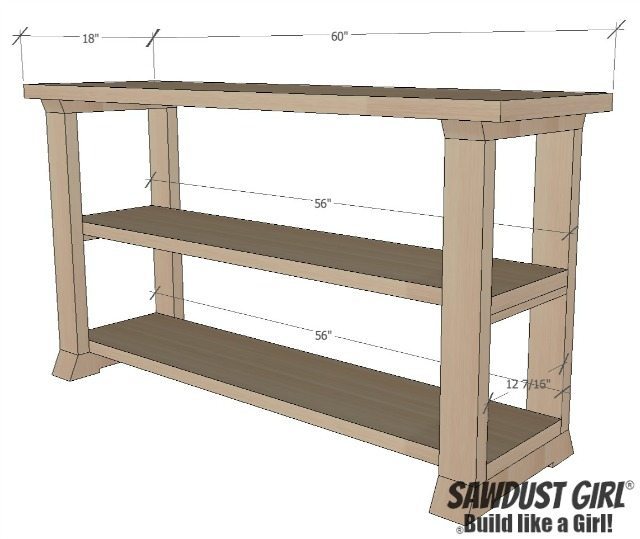
Measure the width, height, and depth of the console table. These numbers help you know how big the shelf should be.
Check the space under the table for shelf placement. Make sure there is enough room for the shelf and items you want to store.
Select Material And Style
Choose a material that matches or complements the table. Wood, metal, or glass all work, but pick one that fits your decor.
Consider the style of the console table. A modern table suits a simple shelf. A rustic table looks great with a wooden shelf.
Gather Necessary Tools And Materials
Planning shelf placement is the first step to add a shelf to your console table. It helps you decide the best spot for the shelf. Good planning makes the shelf useful and stable. Take your time to measure and mark before drilling or fixing anything.
Determine Shelf Height
Start by deciding how tall the shelf should be. Think about what you want to store or display. Measure the height of those items. Leave some extra space above the tallest item for easy access. Make sure the shelf will not block any table features like drawers or legs.
Mark Attachment Points
Next, find the exact spots to attach the shelf. Use a pencil to mark where the brackets or supports will go. Check that the marks are level on both sides. Use a level tool to avoid a slanted shelf. These marks guide you during installation and keep the shelf steady.
Plan Shelf Placement
Cutting and preparing the shelf is a key step in adding extra storage to your console table. This stage ensures the shelf fits perfectly and looks smooth. Proper preparation makes installation easier and improves the final result.
Take your time and follow each step carefully. A well-cut and finished shelf will last longer and enhance your table’s style.
Measure And Cut Wood
Start by measuring the space under your console table. Use a tape measure to get the exact width and depth. Write down the numbers to avoid mistakes.
Choose a wood piece that matches your table’s style. Mark the wood with a pencil using your measurements. Double-check the marks before cutting.
Use a saw to cut the wood along the marks. Cut slowly to keep the edges straight. Wear safety gear like goggles and gloves.
Sand And Finish Surface
Sanding smooths rough edges and removes splinters. Use medium-grit sandpaper first, then fine-grit for a soft finish. Sand all sides and corners evenly.
After sanding, clean the dust with a dry cloth. Apply paint, stain, or varnish to protect the wood. Let it dry fully before adding the shelf to the table.
Cut And Prepare The Shelf
Installing shelf supports is a key step in adding a shelf to your console table. These supports hold the shelf steady and keep it level. Proper installation ensures your shelf stays strong and safe. Follow simple steps to pick the right supports and attach them securely.
Choose Support Type
Choose supports that fit your shelf size and style. Common options include brackets, cleats, or metal clips. Brackets are strong and visible, adding a decorative touch. Cleats fit under the shelf and offer hidden support. Metal clips are small and easy to install. Match the support type to your table’s material and shelf weight.
Secure Supports To Table
Mark support positions on the console table first. Use a level to ensure they are even. Drill pilot holes to avoid splitting the wood. Attach supports with screws suitable for your table’s material. Tighten screws firmly for stability. Check that supports do not wobble before placing the shelf.
Install Shelf Supports
Attaching the shelf is the key step to complete your console table upgrade. This part requires care to ensure the shelf is stable and fits well. The right placement and secure fixing will make your shelf strong and useful.
Follow each step carefully to avoid mistakes. Take your time and check your work as you go. A well-attached shelf will last for years and hold your items safely.
Position Shelf On Supports
Place the shelf gently on the supports. Make sure it sits flat and does not wobble. Check the shelf edges align with the console table frame. Adjust the shelf slightly to get the perfect fit. This step sets the base for a strong attachment.
Fix Shelf In Place
Use screws or brackets to fix the shelf to the supports. Pre-drill holes to avoid wood splitting. Tighten screws firmly but do not overdo it. Secure fixing keeps the shelf from moving or falling. Double-check the shelf stability before finishing.
Credit: sawdustgirl.com
Attach The Shelf
Adding a shelf to a console table is just the first step. Making it useful and stylish is the key. Enhancing shelf functionality means using the space well. It should hold items neatly and look good too. The shelf can be both practical and decorative.
Add Decorative Elements
Decorate the shelf with small plants or candles. These items add color and life to the space. Use picture frames or art pieces for a personal touch. Choose items that match your room’s style. Keep it simple to avoid clutter. Decorative elements make the shelf more inviting.
Organize Storage Items
Use baskets or boxes to group small items on the shelf. This keeps things tidy and easy to find. Stack books or magazines neatly for quick access. Place everyday items like keys or mail in designated containers. Organized shelves reduce mess and save time. This makes your console table both neat and useful.
Enhance Shelf Functionality
Adding a shelf to a console table is practical and stylish. To keep it safe and looking good, follow these simple safety and maintenance tips. These steps help your shelf last longer and avoid accidents.
Check Stability Regularly
Check the shelf’s stability often. Make sure it stays firmly attached to the console table. Tighten any loose screws or brackets. A stable shelf holds items safely and prevents falls. If the shelf wobbles, fix it right away.
Clean And Protect Surface
Clean the shelf surface regularly. Use a soft cloth and mild cleaner. Avoid harsh chemicals that can damage the finish. Wipe spills quickly to stop stains. Apply furniture polish or wax to protect wood shelves. This keeps the surface smooth and shiny.

Credit: househomemade.us

Credit: housefulofhandmade.com
Frequently Asked Questions
How Do I Measure For A Shelf On A Console Table?
Measure the width and depth between the table legs. Ensure space for storage and aesthetics. Accurate measurements prevent fitting issues.
What Materials Work Best For Console Table Shelves?
Wood, plywood, or MDF are common choices. Choose based on weight capacity and style. Wood offers durability and a classic look.
How Do I Securely Attach A Shelf To A Console Table?
Use brackets or screws designed for furniture. Pre-drill holes to avoid splitting wood. Ensure the shelf is level and firmly attached.
Can I Add A Shelf Without Professional Tools?
Yes, basic tools like a drill, screwdriver, and measuring tape suffice. Choose easy-to-install brackets and follow clear instructions for DIY success.
Conclusion
Adding a shelf to your console table improves space and style. It gives extra room for books, plants, or decor. The process is simple and does not take much time. You can use basic tools and materials to build it.
A shelf also makes your table more useful every day. Try this easy upgrade to refresh your furniture. Enjoy a neat and organized look in your home. Small changes often bring big benefits. Give your console table a fresh look today.


