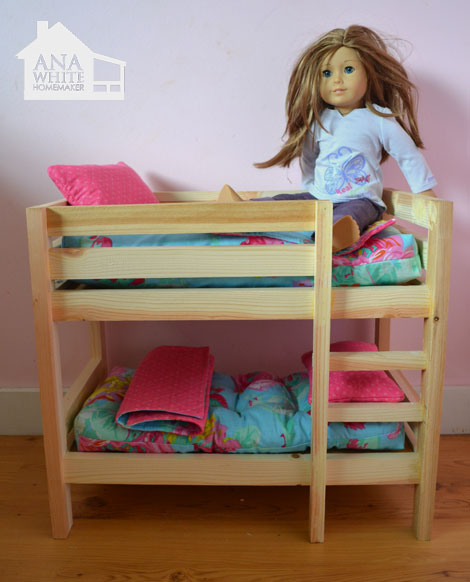
Are you ready to create the perfect sleeping space for your American Girl dolls? Building a bunk bed for your dolls is a fun and rewarding project that adds charm and creativity to playtime.
Imagine the excitement your child will feel when their dolls have a cozy, stylish bunk bed made just for them. In this guide, you’ll find simple, step-by-step instructions that anyone can follow—even if you’re new to building. Keep reading, and you’ll discover how to turn basic materials into a beautiful, sturdy bunk bed that brings your doll’s room to life.
Your dolls deserve the best, and you’re just a few easy steps away from making it happen!
Credit: www.ana-white.com
Materials Needed
Building an American Girl bunk bed needs the right materials. These materials help create a strong and safe bed for dolls. Choosing good quality items makes the project easier and the bed lasts longer.
Gathering everything before starting saves time and effort. Below are the main materials needed for this fun project.
Wood And Tools
Use pine or plywood for the bed frame. These woods are light and easy to cut. Smooth wood boards avoid splinters and look nice.
Essential tools include a saw, drill, and measuring tape. A screwdriver helps with screws, and sandpaper smooths edges. A pencil marks where to cut or drill. Clamps hold the wood steady while working.
Hardware And Accessories
You need wood screws to join pieces firmly. Small nails can secure trim or decorative parts. Wood glue adds extra strength to joints.
Optional items include paint or wood stain for color. Safety brackets keep the bed steady and safe. Soft pads under legs prevent floor scratches.
Preparing The Wood
Preparing the wood is the first step in building an American Girl bunk bed. This step ensures all pieces fit well and look smooth. Careful preparation makes the bed sturdy and safe for dolls. Follow these simple steps to get your wood ready.
Measuring And Cutting
Measure each piece of wood carefully. Use a tape measure for accuracy. Mark the wood with a pencil before cutting. Cut the wood with a saw, following your marks exactly. Take your time to keep the cuts straight. Proper cutting helps the bed parts fit perfectly.
Sanding And Finishing
Sand each cut edge to remove rough spots. Use fine-grit sandpaper for a smooth finish. Sanding prevents splinters and gives a clean look. After sanding, wipe the wood with a damp cloth. Apply a finish or paint to protect the wood. Let the finish dry completely before assembly.
Assembling The Frame
Assembling the frame is the first step to build the American Girl bunk bed. It creates the strong base needed for the bed. Follow clear steps to ensure the frame is sturdy and safe. Work carefully to avoid mistakes and save time later.
Building The Bed Posts
Start by gathering all the bed posts. These are the four vertical pieces that support the bed. Lay them flat on a clean surface.
Attach the small brackets to the top and bottom of each post. Use the screws provided in the kit. Tighten the screws firmly with a screwdriver.
Make sure the posts stand straight and are the same height. This keeps the bed balanced and safe for dolls. Double-check each post before moving on.
Connecting The Side Rails
Next, connect the side rails to the bed posts. The side rails hold the mattress and connect the posts. Align the rails with the brackets on the posts.
Insert the screws through the rails into the brackets. Tighten them securely to prevent wobbling. Repeat this for both sides of the bed.
Check that the rails are level and firmly attached. The frame should feel solid and stable. This step is key to a strong bunk bed frame.

Credit: www.youtube.com
Creating The Bunk Bed Slats
Creating the bunk bed slats is a key step in building a sturdy American Girl bunk bed. These slats hold the mattress and support the weight evenly. Properly made slats ensure safety and comfort for playtime or sleep. This section explains how to cut and attach the slats correctly.
Cutting Slats To Size
Start by measuring the inside width of the bunk bed frame. Cut wooden slats to match this length exactly. Use smooth, even cuts for a neat finish. Sand the edges to avoid splinters. Each slat should be the same size for balance and support.
Attaching Slats To Frame
Place the cut slats evenly across the bed frame. Leave small gaps between slats for air circulation. Secure each slat with screws or nails into the frame. Check that all slats are firmly attached and do not move. This creates a solid base for the mattress to rest on.
Constructing The Ladder
Constructing the ladder for an American Girl bunk bed is a key step. The ladder must be safe and sturdy. It helps your doll climb up and down easily. This section guides you through the basic process of making the ladder.
Focus on measuring each step carefully. Then secure the ladder firmly to the bed frame. This ensures your doll’s safety during playtime.
Measuring Ladder Steps
Start by measuring the height of the bunk bed. Divide this height by the number of steps you want. Each step should be evenly spaced. Use a ruler or measuring tape for accuracy. Mark the spots on the ladder rails clearly. This helps keep each step level and comfortable to climb.
Check the width of each step. It should be wide enough to hold your doll’s feet. Standard ladder steps work well for most American Girl dolls. Double-check measurements before cutting or attaching the steps.
Securing Ladder To Bed
Place the ladder against the bunk bed frame. Align it so the steps are easy to reach. Use screws or strong glue to attach the ladder. Make sure the ladder does not wobble or move. Tighten all screws carefully. Test the ladder’s stability by gently pressing it. The ladder must hold firm without shaking.
Check that the ladder leans at a safe angle. Too steep or too flat can cause falls. Adjust if needed before final fixing. Secure the ladder at both top and bottom points for safety.

Credit: www.bybrittanygoldwyn.com
Adding Safety Features
Adding safety features to the American Girl bunk bed is very important. It helps keep the dolls and little ones safe during play. Simple safety steps make the bed secure and stable. This way, the bed stays strong and fun for a long time.
Installing Guard Rails
Guard rails stop dolls from falling off the top bunk. Use sturdy wood or plastic rails that fit well. Attach them tightly to the bed frame. Make sure the rails cover the sides fully. Check that there are no sharp edges or gaps. This keeps playtime safe and worry-free.
Checking Stability
Stability means the bed does not wobble or shake. Push the bed gently from different sides. Tighten all screws and bolts to keep parts firm. Use extra supports if the bed feels loose. A steady bed prevents accidents and keeps dolls safe. Regular checks help maintain strong support.
Painting And Decorating
Painting and decorating your American Girl bunk bed is a fun way to make it special. It adds color and personality to the bed. A well-painted bed looks neat and lasts longer. Decorating lets you express style and creativity.
Choosing Paint Colors
Pick colors that match the room’s theme or your doll’s style. Soft pastels create a calm look. Bright colors add energy and fun. Use non-toxic, child-safe paint for safety. Test a small area first to see how the color looks. Think about the bed’s wood type and how paint will stick.
Applying Finishing Touches
After painting, add details like stencils or stickers for charm. Use a clear sealant to protect the paint. Sand edges lightly before sealing to keep them smooth. Let each paint layer dry fully to avoid smudges. Add small fabric cushions or miniature bedding for a cozy feel.
Final Assembly And Inspection
The final assembly and inspection stage is crucial for your American Girl bunk bed. This step ensures all parts fit perfectly and the bed is safe for play. Take your time to carefully assemble every piece. Double-check each connection for a sturdy structure.
Putting All Parts Together
Start by aligning the bed frames correctly. Secure the side rails to the headboards and footboards. Use the screws and bolts provided in the kit. Tighten them firmly but avoid over-tightening. Attach the ladder and guardrails last. Check that each part clicks or fits without gaps. This guarantees a neat, stable frame.
Ensuring Safety And Durability
Inspect all joints and connections for tightness. Test the bed by pressing gently on different areas. Ensure no wobbling or loose parts. Sand down any rough edges or splinters. Confirm guardrails are high enough to prevent falls. Use non-toxic paint or finish to keep it child-friendly. The bed should hold up to regular play without damage.
Frequently Asked Questions
How Long Does It Take To Build An American Girl Bunk Bed?
Building an American Girl bunk bed usually takes 2 to 4 hours. Time varies based on experience and tool availability. Following instructions carefully speeds up the process. Preparation and organizing parts beforehand help save time.
What Tools Are Needed For Building The Bunk Bed?
Essential tools include a screwdriver, hammer, drill, measuring tape, and wrench. These tools ensure proper assembly and safety. Having all tools ready before starting simplifies the process and avoids interruptions.
Are The Materials For The Bunk Bed Child-safe?
Yes, materials used are generally non-toxic and child-safe. Choose smooth, sturdy wood and non-toxic paint or finish. This ensures safety and durability for your child’s doll bed.
Can I Customize The American Girl Bunk Bed Design?
Absolutely! You can paint, add decals, or modify the structure. Customizing makes the bunk bed unique and personal. Just ensure modifications keep the bed stable and safe.
Conclusion
Building an American Girl bunk bed can be a fun and rewarding project. Follow each step carefully to ensure safety and stability. Take your time and enjoy the process. Personalize the bed to fit your doll’s style. This DIY project adds charm to any playroom.
With patience and attention, you can create a special space for your doll. Remember, simple tools and clear instructions make it easier. Now, your doll has a cozy bunk bed to enjoy every day.
