Are you ready to give your bathroom a fresh, stylish look? Attaching a vanity sink to your cabinet might seem tricky, but it’s easier than you think.
With the right steps, you can do it yourself and save time and money. Imagine the satisfaction of seeing your new sink perfectly in place, adding both function and charm to your space. Keep reading, and you’ll discover simple, clear instructions that guide you through the process—no confusion, no stress.
Let’s get started on transforming your bathroom today!
Tools And Materials Needed
Attaching a vanity sink to a cabinet needs the right tools and materials. Having everything ready makes the job easier and faster. It helps to avoid mistakes and saves time. This section lists the tools and materials needed for this task.
Essential Tools
- Adjustable wrench for tightening bolts
- Screwdriver for screws and brackets
- Measuring tape to check sizes accurately
- Level to ensure the sink is straight
- Drill with bits for making holes
- Plumber’s putty or silicone caulk for sealing
- Pliers for gripping and bending
Required Materials
- Vanity sink designed to fit your cabinet
- Mounting brackets or clips
- Sink drain assembly
- Water supply lines
- Plumber’s tape to prevent leaks
- Caulk or sealant for edges
- Cabinet with proper cutouts
Credit: www.lowes.com
Prepare The Vanity Cabinet
Start by cleaning the cabinet surface where the sink will sit. Check that the cabinet is sturdy and level before attaching the vanity sink. Secure any loose parts to ensure a strong base.
Clear The Workspace
Start by removing everything from around the vanity cabinet. Clear the countertop and the floor area. This space needs to be open and safe. It helps you work easily and prevents accidents. Dust and debris can cause problems. Wipe down the cabinet surface to clean dirt and grime.
Check Cabinet Stability
Check if the cabinet stands firmly. Press gently on different spots. The cabinet should not wobble or shake. If it moves, fix the legs or tighten screws. A stable cabinet supports the sink properly. Look for cracks or damage on the cabinet too. Repair any weak areas before attaching the vanity sink.
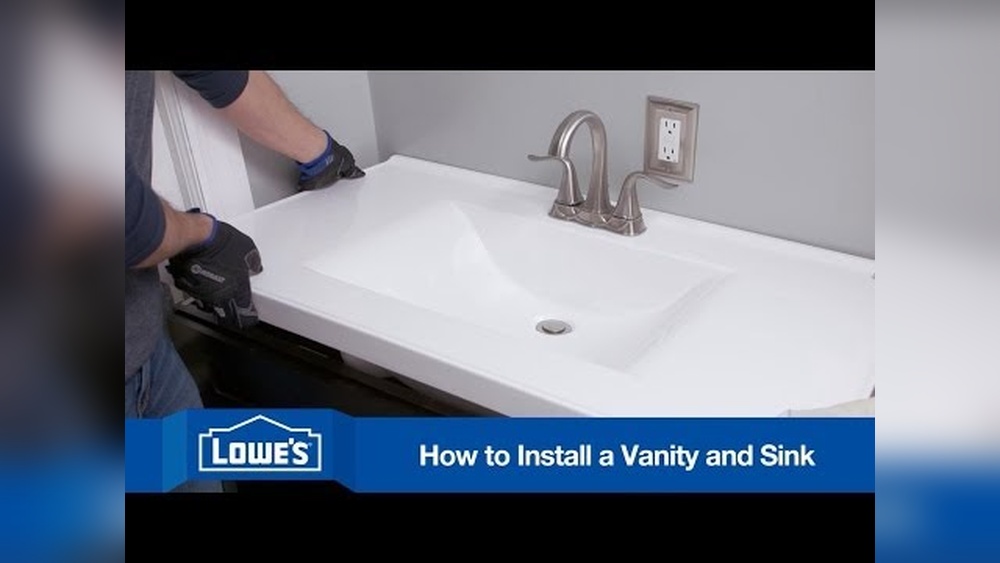
Position The Sink
Positioning the vanity sink correctly is key for a smooth installation. The sink must fit well on the cabinet and align with plumbing fixtures. Take time to place the sink carefully before securing it. This step helps avoid mistakes and ensures a neat finish.
Dry Fit The Sink
Place the sink gently on top of the cabinet without any sealant or screws. Check how it sits and fits the cabinet edges. Make sure the sink does not wobble or slide. Adjust the position until it fits snugly and evenly. Dry fitting helps find the best spot before final installation.
Mark Placement
Use a pencil to mark the cabinet where the sink edges meet. Mark holes for any mounting brackets or screws needed. These marks guide you during the final installation. Double-check the marks to ensure they are accurate. Correct marking prevents shifting and keeps the sink in place.

Credit: www.youtube.com
Apply Sealant
Applying sealant is a key step in attaching your vanity sink to the cabinet. It creates a waterproof barrier. This stops water from leaking into the cabinet and causing damage. Sealant also helps keep the sink firmly in place. Taking time to apply it correctly will ensure a strong, lasting fit.
Choose The Right Sealant
Choose a sealant that is waterproof and mold-resistant. Silicone sealants work well for bathroom sinks. They are flexible and stick well to porcelain and wood. Avoid using sealants that are not meant for wet areas. These may break down over time and cause leaks.
Apply Even Bead
Cut the tip of the sealant tube at a 45-degree angle. Apply a smooth, even bead of sealant around the sink edge. Keep the bead thin but continuous. Avoid gaps or clumps. Press the sink down gently onto the cabinet. Wipe away any extra sealant with a damp cloth before it dries.
Attach Sink To Cabinet
Attaching a vanity sink to a cabinet is an important step in bathroom setup. It ensures the sink stays stable and looks neat. Follow these simple steps to attach your sink correctly. Doing it right prevents leaks and damage later.
Take your time to align and secure the sink properly. This makes cleaning easier and keeps the sink safe during use.
Align Sink Correctly
Place the sink over the cabinet carefully. Check that it fits evenly on all sides. The sink should sit flat without any gaps. Make sure the drain hole lines up with the cabinet’s plumbing.
Adjust the sink slightly if needed. Proper alignment helps avoid water spills. It also keeps the sink balanced for daily use.
Secure With Clips Or Screws
Use the clips or screws that came with your sink. Attach them under the sink rim to the cabinet. Tighten each clip or screw just enough to hold the sink firmly.
Do not overtighten. This can crack the sink or damage the cabinet. Check the sink again for level and fit after securing. The sink should feel solid and not move.
Connect Plumbing
Connecting the plumbing is a key step when attaching a vanity sink to a cabinet. It involves installing the faucet and drain correctly. You also need to test for leaks to avoid water damage later. Follow each step carefully for a secure and lasting setup.
Install Faucet And Drain
Start by mounting the faucet on the sink. Use the provided nuts and washers to tighten it. Next, attach the water supply lines to the faucet. Make sure connections are firm but do not overtighten.
Now, install the drain assembly. Apply plumber’s putty around the drain hole. Insert the drain and tighten the locknut underneath. Attach the P-trap to the drain tailpiece and wall drain pipe. Check that all parts fit snugly.
Test For Leaks
Turn on the water supply slowly. Watch all joints and connections closely. Look for drips or moisture around the faucet and drain. Tighten any loose fittings to stop leaks.
Flush water through the drain to check flow. Ensure no water pools under the cabinet. A leak-free connection keeps your bathroom safe and dry.
Final Adjustments
Final adjustments ensure your vanity sink is secure and neat. This step completes the installation and prevents future problems. Take time to check every detail carefully.
Clean Excess Sealant
Sealant keeps water from leaking under the sink. Use a damp cloth or paper towel to wipe away extra sealant. Remove it before it dries to avoid messes. Clean edges make your sink look neat and professional. Be gentle to avoid disturbing the seal.
Check Stability
Press gently on the sink to test its firmness. It should not wobble or move side to side. Tighten screws or brackets if you feel any looseness. A stable sink lasts longer and stays safe. Double-check all attachments before finishing.
Credit: www.homedepot.com
Frequently Asked Questions
How Do You Secure A Vanity Sink To A Cabinet?
To secure a vanity sink, align it with the cabinet opening. Use mounting clips or brackets underneath. Tighten screws carefully to avoid cracks. Apply silicone sealant around edges for stability and water resistance.
What Tools Are Needed To Attach A Vanity Sink?
You need a screwdriver, drill, adjustable wrench, and silicone sealant. A level and measuring tape help with alignment. Mounting clips or brackets are essential for securing the sink properly.
Can I Install A Vanity Sink Without Professional Help?
Yes, with basic DIY skills and proper tools, you can install it. Follow manufacturer instructions carefully. Ensure plumbing connections are tight and leak-free. Take safety precautions when handling tools and materials.
How Do I Prevent Water Leaks When Attaching A Vanity Sink?
Apply a bead of silicone sealant around the sink rim. Tighten mounting screws evenly to avoid gaps. Check all plumbing connections for tightness. Test for leaks by running water after installation.
Conclusion
Attaching a vanity sink to a cabinet is simple with the right steps. Take your time and follow the instructions carefully. Make sure all parts fit well and are tight. Check for leaks before finishing the job. This will keep your bathroom neat and safe.
A well-installed sink lasts longer and looks better. Enjoy your new vanity setup without any worries. Practice makes perfect, so don’t rush. You can do this yourself with patience and care.