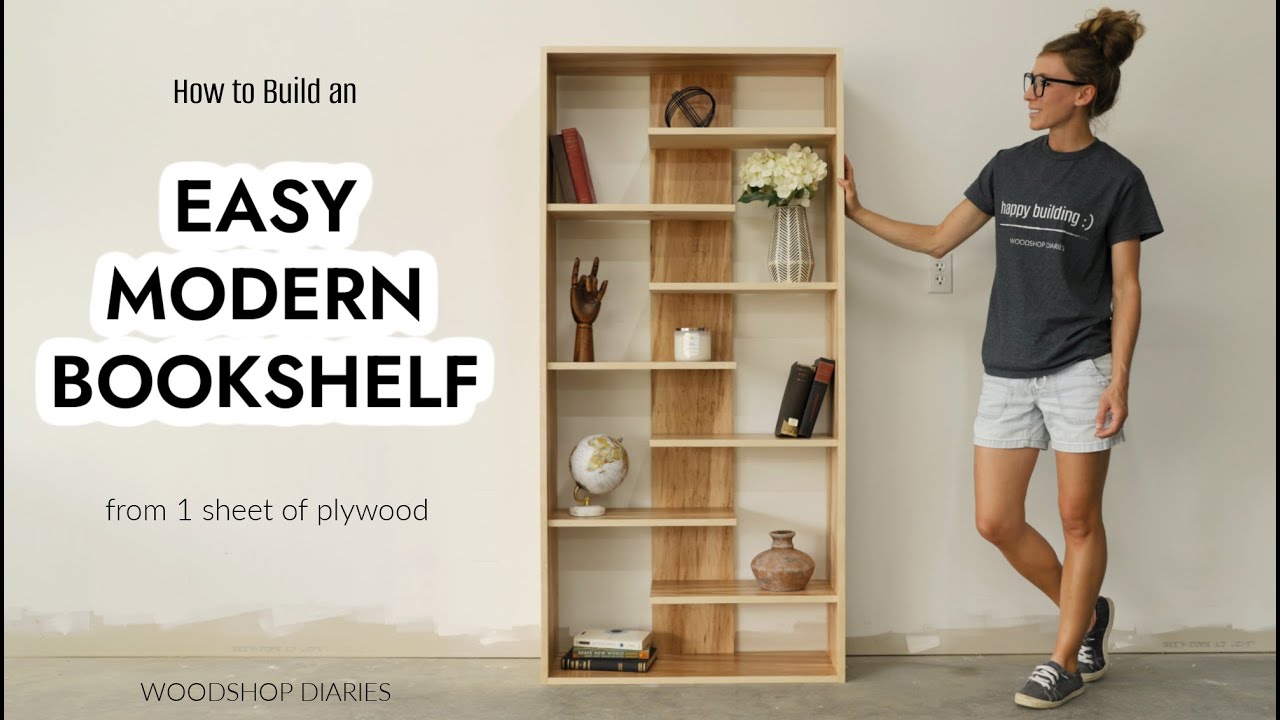
Are you looking to add a sturdy, stylish bookshelf to your space without spending a fortune? Building a bookshelf out of plywood is easier than you might think.
With just a few tools and some basic steps, you can create a custom piece that fits perfectly in your home or office. Imagine having a bookshelf that not only holds your favorite books but also reflects your personal style.
Keep reading, and you’ll discover simple tips and tricks to help you build a beautiful plywood bookshelf from start to finish. Your perfect bookshelf is closer than you think.
Credit: www.youtube.com
Choosing The Right Plywood
Choosing the right plywood is key to building a strong, lasting bookshelf. The right type affects durability, appearance, and ease of work. Picking plywood carefully saves time and money.
Understand the types, thickness, and quality before buying. These factors guide you to the best choice for your project.
Types Of Plywood
Plywood comes in many types. Each type suits different projects. Common plywood types include softwood, hardwood, and cabinet grade.
Softwood plywood is light and easy to cut. It works well for simple shelves. Hardwood plywood is stronger and smoother. It is better for visible parts of the shelf.
Cabinet grade plywood has a fine finish. It looks good without much sanding. Use it if you want a polished bookshelf.
Selecting Thickness And Grade
Thickness affects strength. Thicker plywood holds more weight. For bookshelves, 3/4 inch plywood is a good choice. It balances strength and weight.
Plywood grade shows surface quality. A-grade plywood has smooth surfaces and few defects. Lower grades may have knots and rough spots.
Choose A or B grade for shelves you can see. Lower grades work for hidden parts or backing.
Where To Buy Quality Plywood
Buy plywood from trusted stores. Home improvement centers often stock good plywood. Local lumber yards may offer better quality and advice.
Check the plywood before buying. Look for smooth surfaces and no warping. Good plywood makes building easier and the shelf stronger.

Credit: www.reddit.com
Tools And Materials Needed
Building a bookshelf out of plywood needs the right tools and materials. This helps you work safely and get good results. Gather everything before starting. It saves time and makes the process smooth.
Essential Tools
- Measuring tape to get exact sizes
- Circular saw or handsaw for cutting plywood
- Power drill for screws and holes
- Screwdriver to tighten screws
- Clamps to hold pieces together
- Sandpaper or electric sander to smooth edges
- Carpenter’s square for straight corners
Additional Supplies
- Wood screws to fasten parts
- Wood glue for extra strength
- Plywood sheets, preferably 3/4 inch thick
- Wood filler to fix small holes or gaps
- Paint or wood stain for finishing
- Brush or roller for applying finish
Safety Gear
- Safety glasses to protect your eyes
- Dust mask to avoid breathing sawdust
- Work gloves to protect your hands
- Ear protection if using loud tools
- Wear closed-toe shoes for foot safety
Planning Your Bookshelf Design
Planning your bookshelf design is the first step to a successful project. It helps avoid mistakes and saves time. Careful planning gives you a clear idea of what to build. It also ensures the bookshelf fits your space perfectly. Follow these steps to plan your design effectively.
Measuring Space And Dimensions
Start by measuring the area where the bookshelf will go. Measure height, width, and depth carefully. Use a tape measure for accuracy. Write down the numbers. Check for obstacles like vents or sockets. This helps prevent fitting problems later.
Sketching Your Design
Draw a simple sketch of your bookshelf on paper. Show the basic shape and size. Mark the positions of shelves and sides. Use a ruler to keep lines straight. This visual guide helps plan cuts and assembly. It also makes it easier to explain your idea.
Deciding Shelf Count And Spacing
Think about what you will store on your shelves. Books, decorations, or plants? Choose the number of shelves based on your needs. Leave enough space between shelves for taller items. Usually, 10 to 12 inches between shelves works well. Adjust spacing for special items.
Cutting The Plywood
Cutting plywood is a key step in building a sturdy bookshelf. Accurate cuts ensure your pieces fit well. This step needs care and attention to detail. Follow safety rules to avoid accidents. Use the right tools for smooth, clean cuts.
Marking Your Cuts
Start by measuring the plywood carefully. Use a pencil and a ruler to mark straight lines. Double-check your measurements before cutting. Clear, visible marks help guide your saw. Mark both sides of the plywood for accuracy.
Safe Cutting Techniques
Wear safety glasses and ear protection before cutting. Secure the plywood on a stable surface. Use clamps to hold it steady. Cut slowly and follow the marked lines. Keep your hands away from the blade at all times.
Sanding The Edges
After cutting, the edges may feel rough or splintered. Use fine-grit sandpaper to smooth all edges. Sand gently to avoid damaging the plywood surface. Smooth edges improve your bookshelf’s look and safety. Check for any splinters before assembly.
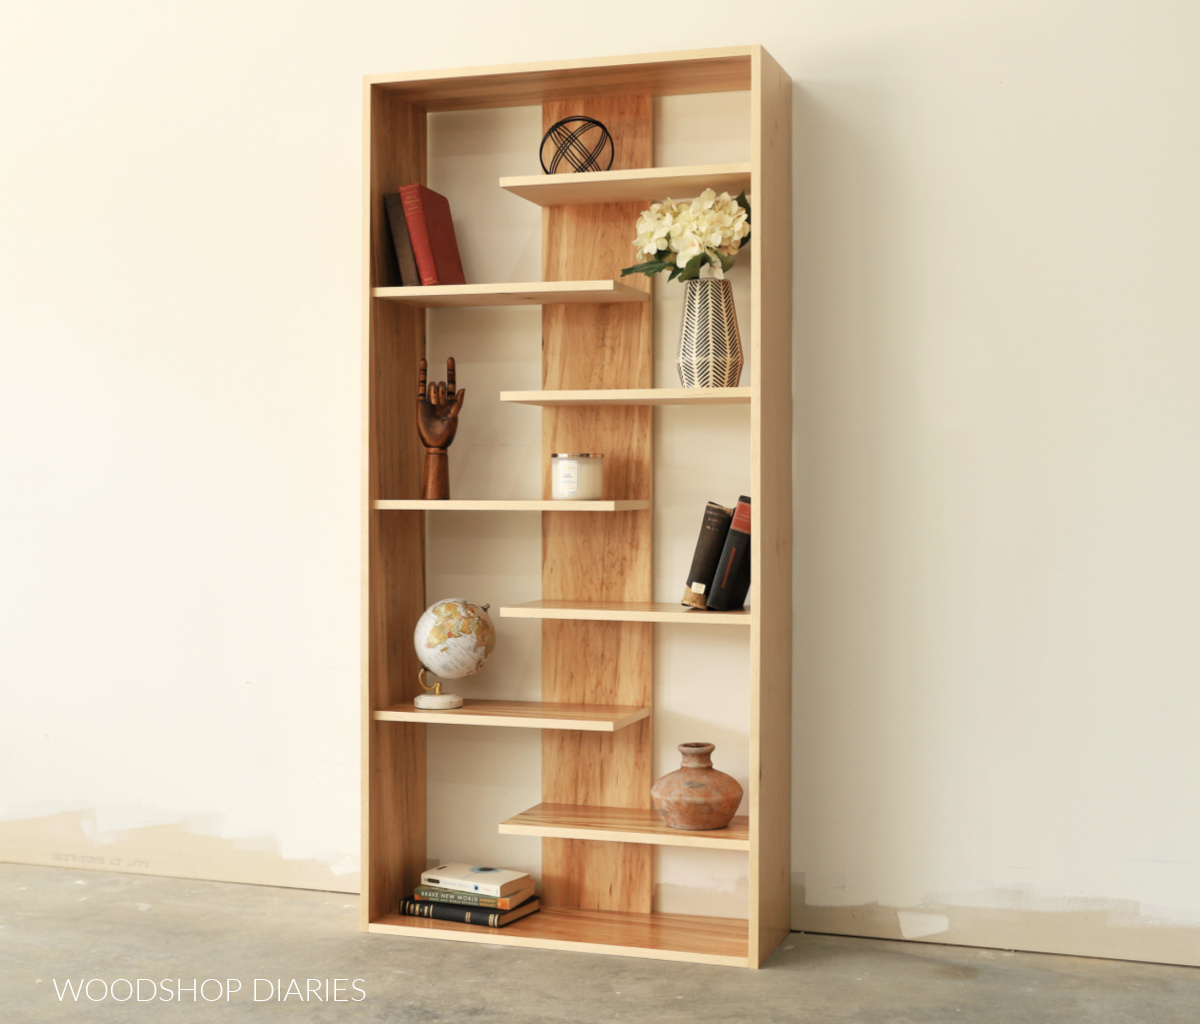
Assembling The Frame
Assembling the frame is the key step in building a sturdy bookshelf. This step sets the shape and strength for the whole project. Take your time to make sure every piece fits well. A strong frame means your bookshelf will last for years.
Follow clear steps to join the parts correctly. Use the right tools and materials for a neat finish. Your frame should be square and solid before adding shelves.
Joining The Sides And Bottom
Start by connecting the two side panels to the bottom panel. Place the bottom panel flat on your work surface. Align one side panel vertically at the edge of the bottom. Use clamps to hold them together tightly. Check that the corner forms a right angle. Attach the side panel using screws or nails. Repeat with the other side panel on the opposite edge. Ensure both sides stand straight and parallel.
Reinforcing Joints
Strengthen the joints to avoid wobbling. Add small wooden blocks inside each corner. Cut these blocks to fit snugly between the side and bottom panels. Secure each block with screws or nails. This extra support keeps the frame steady. Double-check all corners for tightness and alignment. Reinforcing joints makes the bookshelf safe to hold heavy books.
Using Wood Glue And Screws
Apply wood glue to every contact surface before screwing. The glue fills gaps and adds extra hold. Spread a thin, even layer with a brush or stick. Press the parts together firmly after gluing. Insert screws slowly, avoiding splits in the plywood. Use screws long enough to hold but not poke through. Let the glue dry fully before moving the frame. This step ensures a durable, strong connection.
Credit: www.woodshopdiaries.com
Attaching The Shelves
Attaching the shelves is a key step in building a sturdy plywood bookshelf. Shelves hold your books and display items. Proper attachment keeps the structure safe and reliable. Take care to place and secure each shelf correctly. This ensures a neat, balanced look and strong support.
Positioning Shelves Evenly
Measure the inside height of your bookshelf frame. Divide this height by the number of shelves plus one. Mark the spots on both sides of the frame. Use a level to draw straight lines across the marks. These lines guide the shelf placement. Keeping shelves evenly spaced makes the bookshelf look tidy. It also helps balance the weight of books on each shelf.
Securing Shelves Properly
Use wood screws or brackets to fasten shelves securely. Pre-drill holes to avoid splitting the plywood. Screw the shelves into the side panels at the marked lines. Check that screws go in straight and hold firmly. If using brackets, fix them under each shelf and attach to sides. Proper securing prevents shelves from sagging or falling.
Checking For Stability
After attaching all shelves, test the bookshelf’s stability. Gently press on each shelf to check for movement. Make sure shelves do not wobble or shift. Tighten any loose screws or brackets. Place a few books on each shelf to see if it holds well. A stable bookshelf stays solid and safe for daily use.
Finishing Touches
Finishing touches make your plywood bookshelf look neat and last longer. These steps help hide imperfections and protect the wood. A smooth, clean surface improves the shelf’s appearance and strength. Follow each step carefully to get the best results.
Filling Gaps And Holes
Check the bookshelf for small holes or gaps. Use wood filler to cover these spots. Apply the filler with a putty knife, pressing it into cracks. Let the filler dry fully before sanding it smooth. This step creates an even surface for painting or staining.
Applying Paint Or Stain
Choose paint or stain based on your style choice. Paint gives a solid color and hides wood grain. Stain enhances the natural wood look. Use a brush or cloth to apply evenly. Allow each coat to dry well before adding another. Multiple coats give a richer, fuller finish.
Adding Protective Coating
Protective coating keeps your bookshelf safe from damage. Use clear polyurethane or varnish for strength and shine. Apply thin layers with a clean brush. Let each layer dry before adding the next. This coating seals the paint or stain and prevents wear over time.
Maintaining Your Bookshelf
Maintaining your plywood bookshelf ensures it stays strong and looks good for years. A little care goes a long way to keep it in top shape. Simple habits can protect your shelf from wear and tear. Small repairs prevent bigger problems later. Follow easy steps to keep your bookshelf neat and sturdy.
Regular Cleaning Tips
Dust your bookshelf once a week with a soft cloth. Use a damp cloth to wipe sticky spots gently. Avoid harsh chemicals that can damage the plywood finish. Clean the shelves before placing books back. Keep the area around the bookshelf clean to reduce dust buildup.
Preventing Damage
Place your bookshelf away from direct sunlight to stop fading. Avoid placing heavy items on top shelves. Use coasters or mats under plants or liquids. Keep the shelf dry to prevent warping or mold. Check stability often and tighten screws if needed.
Repairing Minor Issues
Fill small scratches with wood filler or touch-up markers. Sand rough edges lightly before applying new paint or varnish. Fix loose shelves by tightening brackets or screws. Replace damaged parts early to avoid bigger repairs. Use glue to fix small splits or cracks carefully.
Frequently Asked Questions
What Type Of Plywood Is Best For Bookshelves?
Birch plywood is ideal due to its strength and smooth finish. It supports weight well and looks attractive when painted or stained.
How Do I Ensure My Plywood Bookshelf Is Stable?
Use sturdy brackets and secure joints with wood glue and screws. Adding a back panel enhances overall stability and prevents wobbling.
Can I Customize The Size Of My Plywood Bookshelf?
Yes, plywood is easy to cut and customize. Measure your space carefully and adjust dimensions before cutting for a perfect fit.
What Tools Are Needed To Build A Plywood Bookshelf?
Essential tools include a saw, drill, screwdriver, measuring tape, and clamps. Sandpaper and wood glue help achieve a smooth, strong finish.
Conclusion
Building a plywood bookshelf is a simple, rewarding project. You need basic tools and some patience. Measure and cut carefully to fit your space well. Sand the edges to make it smooth and safe. Use screws or nails to hold pieces tightly.
Paint or stain it to match your room’s style. This bookshelf will hold your books and show your effort. Enjoy the pride of creating something useful yourself. Start with small steps, and watch your skills grow. Keep practicing, and woodworking will become easier over time.