Are you looking to create a fun and cozy sleeping space for your little one? Building a car toddler bed can be the perfect way to make bedtime exciting and special.
Imagine your child’s eyes lighting up every night as they climb into a bed shaped like their favorite car. In this guide, you’ll discover simple, step-by-step instructions to build a safe, sturdy, and stylish car toddler bed that fits your space and budget.
Ready to turn your child’s bedroom into a thrilling adventure? Let’s get started!
Materials And Tools Needed
Building a car toddler bed requires the right materials and tools. Gathering everything before starting saves time. Choosing good materials ensures the bed is safe and lasts long. The tools help make the work easier and more precise. Safety gear protects both the builder and the child. Below are the key materials and tools needed for this project.
Choosing The Right Wood
Use solid wood like pine or oak for strength and durability. Avoid soft or splintering wood to keep the bed safe. Wood should be smooth and free of cracks. Choose untreated or child-safe finished wood. This prevents harmful chemicals from affecting your toddler. Cut wood pieces to fit the car bed design precisely.
Essential Tools For The Project
A cordless drill is needed for making holes and driving screws. Use a saw to cut wood pieces to size. Sandpaper or an electric sander smooths rough edges. A tape measure helps to get exact measurements. Clamps hold pieces steady while assembling. A screwdriver is handy for tightening screws manually. These tools make building faster and safer.
Safety Gear For Parents
Wear safety goggles to protect eyes from dust and wood chips. Use ear protection when operating loud tools. Gloves protect hands from splinters and sharp edges. A dust mask keeps wood dust out of your lungs. Dress in close-fitting clothes to avoid catching on tools. Safety gear reduces risks and keeps the project stress-free.

Credit: www.youtube.com
Designing The Car Bed
Designing the car bed is a fun and important step. It helps create a safe and cozy space for your toddler. A well-designed bed sparks imagination and comfort. It also fits well in the room and matches your child’s tastes.
Selecting A Car Theme
Choose a car theme that your toddler will love. Popular themes include race cars, fire trucks, or classic cars. Think about colors and shapes that attract your child. Pick simple designs that are easy to build and paint. The theme sets the style and mood of the bed.
Creating A Simple Blueprint
Draw a basic plan of the bed before starting. Sketch the shape of the car and parts like wheels and windows. Use simple lines and shapes to keep it clear. This blueprint guides you during the build. It helps to avoid mistakes and saves time.
Measuring Toddler Bed Dimensions
Measure the mattress size first. Most toddler mattresses are about 28 by 52 inches. Add extra space for the car frame and sides. Leave enough room for your child to move comfortably. Correct measurements ensure the bed is safe and fits well in the room.
Cutting And Preparing Wood
Cutting and preparing wood is a key step in building a car toddler bed. This process shapes the wood pieces to fit perfectly. It also ensures the bed is safe and smooth for your child. Taking time on this step makes the assembly easier and the final bed stronger.
Marking The Wood Pieces
Start by measuring each part carefully. Use a pencil to mark where you will cut. Double-check your measurements before marking. Clear, precise marks help you cut straight lines. Mark all pieces according to your bed plan. This reduces mistakes and wasted wood.
Safe Cutting Techniques
Always wear safety glasses and gloves. Use a steady hand and take your time. Cut along the pencil lines using a saw or power tool. Keep your fingers away from the blade. Secure the wood on a stable surface to avoid slips. Stop if you feel unsure and adjust your position.
Sanding For Smooth Edges
After cutting, use sandpaper to smooth all edges. Sanding removes rough spots and splinters. Start with coarse grit and finish with fine grit paper. Smooth edges protect your child from scratches. Check every corner and surface for roughness. Sanding also helps paint or finish stick better.
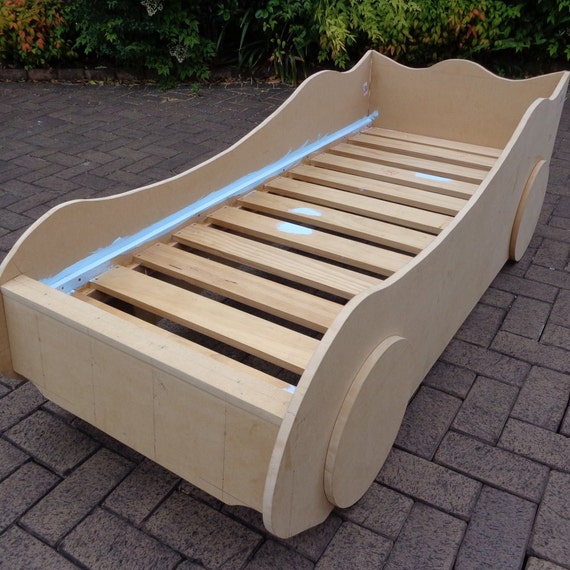
Assembling The Bed Frame
Assembling the bed frame is the first step in creating a cozy car toddler bed. This stage gives shape and strength to the whole project. Follow each step carefully to ensure a sturdy bed that lasts.
Constructing The Base
Start with the base, the foundation of the bed. Use strong wooden planks for support. Cut the planks to the right size. Join them with screws for a firm hold. Check that the base is level and square. This helps the mattress sit flat and safe.
Building The Side Panels
Next, make the side panels. These panels look like car doors and add style. Cut the wood into the car shape you want. Sand the edges smooth for safety. Attach the panels to the base with screws. Make sure they stand straight and steady.
Attaching The Headboard And Footboard
Finally, fix the headboard and footboard. These pieces close the bed frame. Cut them to match the car theme. Secure them tightly to the base and side panels. Double-check all screws are tight. This completes the bed frame, ready for finishing touches.
Adding Car Details
Adding car details brings the toddler bed to life. It turns a simple bed into a fun car shape. This makes bedtime exciting for your child. Details like wheels, lights, and paint make it special. These small touches create a realistic car look. They also add personality to the bed. Below are simple steps to add these features.
Crafting Wheels And Lights
Start by making wheels from wood or thick plastic. Cut round shapes that fit the bed size. Attach them securely to the sides of the bed frame. For lights, use safe LED strips or plastic covers. Fix the lights at the front and back of the bed. Make sure all parts are smooth and child-safe. This adds a real car feel and fun playtime features.
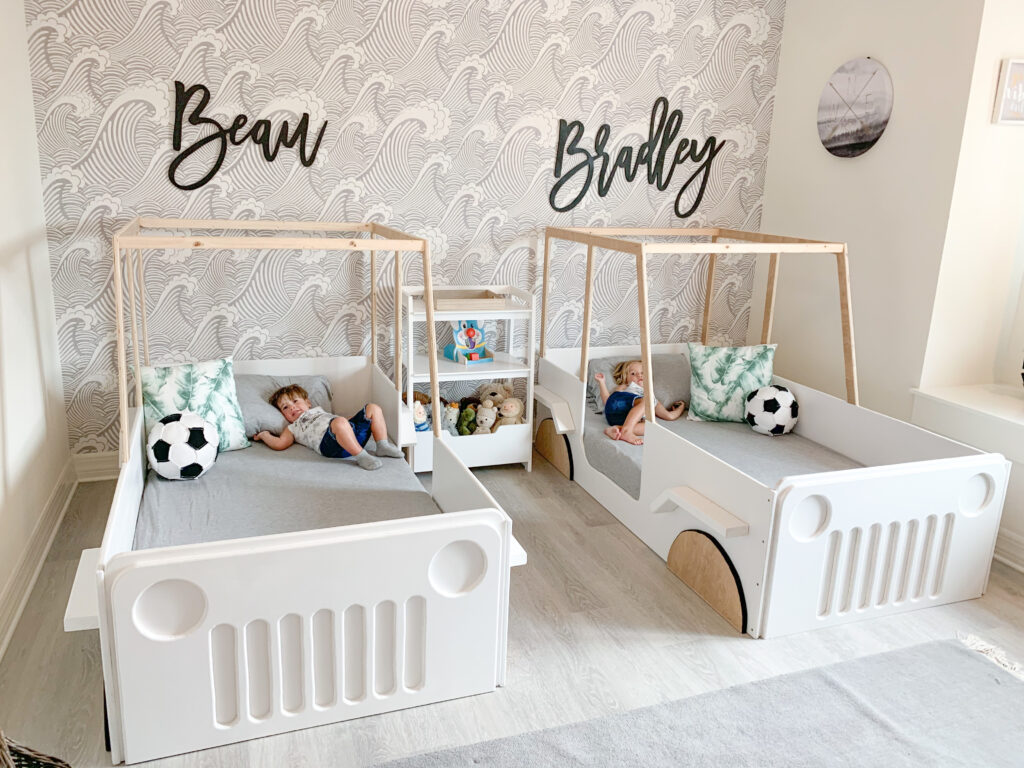
Painting And Decorating
Choose bright colors like red, blue, or yellow. Paint the bed with non-toxic, child-safe paint. Use a small brush for details like stripes or numbers. Add stickers or decals of car logos for extra fun. Let the paint dry completely before moving on. Decorating makes the bed attractive and unique for your child.
Applying Protective Finish
Apply a clear protective finish over the paint. Use a non-toxic varnish or sealant safe for children. This protects the bed from scratches and spills. It also keeps the colors bright and fresh longer. Apply two thin coats for best results. Allow each coat to dry fully before the next. This step ensures the bed stays beautiful and durable.
Credit: www.etsy.com
Final Touches
Final touches make your car toddler bed complete and safe. These steps help create a cozy, secure space for your child. Focus on comfort, safety, and care to ensure the bed lasts long. A few simple tasks finish the build perfectly.
Installing Mattress And Bedding
Choose a mattress that fits the car bed frame exactly. It should be firm and comfortable for toddlers. Add soft bedding, like a fitted sheet and a light blanket. Avoid pillows or thick quilts to reduce risk during sleep. Make sure bedding stays in place and does not bunch up.
Ensuring Stability And Safety
Check all screws and bolts for tightness after assembly. The bed should not wobble or move easily. Use corner guards to cover sharp edges. Place the bed away from windows and cords to prevent accidents. Add non-slip pads under the bed legs to keep it steady on smooth floors.
Maintenance Tips For Longevity
Regularly clean the bed frame with a damp cloth. Avoid harsh chemicals that can damage paint or wood. Tighten screws every few months to maintain strength. Inspect the bed for cracks or loose parts often. Replace worn bedding to keep the bed fresh and safe for your child.
Credit: ohhappyplay.com
Frequently Asked Questions
What Materials Are Needed To Build A Car Toddler Bed?
You need plywood, screws, wood glue, paint, sandpaper, and a mattress. Optional items include decals and wheels for decoration. Quality materials ensure safety and durability for your toddler’s bed.
How Long Does It Take To Build A Car Toddler Bed?
Building a car toddler bed typically takes 4 to 6 hours. Time varies based on experience and complexity of design. Proper planning helps complete the project efficiently and safely.
Is It Safe To Build A Diy Car Toddler Bed?
Yes, if you follow safety guidelines and use non-toxic paint. Ensure all edges are smooth, and the bed is sturdy. Always use child-safe materials to prevent accidents or allergies.
Can I Customize The Car Toddler Bed Design?
Absolutely! Customize colors, decals, and accessories to match your child’s preferences. Customization makes the bed more appealing and personal for your toddler’s room.
Conclusion
Building a car toddler bed can be fun and rewarding. It gives your child a cozy place to sleep. You only need a few simple tools and materials. Follow each step carefully for the best results. This project saves money and adds a personal touch to your home.
Your toddler will love the car shape and feel special. Try this DIY project to create a safe and comfortable bed. Enjoy the process and the happy smiles it brings.