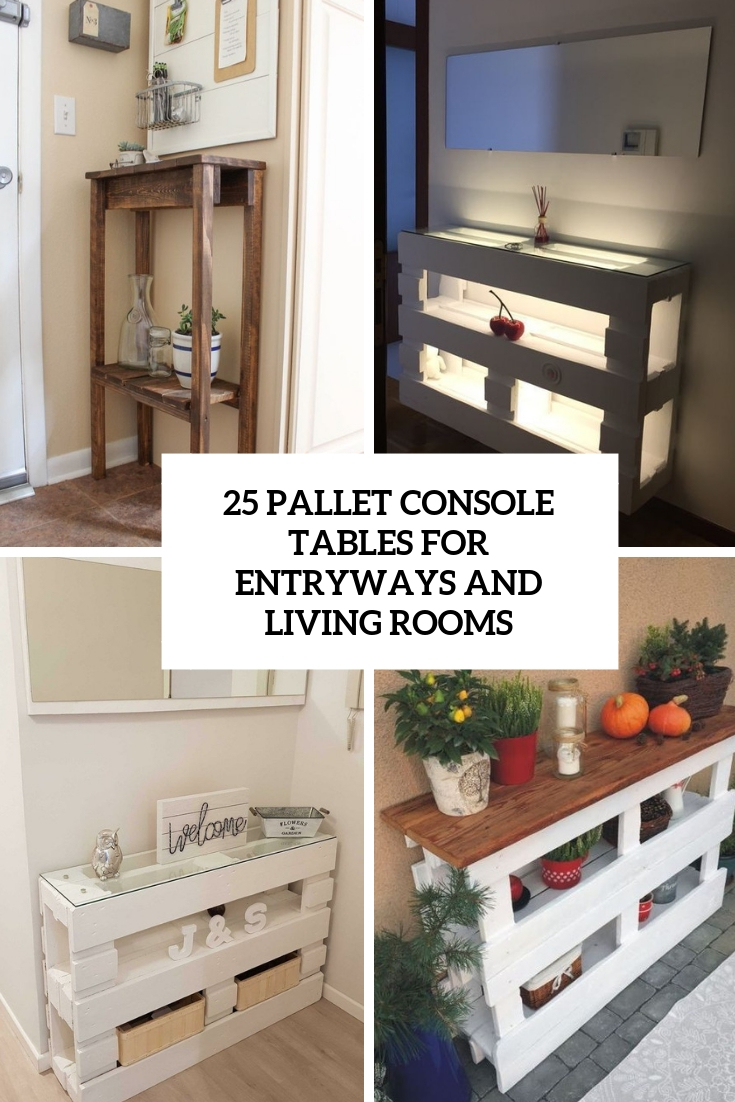
Are you looking for a simple, budget-friendly way to add charm to your home? Building a console table from a pallet is a fantastic project you can do yourself.
Imagine turning old wood into a stylish piece that fits perfectly in your entryway or living room. In this guide, you’ll learn easy steps to create a unique console table that shows off your personal style. Ready to transform a pallet into something amazing?
Let’s dive in and make your space stand out!
Materials Needed
Building a console table from a pallet needs the right materials. Gathering these before starting helps the project go smoothly. Having everything ready saves time and avoids frustration. Below are the key materials you need to complete your pallet console table.
Choosing The Right Pallet
Select a pallet that is sturdy and in good shape. Avoid pallets with cracks, rot, or too many nails. Look for pallets marked with “HT,” which means heat treated and safer for indoor use. Size matters; choose a pallet large enough for your table design. Clean the pallet well to remove dirt and splinters.
Tools Required
Use a saw to cut the pallet wood to size. A hammer and pry bar help remove nails and separate boards. Sandpaper or an electric sander smooths rough surfaces. A drill is useful to make holes for screws. Screwdrivers tighten screws to keep the table strong.
Additional Supplies
Buy wood screws or nails to join the pieces firmly. Wood glue adds extra hold between boards. Choose a wood finish like paint or stain to protect the wood. Brushes or rags help apply the finish evenly. Safety gear like gloves and goggles keeps you safe while working.
Preparing The Pallet
Preparing the pallet is the first step in building a sturdy console table. It takes time but ensures your table looks great and lasts long. The process involves cleaning, sanding, taking apart, and choosing the best wood pieces.
Cleaning And Sanding
Start by cleaning the pallet with a brush to remove dirt and dust. Use soap and water for sticky spots. Let it dry completely before sanding.
Sanding smooths the wood and removes splinters. Use medium-grit sandpaper first, then fine-grit for a smooth finish. Sand all surfaces evenly.
Disassembling The Pallet
Carefully take the pallet apart using a crowbar or hammer. Work slowly to avoid breaking the wood. Remove nails or staples with pliers.
Keep the boards flat and undamaged. Disassembled boards are easier to use for your table parts.
Selecting The Best Boards
Look for boards that are straight and free of cracks. Avoid wood with signs of rot or heavy damage. Choose boards with even thickness for stability.
Pick boards with an appealing grain and color. The right wood pieces will make your console table look professional and strong.
Designing The Console Table
Designing the console table is the first step in your DIY project. It helps set clear goals and avoids mistakes. Taking time to design saves effort later. A good design matches your space and style. You will also know what materials and tools you need.
Measuring And Planning
Start by measuring the space where the console table will go. Note the height, width, and depth available. Consider how much storage or display space you want. Plan the table size to fit well and look balanced. Think about the pallet wood size too. This helps reduce waste and extra cuts.
Sketching The Layout
Draw a simple sketch of your console table on paper. Show the top, sides, and legs. Mark the measurements clearly. This visual guide helps you see the shape and structure. You can adjust the design before cutting wood. Sketching also helps explain your idea if you ask for help.

Credit: www.remodelaholic.com
Cutting And Shaping Wood
Cutting and shaping wood is the first step to build your console table from a pallet. It requires careful measurement and precise cuts. This step helps the wood pieces fit perfectly together. It also ensures the table looks neat and sturdy. Taking time to cut and shape wood properly makes the building process easier.
Cutting Boards To Size
Start by measuring the pallet boards accurately. Use a tape measure and mark where to cut. Cut the boards with a saw, following the marks closely. Use a handsaw or power saw for straight cuts. Cut slowly and carefully to avoid mistakes. Check each piece after cutting to confirm the size matches your plan.
Smoothing Edges
After cutting, the edges can be rough or splintered. Smooth these edges using sandpaper or a sanding block. Sand in one direction for a clean finish. Pay attention to corners to avoid sharp points. Smooth edges help prevent injuries and give a polished look. Take time to sand all surfaces that will be visible.
Assembling The Table
Assembling the console table is the most exciting part of the project. This step brings all parts together into a sturdy piece of furniture. Follow clear steps to build a tabletop, construct the legs, and join the components securely. Take your time and check each step carefully.
Building The Tabletop
Start by laying pallet boards flat and side by side. Align the boards to form a smooth surface. Use a drill to attach support beams under the boards. These beams keep the tabletop strong and prevent warping. Sand the surface to remove rough edges and splinters. A smooth tabletop looks better and feels safer to touch.
Constructing The Legs
Cut four wooden legs from sturdy pallet wood or reclaimed lumber. Make sure all legs are the same length for balance. Sand each leg to smooth rough spots. Drill pilot holes for screws to avoid splitting the wood. Legs should be thick enough to hold the table weight without wobbling.
Joining Components
Place the legs under the tabletop at each corner. Use wood screws to attach the legs firmly. Add corner brackets for extra strength if needed. Check the table for stability and adjust screws if it wobbles. Finally, sand any rough connections and apply a finish to protect the wood.
Credit: www.reddit.com
Finishing Touches
Finishing touches make your pallet console table look complete and polished. These steps improve its feel and protect it for daily use. Proper finishing keeps your table safe from damage and enhances its beauty.
Sanding For Smoothness
Start by sanding the entire table surface. Use medium-grit sandpaper to remove rough spots and splinters. Then switch to fine-grit paper for a smooth finish. Sand in the direction of the wood grain to avoid scratches. Take time here; smooth wood feels better and looks nicer.
Applying Stain Or Paint
Choose a stain or paint that fits your style. Stain shows the wood’s natural grain and adds color. Paint offers a solid, colorful look. Apply evenly with a brush or cloth. Let it dry completely between coats. Two or three coats usually work best for good coverage.
Sealing For Protection
Seal the table to protect it from moisture and wear. Use a clear polyurethane or varnish. This layer guards against scratches and spills. Apply thin coats and allow each to dry fully. Lightly sand between coats for a smooth finish. This step extends the life of your console table.
Tips For Maintenance
Maintaining your pallet console table keeps it looking fresh and lasting longer. Simple care steps protect the wood and finish. Regular upkeep prevents bigger problems that need costly fixes.
Follow easy maintenance tips to enjoy your console table for years. Small daily efforts make a big difference.
Cleaning Advice
Dust your console table often with a soft cloth. Avoid rough materials that can scratch the wood. Use a damp cloth for sticky spots, then dry immediately. Do not soak the wood with water. Mild soap works well for tough stains. Avoid harsh chemicals that damage the finish. Clean spills right away to stop stains and water marks.
Repairing Minor Damages
Check your table for small cracks or dents regularly. Fill cracks with wood filler and smooth with sandpaper. Use touch-up markers or stain to cover scratches. Tighten loose screws or nails to keep the table stable. Replace broken parts carefully to match the original style. Small repairs keep your table strong and looking great.
Credit: www.digsdigs.com
Frequently Asked Questions
What Materials Are Needed To Build A Pallet Console Table?
You need a wooden pallet, sandpaper, saw, screws, drill, wood stain, and table legs. Optional materials include wood filler and paint for finishing touches.
How Do You Prepare A Pallet For Making A Console Table?
First, clean the pallet thoroughly. Remove any nails or staples. Sand the wood smooth to avoid splinters before assembly.
How Long Does It Take To Build A Pallet Console Table?
Building a pallet console table typically takes 4 to 6 hours. Time varies based on skill level and drying time for finishes.
Can I Customize The Size Of My Pallet Console Table?
Yes, you can cut the pallet to your desired size. Adjust the length and width to fit your space perfectly.
Conclusion
Building a console table from a pallet is a fun and simple project. It saves money and helps the environment by reusing wood. You only need a few tools and some basic skills. The result is a unique piece that fits your space perfectly.
Try different finishes to match your style. Enjoy the process and take pride in your handmade table. This project shows how creativity can turn old pallets into useful furniture. Give it a try and see what you can build!