Looking for a unique way to organize your coats while showing off your love for hockey? Building a hockey stick coat rack is a fun and creative project that you can easily do yourself.
Imagine turning old hockey sticks into a stylish and practical piece for your home or game room. In this guide, you’ll discover simple steps to create a coat rack that’s both eye-catching and functional. Ready to add a personal touch to your space?
Let’s get started!
Materials Needed
Building a hockey stick coat rack needs specific materials. Choosing the right items makes your project easier and more durable. This section explains the key materials required for a strong and stylish coat rack.
Focus on selecting good quality hockey sticks and gathering the right supplies. These parts will help you create a unique and functional rack.
Choosing The Right Hockey Sticks
Pick hockey sticks that are strong and not damaged. Old sticks with cracks or splinters may break easily. Look for sticks made of wood or composite material. These are sturdy and can hold the weight of coats.
Choose sticks with a nice color or finish. This adds to the rack’s look. Avoid sticks with worn-out grips or too many scratches. The stick’s length and shape should fit your space well.
Additional Supplies
Besides hockey sticks, gather screws or nails to hold the parts together. Use a drill or screwdriver to fix the pieces firmly. Sandpaper helps smooth rough edges on the sticks.
Wood glue adds extra strength to joints. You may want paint or varnish to protect and decorate the rack. Hooks or pegs can be attached for hanging coats.
Have measuring tape and a pencil ready for accurate cuts and marks. These supplies ensure your coat rack looks neat and lasts long.
Credit: hockeystickbuilds.com
Tools Required
Building a hockey stick coat rack needs the right tools. Proper tools make the job easier and safer. Each step requires specific tools to cut, assemble, and finish the rack.
Gathering these tools before starting saves time and avoids interruptions. Below are the main tools you will need.
Cutting Tools
A saw is essential to cut hockey sticks to size. A handsaw or electric saw works well. A utility knife helps trim small parts and tape. Sandpaper or a sanding block smooths rough edges after cutting.
Assembly Tools
A drill makes holes for screws or hooks. Screwdrivers help tighten screws securely. Clamps hold pieces together while assembling. A measuring tape ensures accurate placement of parts.
Finishing Tools
Paintbrushes apply paint or varnish for a clean finish. Rags help wipe off excess stain or paint. Protective gloves keep your hands safe from chemicals. A small hammer can help fit pieces tightly together.
Preparing The Hockey Sticks
Preparing the hockey sticks is the first step to build a strong coat rack. The sticks need to be clean and smooth for a neat look. You must also cut them to the right length. These steps help the coat rack fit well in your space and look great.
Cleaning And Sanding
Start by wiping the hockey sticks with a damp cloth. This removes dust and dirt. Use mild soap if the sticks are very dirty. Dry them completely before moving on.
Next, sand the sticks using fine-grit sandpaper. Sand until the surface feels smooth. This helps paint or finish stick better. Sand rough edges and splinters carefully to avoid injury.
Trimming To Size
Measure the space where the coat rack will hang. Decide how long each hockey stick should be. Mark the cutting points clearly with a pencil.
Use a saw to cut the sticks at the marks. Cut slowly to keep edges straight. After cutting, sand the ends again to smooth rough spots. This step ensures a clean and safe finish.

Credit: www.liftingitalia.com
Designing The Rack Layout
Designing the rack layout is an important step in building a hockey stick coat rack. It helps you plan how the rack will look and how it will fit in your space. A good design makes the rack both useful and attractive.
Think about how many coats you want to hang and where you will place the rack. This step saves time and helps avoid mistakes later.
Determining Size And Shape
Start by measuring the space on your wall. Decide the height and width that fits well. The rack should be big enough for all coats but not too large for the room.
Next, choose the shape of the rack. You can keep it straight, or create a curve or zigzag design with the hockey sticks. The shape adds style and helps hold more items.
Marking Attachment Points
Mark where each hockey stick will attach to the wall or base. Use a pencil and a level for straight lines. Correct marks keep the rack steady and balanced.
Space the attachment points evenly for a neat look. Make sure they can support the weight of coats and items you plan to hang.
Assembling The Coat Rack
Assembling the coat rack is the next step after gathering all materials. This part is simple and fun. Focus on joining the hockey sticks carefully. A sturdy coat rack needs strong connections. Follow the steps closely for a neat finish.
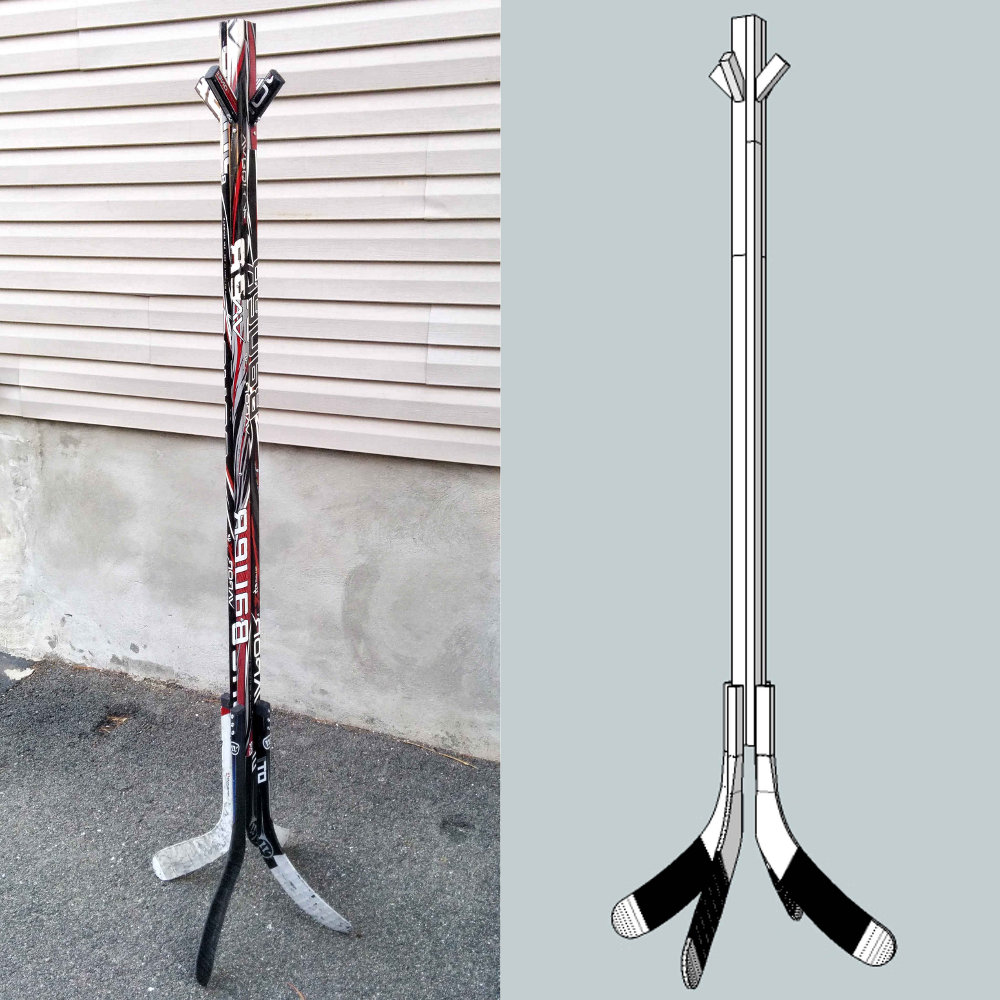
Attaching The Sticks
Start by laying the sticks flat on a surface. Arrange them in your desired pattern. Use screws or nails to join the sticks at crossing points. Drill small pilot holes first to avoid splitting the wood. Make sure each stick is aligned straight. Tighten the screws firmly but gently. Check that the sticks do not wobble or shift.
Securing The Structure
After attaching the sticks, reinforce the structure. Use wood glue on the joints for extra strength. Clamp the joints and let the glue dry fully. Attach a wooden base or wall hooks for stability. Test the coat rack by hanging light items first. Ensure it stands firm and holds weight well. Sand any rough edges to prevent splinters.

Credit: www.youtube.com
Finishing Touches
Finishing touches make your hockey stick coat rack look complete and polished. These steps help protect the wood and add useful features. Careful finishing enhances both style and durability. Spend time here to create a rack you will enjoy for years.
Painting Or Staining
Choose paint or stain to match your room’s style. Paint offers bright, solid colors. Stain shows the natural wood grain. Apply a thin coat for best results. Let it dry fully before the next step. Seal with a clear finish to protect against scratches and moisture. This makes the rack last longer and look better.
Adding Hooks Or Hangers
Select sturdy hooks to hold coats and bags. Space hooks evenly along the stick. Screw them in tight for strong support. Use hooks that fit the rack’s style and size. Consider adding small hangers for keys or hats. These details improve function and add charm. Check each hook holds weight well before use.
Mounting The Rack
Mounting the hockey stick coat rack is a key step to secure it on your wall. Proper mounting keeps the rack stable and able to hold coats and hats. Take your time to select the best spot and attach the hardware correctly. This ensures your rack stays safe and looks great.
Choosing Wall Location
Pick a spot with enough space for coats to hang freely. Avoid places near doors that open into the rack. Look for a wall that is strong and flat. Walls made of wood or studs behind drywall work best. Avoid plaster or hollow walls without support. The rack should be easy to reach but not in the way.
Installing Mounting Hardware
Use a stud finder to locate wall studs for strong support. Mark the spots where screws will go. Drill pilot holes to make screwing easier. Choose screws and anchors made for your wall type. Attach brackets or hooks securely to the wall. Hang the hockey sticks on the mounted hardware carefully. Check stability by gently pulling on the rack.
Maintenance Tips
Proper care keeps your hockey stick coat rack strong and looking great. Regular maintenance stops damage and extends its life. Follow these simple steps to keep your rack in top shape.
Cleaning The Rack
Dust and dirt can build up on the rack. Use a soft cloth to wipe it gently. Avoid harsh cleaners that may damage the wood or finish. A mix of mild soap and water works well. Dry the rack completely after cleaning to prevent moisture damage.
Repairing Damages
Small scratches or chips can be fixed quickly. Use wood filler or touch-up markers that match the rack’s color. For loose parts, tighten screws or glue joints carefully. Check the rack regularly for any signs of wear. Early repairs keep the rack sturdy and safe.
Frequently Asked Questions
What Materials Are Needed To Build A Hockey Stick Coat Rack?
You need old hockey sticks, wall mounts, screws, a drill, and a level. These materials ensure a sturdy, functional coat rack with a sporty look.
How Do You Attach Hockey Sticks To The Wall?
Use wall mounts and screws to secure the sticks. Ensure they are level and firmly fixed for safety and durability.
Can I Customize The Coat Rack Design?
Yes, you can arrange sticks in various patterns. Customize the size, color, and number of hooks to fit your space and style.
Is Building A Hockey Stick Coat Rack Beginner-friendly?
Yes, it’s a simple DIY project. Basic tools and minimal carpentry skills are required, making it accessible for beginners.
Conclusion
Building a hockey stick coat rack is simple and fun. You only need a few tools and some old hockey sticks. This project adds a unique touch to any room. It also helps keep coats and hats organized. You can customize it with paint or decorations.
Try making one for your home or as a gift. It shows creativity and saves money. Give it a try and enjoy your new coat rack.